
- Is it possible to create multiple partitions on a USB flash drive?
- Tutorial to create multiple partitions on a usb flash drive in Windows 10/11
- Frequently Asked Questions
- Conclusion
Are you looking for a tool to create multiple partitions on a USB flash drive? This tutorial will show you how to create multiple partitions on a USB flash drive and introduce related knowledge.
Is it possible to create multiple partitions on a USB flash drive?
In Windows operating systems prior to Windows 10, such as Windows 7 and Windows 8, we usually cannot create multiple partitions for usb flash drives, and even if we use a third-party tool to create multiple partitions for a usb flash drive, Windows can only recognize and use the first partition on it. In fact, in the early versions of Windows 10, this situation still existed, and I don't remember which version of Windows 10 began to allow users to create multiple partitions on the usb flash drive, and this improvement was eventually inherited by the subsequent versions of Windows 10 and Windows 11.
So is it possible to create multiple partitions on a USB flash drive? The answer is related to the Windows operating system you use, if you are using an earlier version of Windows 10 or a version of the Windows operating system before Windows 10, the answer is NO, while if you are using a newer version of Windows 10 or Windows 11, the answer is YES.
As mentioned above, for the vast majority of Windows 10 and all Windows 11 users, it is possible to create multiple partitions for a USB flash drive, and the specific steps will be described in detail below.
![]() Notes: This will destroy all data on the usb flash drive you choose to create multiple partitions, we recommend that you use Hasleo Backup Suite Free to back up the data on this drive before continuing.
Notes: This will destroy all data on the usb flash drive you choose to create multiple partitions, we recommend that you use Hasleo Backup Suite Free to back up the data on this drive before continuing.
Tutorial to create multiple partitions on a usb flash drive in Windows 10/11.
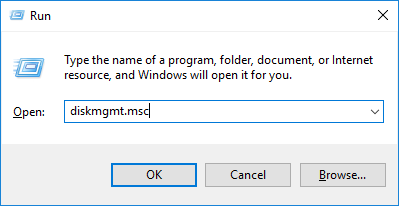
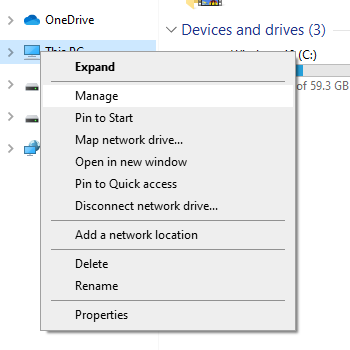
1. Open Windows Disk Management.
Method 1: Press the Windows + R keys to open the Windows Run dialog, type diskmgmt.msc, and then press Enter to open Windows Disk Management.
Method 2: Open Windows Explorer, right-click "This PC" and select "Manage" from the popup menu to open Windows Disk Management.
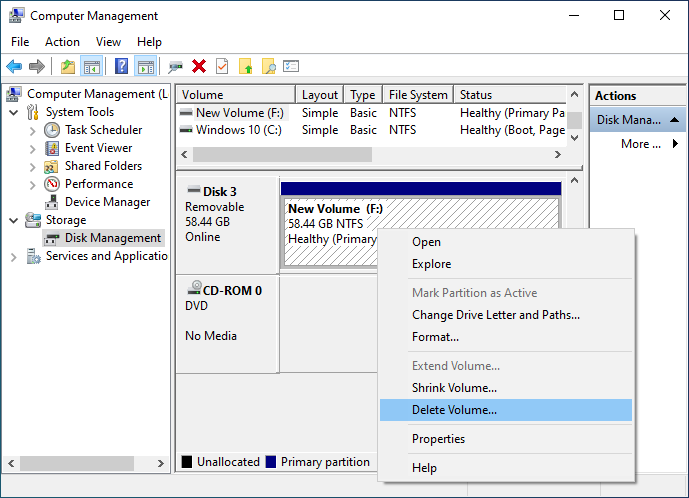
2. Locate the USB flash drive you want to create multiple partitions in Windows Disk Management, right-click a partition that exists on the USB drive and select "Delete Volume" to delete it, repeat this process for each partition on that USB flash drive.
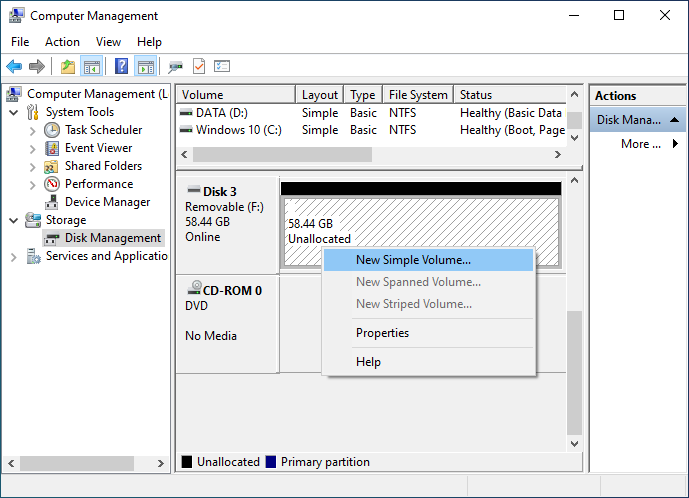
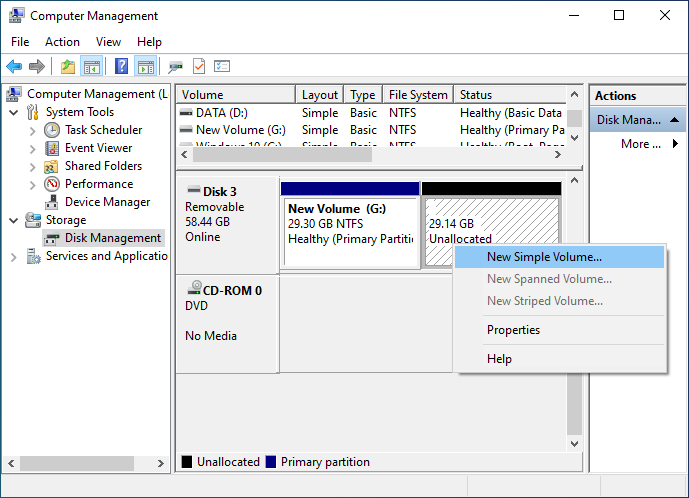
3. After deleting all partitions on the USB flash drive, right-click the Unallocated space on the USB flash drive, and select the "New Simply Volume".
4. Windows Disk Management will pop up the New Simply Volume Wizard, just click the "Next" button.
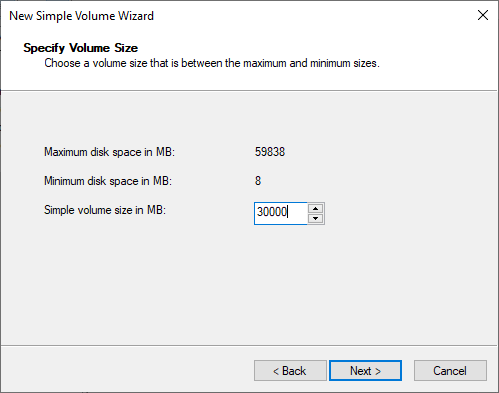
5. In this step, you need to specify the size of the first partition you want to create. You can see the maximum and minimum partition sizes allowed here, enter a reasonable value as needed, then click the "Next" button.
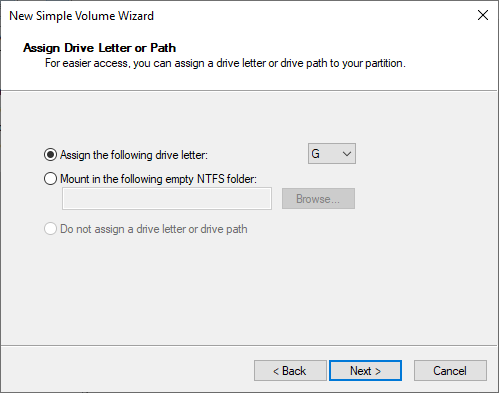
6. Assign a drive letter to the newly created partition, then click the "Next" button.
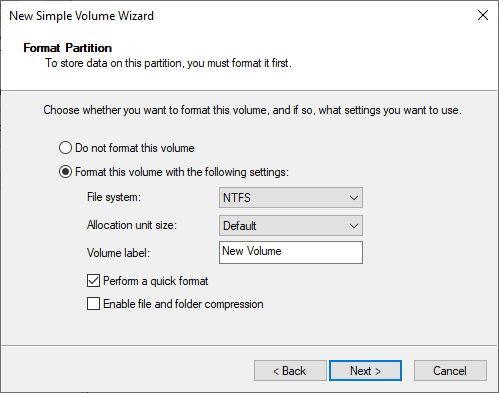
7. Select the file system of the newly created partition as required, and specify the cluster size (usually use the default value) and volume label, then click the "Next" button.
* If you create a partition larger than 32GB, you will not be able to format the partition as FAT/FAT32, so set the maximum size of the partition to 32768 MB to use the FAT/FAT32 file system.
* If you want to use the exFat file system, set the minimum size of the partition to 32769 MB.
* If you only access the drive on a Windows computer, it is recommended that you choose the NTFS file system, which is more secure than FAT/FAT32 and exFat.
* If you need to access the drive on a Mac computer, it is recommended that you choose the FAT/FAT32 or exFat file system, because Mac does not support writing NTFS partitions, you must use a third-party tool to write NTFS partitions on Mac.
8. The New Simply Volume Wizard will display the details of the partition to be created, click the "Finish" button after confirming that it is correct.
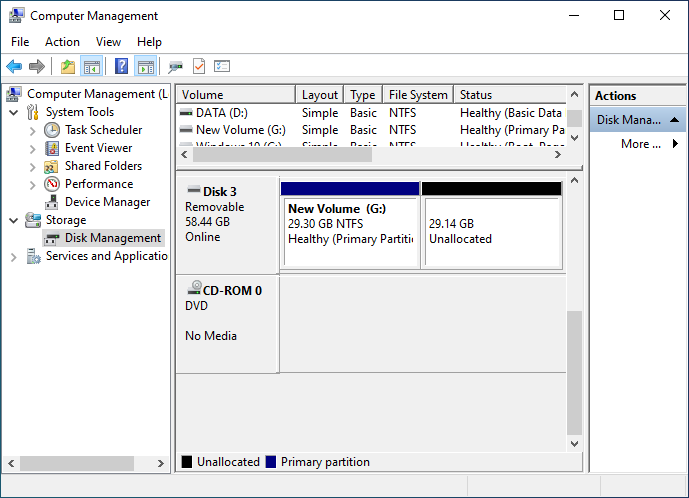
9. Now you have created the first partition on the USB flash drive as shown in the image below:
10. Right-click the Unallocated space on the USB flash drive, select the "New Simply Volume" again, repeat steps 4~7 above to create a new partition on the USB flash drive.
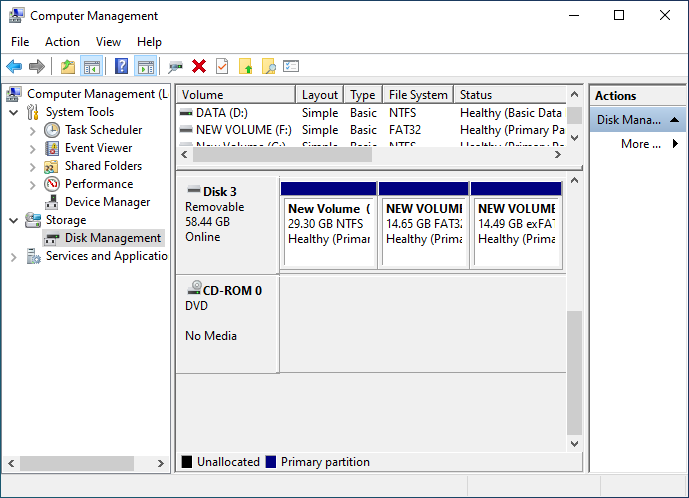
11. You can repeat step 10 to create more partitions for this USB drive as shown in the image below:
Frequently Asked Questions
A: You can create multiple partitions on a USB flash drive, similar to a regular hard drive. The exact number depends on the partition style you use - MBR allows up to 4 primary partitions (or 3 primary + 1 extended with logical drives), while GPT supports up to 128 partitions.
A: No, visibility depends on the operating system. On modern Windows 10/11 computers, all partitions should be visible. However, on older Windows versions (before Windows 10), Mac computers, or Linux systems, only the first partition may be accessible. Some devices like TVs or game consoles may only recognize the first partition as well.
A: For best compatibility: Use NTFS if you only use the USB on Windows computers and need files larger than 4GB. Use FAT32 if you need cross-platform compatibility (Windows, Mac, Linux) but files are under 4GB. Use exFAT if you need cross-platform support and files larger than 4GB. Note: FAT32 has a 32GB partition size limit when formatting in Windows.
A: Yes, you can encrypt individual partitions on a USB flash drive using BitLocker To Go in Windows 10/11. Each partition can have its own password and protection. This is useful for keeping sensitive data separate from other files on the same USB drive.
A: This usually happens because: 1) The computer is running an older Windows version that doesn't support multiple partitions, 2) The USB drive has a partition style (like MBR) that the system doesn't fully support, or 3) The USB controller in the computer only supports a single partition. Try connecting to a newer Windows 10/11 computer to see all partitions.
A: Yes, you can make a USB flash drive bootable with multiple partitions. For example, you could have one partition with Windows installation files (FAT32 for UEFI boot) and another partition for storing utilities or recovery tools. However, only one partition should be marked as active/bootable.
Conclusion
This tutorial details how to create multiple partitions on a USB flash drive, you can see that you can easily create multiple partitions on a USB flash drive with Disk Management built-in Windows.
If you have important files stored on your USB flash drive, we recommend that you encrypt the USB flash drive with BitLocker to protect your data.
Related Guides
- How to install and run Windows 11 on an external hard drive as portable Windows 11?
- How to install and run Windows 11 on a USB flash drive as portable Windows 11?
- How to clone Windows 11 to USB flash drive as portable Windows 11?
- How to clone Windows 11 to an external hard drive as portable Windows 11?
- How to install Windows 11 on a Legacy BIOS compuer?