
This tutorial provides a step-by-step guide for installing multiple VHD(X)-based Windows on a single USB drive using Hasleo WinToUSB. Important: When installing multiple Windows versions on the same USB drive, always install them in ascending version order. For example, install Windows 8 first; then install Windows 10; finally install Windows 11 (highest version last).
Tutorial to Install Multiple VHD(X)-Based Windows on the Same USB Drive as Multi-Boot Portable Windows.
Step 1. Connect the USB drive to your computer. Create a small FAT32 partition (must be primary partition) as the only system partition on the USB drive. Then create a separate NTFS partition (must be primary partition) for each Windows OS you want to install. In this tutorial, we will install Windows 8, 10 and 11 on the same USB drive, as shown in the picture below.

* Tips: The Windows operating system can only be installed on a primary partition. As you know, an MBR disk supports up to 4 primary partitions, with one reserved as the system partition. Therefore, you can only install up to 3 Windows OS on an MBR USB drive. To install more than 3 Windows OS on the same USB drive, you should use the GPT disk format. Note: GPT-formatted drives only support booting on UEFI computers.
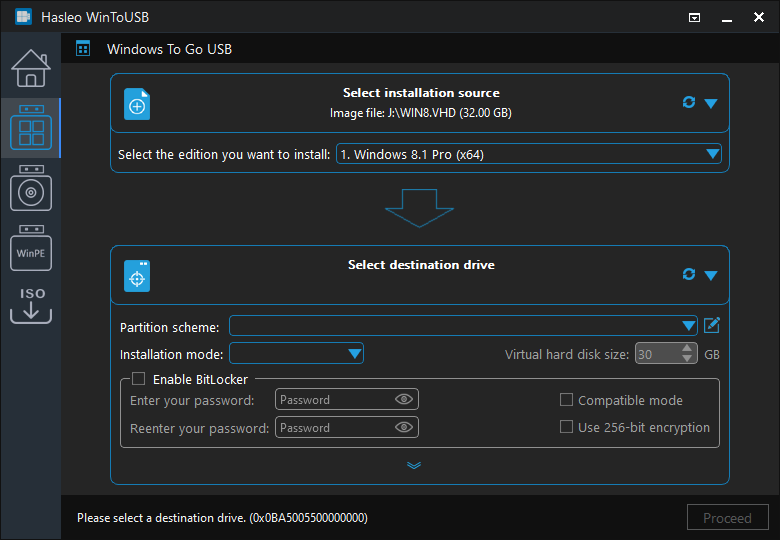
Step 2. Download, install, and run Hasleo WinToUSB. Click "Select installation source", then click "Browse image file". Then choose the VHD(X) file containing a pre-installed windows 8 OS from the dialog box as installation source. Note: If you don't have a pre-installed Windows VHD file, you can also install Windows from a Windows installation ISO or WIM file.
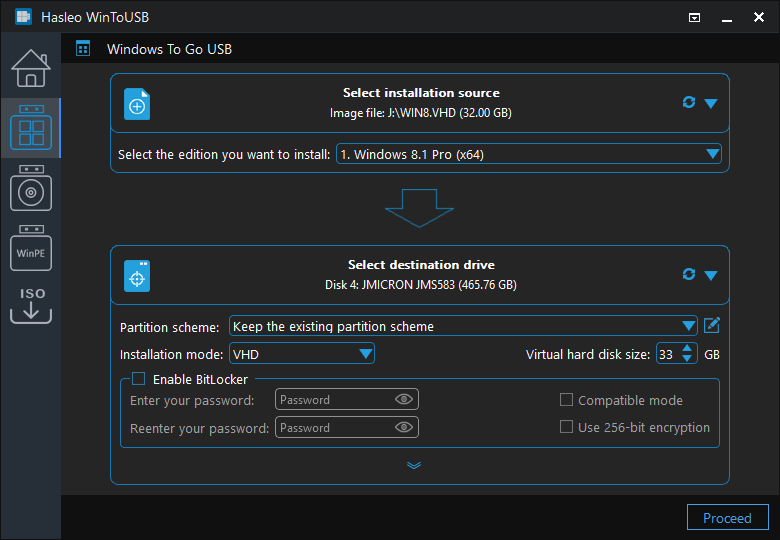
Step 3. Select the destination USB drive from the drop-down list, then a confirmation dialog will appear asking whether to continue formatting the drive. Check the "Keep the existing partition scheme" checkbox and click the "Yes".
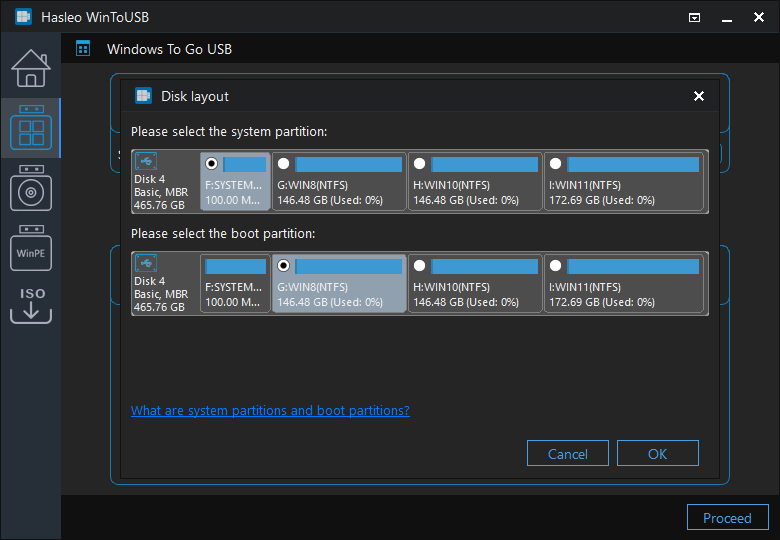
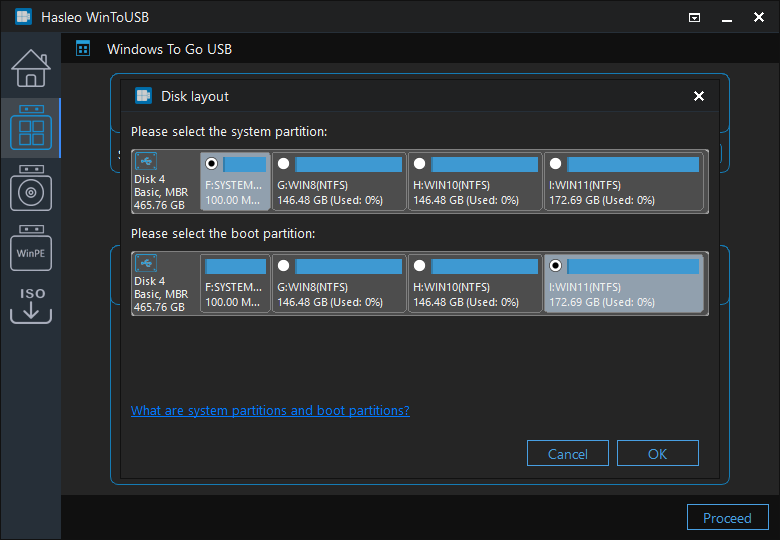
Step 4. Select F: as the system partition and G: as the boot partition for Windows 8, then click "Next" to install Windows 8 on the USB drive.
Step 5. After installation, manually format the system partition (F:) as FAT32 file system format.
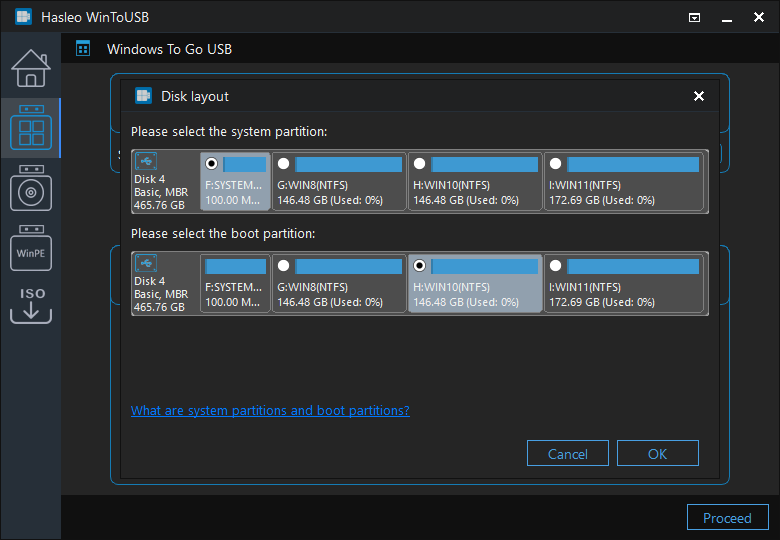
Step 6. Install Windows 10 on F: and H:, and follow steps 2 to 4 as described above.
Step 7. After installation, manually format the system partition (F:) as FAT32 file system format.
Step 8. Install Windows 11 on F: and I:, and follow steps 2 to 4 as described above.
Step 9. After installation, manually format the system partition (F:) as FAT32 file system format.
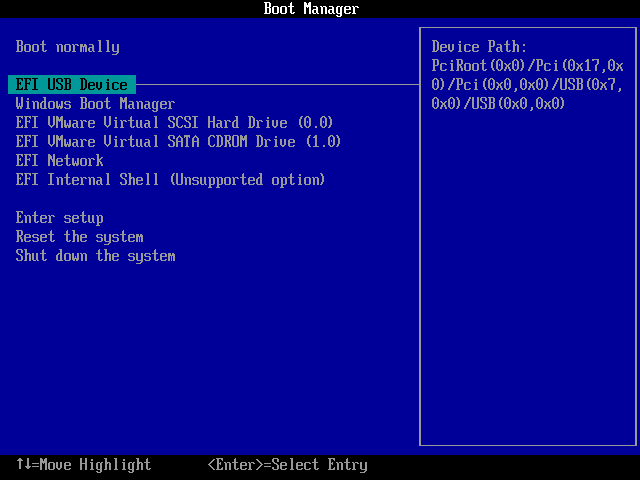
Step 10. After installation, restart the computer and enter UEFI/BIOS settings to boot from the USB drive.
Step 11. Since Windows 11 is the last installed operating system, the normal Windows 11 installation starts up, and you have to complete all the steup steps.

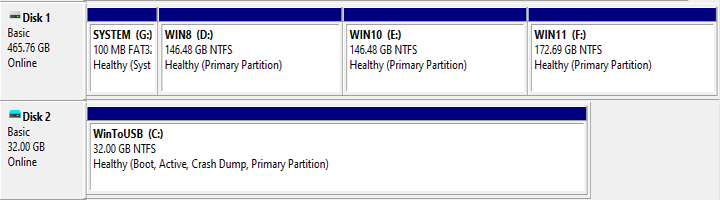
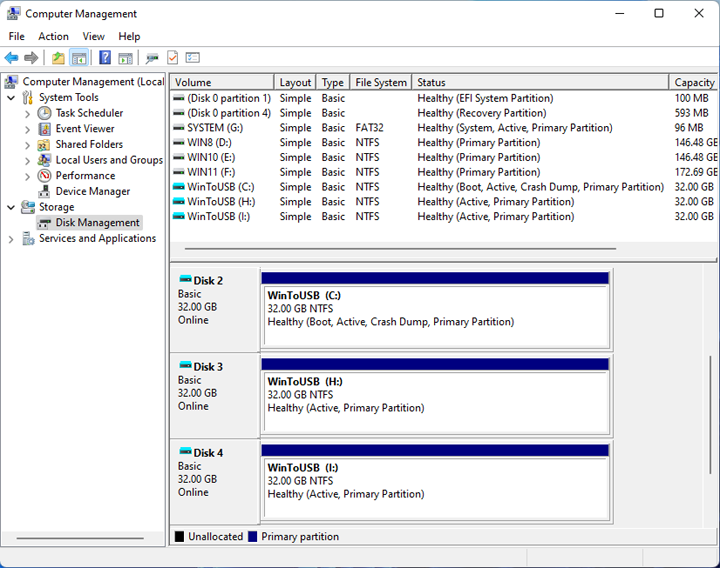
Step 12. After completing the installation, boot Windows from the USB drive. Assign drive letters to the system partition and other Windows-installed partitions, as shown in the picture below. Since Windows 11 is installed in a VHD(X) file, the C: drive is located on a virtual disk, which is numbered Disk 2.
* Tips: If your USB drive uses the GPT disk format, you cannot assign a drive letter to the system partition using Disk Management. Please use Diskpart to assign a drive letter to the partition.
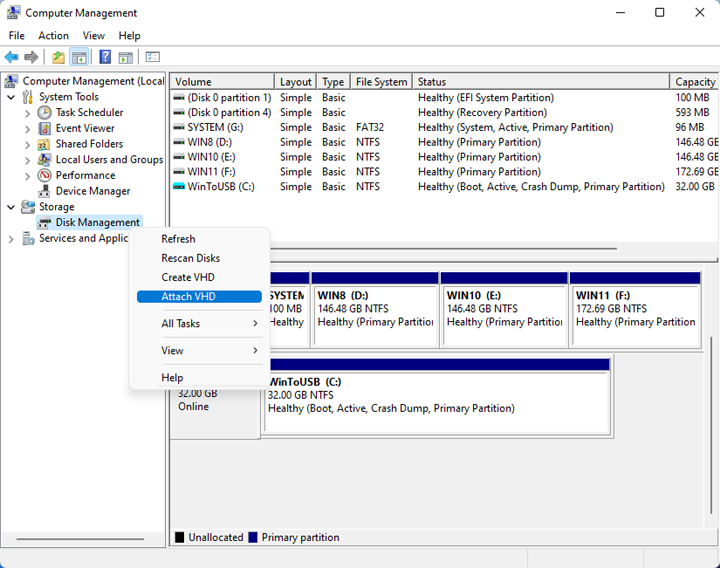
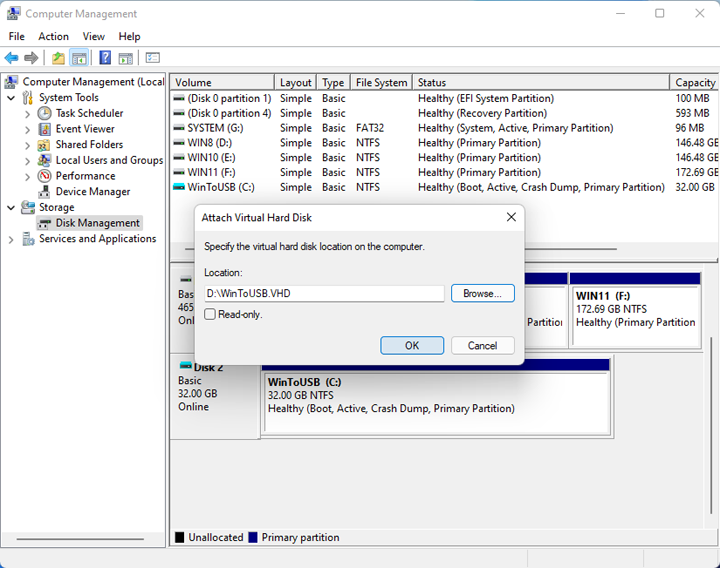
Step 13. Open Windows Disk Management, right-click "Disk Management", and select "Attach VHD" from the pop-up menu.
Step 14. Click the "Browse..." button, and select the Windows 8 VHD(X) file in the D: drive from the dialog box, then click "OK".
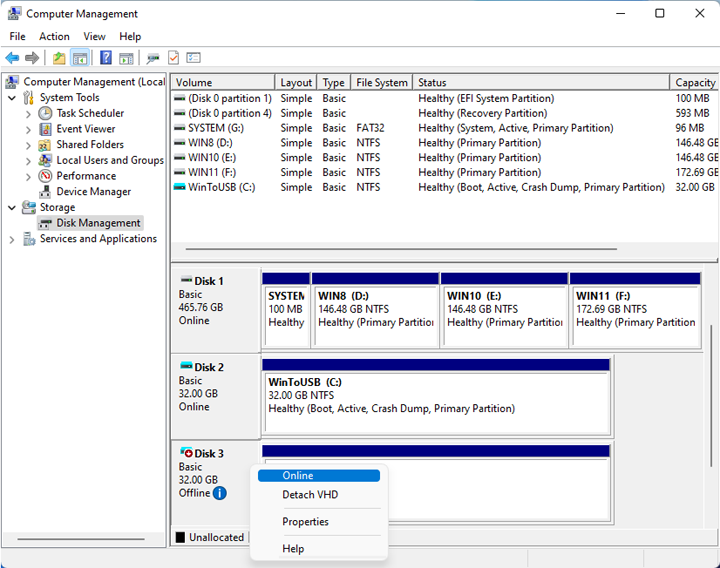
Step 15. After clicking "OK", the Windows 8 VHD(X) file will be mounted as Disk 3. Right-click Disk 3 and select "Online" in the pop-up menu.
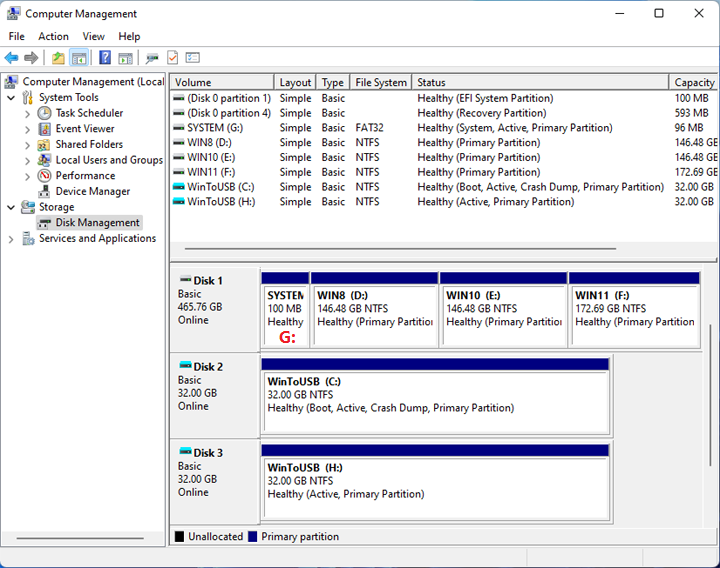
Step 16. After the virtual disk is online, if Windows fails to automatically assign a drive letter to the partition on the disk, manually assign one to its partition.
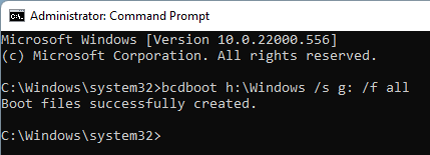
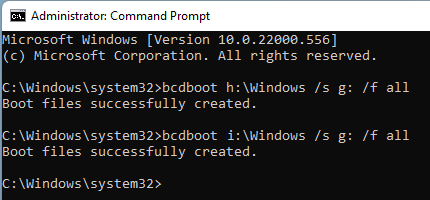
Step 17. Run cmd.exe as a administrator, then run "bcdboot.exe H:\Windows /s G: /f all" (H: is the drive letter for Windows 8 partition on the VHD(X) disk; G: is the drive letter for system partition on the USB drive, as shown in the screenshot above. You should change the command according to the actual assigned drive letter.) in cmd.exe to add Windows 8 to the Windows boot menu.
Step 18. Follow the same steps (Please refer to steps 10 ~ 14) to add Windows 10 on the VHD(X) disk to the Windows boot menu. Note: The drive letter assigned to the partition on the Windows 10 VHD(X) in this tutorial is I:, changing the command according to the actual assigned drive letter.
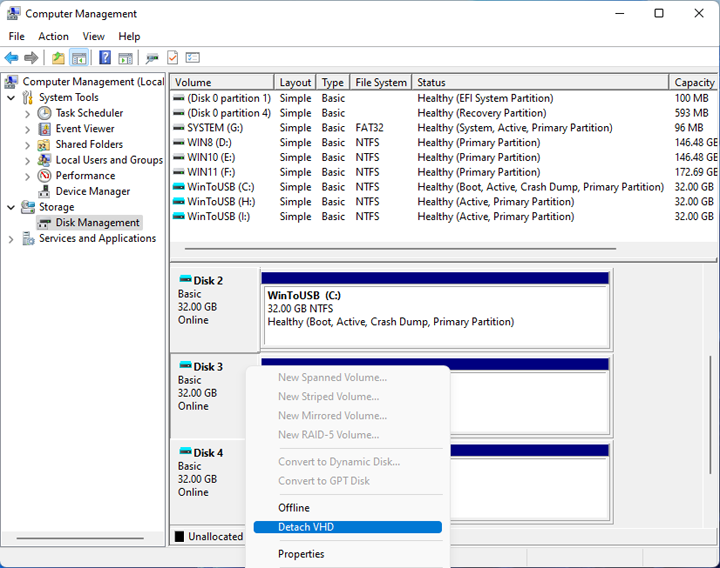
Step 19. To detach mounted Windows 8 and Windows 10 VHD virtual disks, just right-click Disk 3 and Disk 4 and then select "Detach VHD" from the pop-up menu.
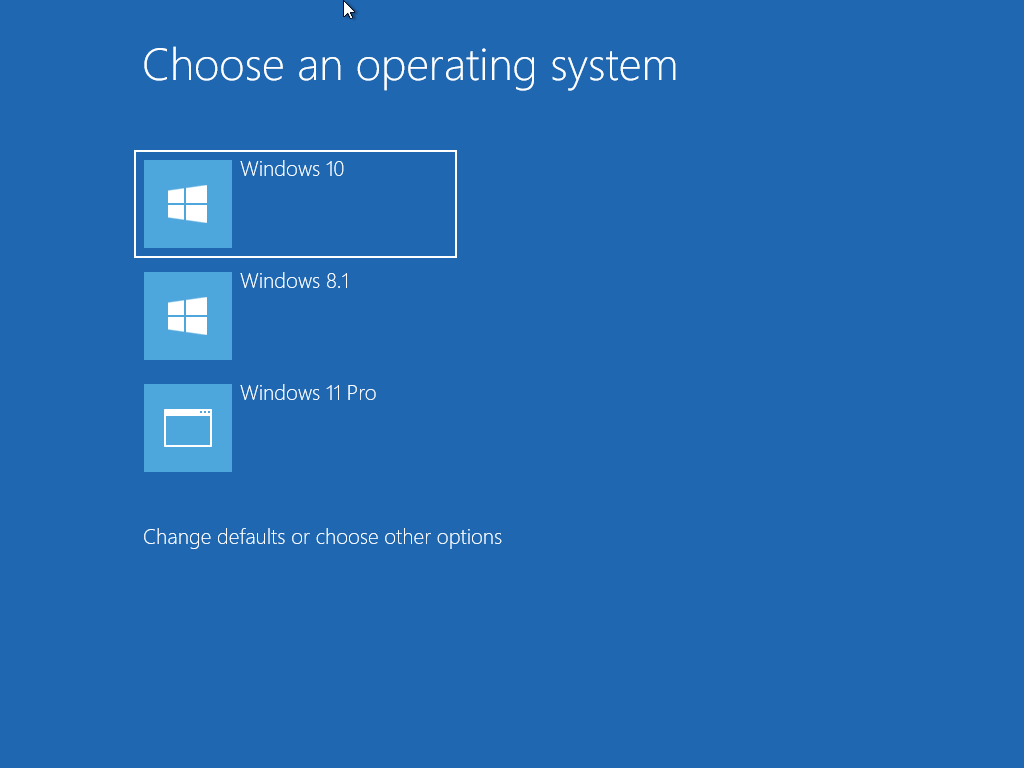
Step 20. Restart your computer and choose to boot from the USB drive. You can then choose to boot different operating systems from the USB.
By following these steps, you can create a VHD(X)-based multiboot Windows USB drive with Hasleo WinToUSB. Afterward, you can boot different Windows OSes from the USB to meet your various work environment requirements.
Frequently Asked Questions
A: On MBR disks, you can install up to 3 Windows OS (since one partition is needed for the system). On GPT disks, you can install more Windows OS. GPT drives only boot on UEFI computers.
A: When installing multiple Windows versions, each installation updates the boot environment. Installing in ascending order (8, 10, 11) ensures the last installed Windows becomes the default boot option and all boot entries are properly configured.
A: VHD-based installations store each Windows in a virtual hard disk file, offering easier backup and restoration of individual Windows environments. Regular installations use actual partitions for each Windows OS.
A: Yes, after installing each Windows version, you should manually format the system partition (FAT32) before installing the next Windows. This ensures each installation properly writes its boot files to the system partition.
A: After setup, when you boot from the USB drive, you'll see a boot menu listing all installed Windows versions. Use arrow keys to select the desired Windows and press Enter to boot into it.
Related Guides
- How to create Windows To Go from VHD or VHDX file?
- How to create a portable Windows 11/10 USB drive?
- How to install multiple Windows to the same USB drive?
- How to create Windows 11 To Go (All Windows 11 editions are supported)?Hot
- How to clone Windows 10 to an external hard drive as portable Windows 10?


