Starting with macOS 10.14 Mojave, applications no longer have full access permission to all disks by default. Instead, Apple has given users the ability to decide if an application should have that access permission. For Hasleo NTFS for Mac, full disk access permission is needed to be able to scan all disks on your Mac. Without this access permission, Hasleo NTFS for Mac will not be able to list all drives. So in order to be able to list all NTFS drives, we need to enable full disk access permission for Hasleo NTFS for Mac, below we will explain the detailed steps.
Step 1. Go to your Mac's System Preferences, open Security & Privacy window > Privacy tab > Full Disk Access folder.
Step 2. Click the lock and enter an administrator password to allow changes.
Step 3. Add Hasleo NTFS for Mac to Full Disk Access based on your macOS version.
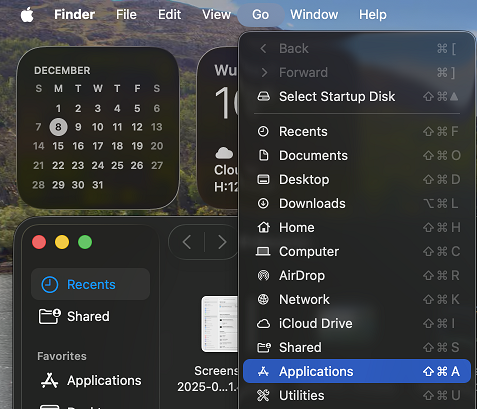
3.1 For macOS 26, open Finder, click 'Go' => 'Applications'.
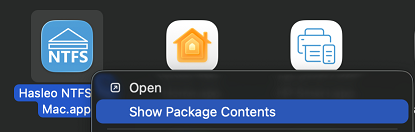
3.2 Right-click on 'Hasleo NTFS For Mac.app', then select 'Show Package Contents' from the pop-up menu.
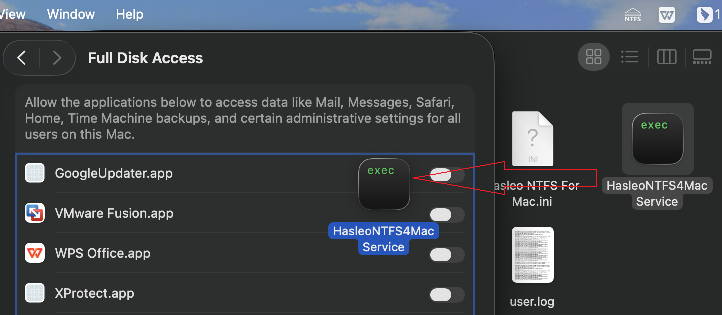
3.3 Go to 'Contents' => 'MacOS'
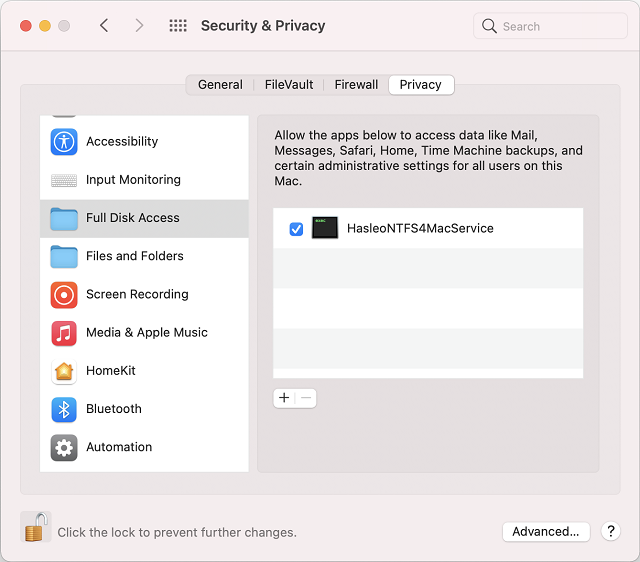
3.4 Drag 'HasleoNTFS4MacService' from 'Hasleo NTFS For Mac.app/Contents/MacOS' into the Full Disk Access list.
For macOS 13, check the "HasleoNTFS4MacService" check box.
For macOS 12, check the "HasleoNTFS4MacService" check box.
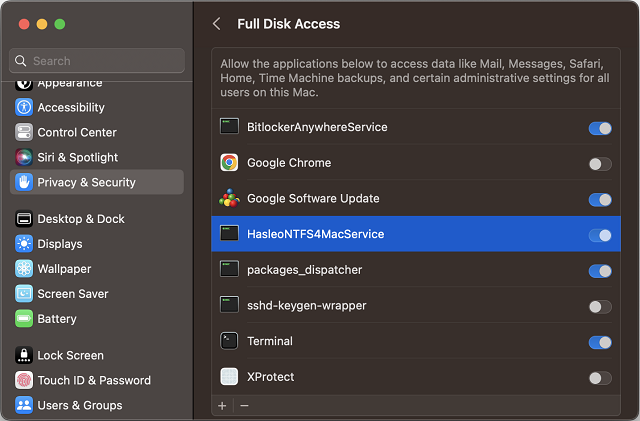
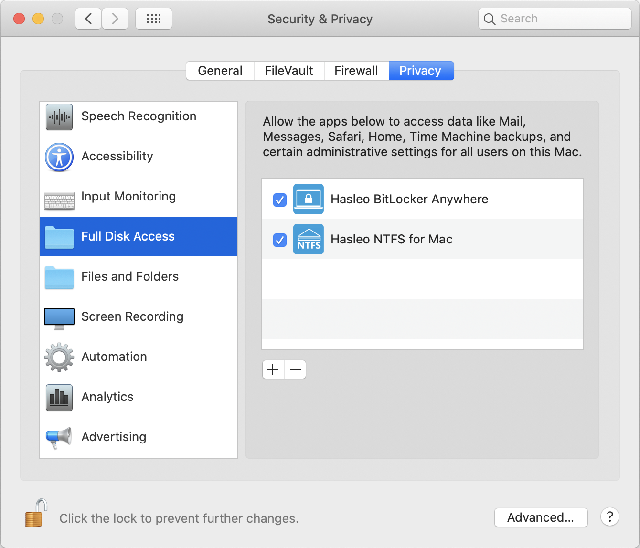
For macOS 11 and lower, add the Hasleo NTFS for Mac to the list by using the "+" button and locating the app in your Applications folder, or by drag-and-dropping it onto the list. Please note that after adding it to the full disk access list, you need to tick the checkbox in front of "Hasleo NTFS for Mac", as shown in the following image:
Done, now just go back to Hasleo NTFS For Mac, it can list, read and write all NTFS drives normally.
A: Starting with macOS 10.14 Mojave, applications no longer have full access permission to all disks by default. Hasleo NTFS for Mac needs full disk access permission to list all NTFS drives. Without this permission, the drive will not be recognized.
A: Go to System Preferences > Security & Privacy > Privacy tab > Full Disk Access. Click the lock to allow changes, then add Hasleo NTFS for Mac to the list by using the + button or drag-and-drop.
A: On macOS 10.14 and later, you need to add HasleoNTFS4MacService to Full Disk Access, not just the main application. The service is located inside the app package at Contents/MacOS folder.
A: Try restarting Hasleo NTFS for Mac after granting the permission. If the issue persists, make sure the NTFS drive is properly connected and formatted as NTFS.
A: No, full disk access is required for macOS 10.14 Mojave and later. On older versions, the app may work but granting full disk access is still recommended for better functionality.
A: No, without full disk access permission, Hasleo NTFS for Mac cannot scan and list all drives on your Mac. You must grant this permission to use the software properly.
A: On macOS 14 and later, open Finder, go to Applications, right-click Hasleo NTFS For Mac.app, select Show Package Contents, navigate to Contents > MacOS, then drag HasleoNTFS4MacService to the Full Disk Access list.
A: Yes, once full disk access is granted, Hasleo NTFS for Mac will be able to list, read, and write to all NTFS drives normally. The drive will appear on your Mac desktop and you can access it like a native drive.
![]()
![]()
