
- Understanding BitLocker Encryption for Windows To Go
- Prerequisites and Requirements for BitLocker
- Enabling BitLocker During Windows To Go Creation
- Enabling BitLocker on Existing Windows To Go Drives
- Managing BitLocker Recovery Keys
- Using BitLocker-Encrypted Windows To Go
- Troubleshooting Common BitLocker Issues
- BitLocker Best Practices for Windows To Go
- Frequently Asked Questions
- Conclusion
Windows To Go brings unprecedented flexibility to professionals who need their familiar Windows environment on any computer. However, the portability that makes Windows To Go so valuable also creates significant security risks—your entire work environment, including sensitive documents, passwords, and business data, travels with you on a small USB drive that can easily be lost or stolen. This is where BitLocker encryption becomes essential. This comprehensive guide will walk you through everything you need to know about enabling and managing BitLocker in Windows To Go, ensuring your portable Windows remains secure even if the physical drive falls into the wrong hands.
Whether you're a business executive carrying confidential presentations, a healthcare professional with patient records, or an IT administrator accessing sensitive systems, protecting your Windows To Go drive with BitLocker encryption provides peace of mind and compliance with data protection regulations. The encryption happens transparently, meaning you can continue working normally while knowing your data remains protected against unauthorized access.
Understanding BitLocker Encryption for Windows To Go
BitLocker is Microsoft's full-volume encryption technology, designed to protect data from unauthorized access by encrypting entire drives. Originally introduced with Windows Vista, BitLocker has evolved significantly over the years and now offers robust protection suitable for both consumer and enterprise environments. When applied to Windows To Go, BitLocker encrypts the entire system volume where Windows is installed, ensuring that all your files, applications, settings, and system files remain inaccessible without proper authentication.
The encryption methodology behind BitLocker uses AES (Advanced Encryption Standard) with 128-bit or 256-bit keys, depending on your configuration and Windows edition. This encryption is applied at the sector level, meaning every piece of data written to the drive is automatically encrypted before storage and decrypted upon read access. The encryption key itself is protected by either a password, PIN, or hardware security module, creating multiple layers of defense against different attack vectors. For Windows To Go specifically, this means that even if someone physically removes the USB drive and attempts to access it from another computer, they will encounter only encrypted data without the proper credentials.
Windows To Go presents unique security considerations that make BitLocker particularly important. Unlike an internal drive that stays in one computer, your Windows To Go drive connects to various systems—some secure, some potentially compromised. You might use it at a client's office, a coffee shop, a hotel business center, or any number of environments where physical security cannot be guaranteed. A lost or stolen Windows To Go drive without encryption could expose not just your personal data, but potentially sensitive corporate information, client data, login credentials, and intellectual property. The consequences of such a breach can include financial losses, regulatory penalties, reputational damage, and legal liability—all of which can be prevented with proper BitLocker encryption.
Hasleo WinToUSB integrates BitLocker support directly into its Windows To Go creation workflow, making it straightforward to enable encryption during the initial setup process. This seamless integration means you don't need to be a security expert to protect your portable Windows environment. The software handles the complex encryption configuration automatically, allowing you to focus on your work rather than technical details. Additionally, if you're using Windows To Go on computers that also have BitLocker enabled, the combined protection creates defense-in-depth security that protects your data at multiple levels.
Prerequisites and Requirements for BitLocker
Before enabling BitLocker on your Windows To Go drive, it's essential to understand the requirements and ensure your environment is properly configured. Meeting these prerequisites prevents common issues and ensures smooth encryption and subsequent use of your protected portable Windows.
Windows Edition Requirements significantly impact BitLocker availability. BitLocker is included in Windows 10 and 11 Pro, Enterprise, and Education editions. Windows 10 and 11 Home editions do not include BitLocker functionality, though users of these editions can still create encrypted Windows To Go using third-party tools like Hasleo BitLocker Anywhere for Windows Home. When creating Windows To Go, ensure your source Windows installation media is from a Pro, Enterprise, or Education edition if you plan to use built-in BitLocker. The Windows To Go drive itself will inherit these edition capabilities, meaning you cannot upgrade BitLocker functionality after creation by simply changing editions—you would need to recreate the Windows To Go drive.
TPM (Trusted Platform Module) Considerations differ for Windows To Go compared to standard BitLocker deployments. Traditional BitLocker implementations often require a TPM chip on the computer for hardware-based key storage and measurement. However, Windows To Go operates differently because it must boot on various computers with unknown hardware configurations. For Windows To Go, BitLocker can operate in "compatible mode" without TPM, using password-based authentication instead. This flexibility is essential since you cannot guarantee that every computer you'll boot from has a compatible TPM. When you enable BitLocker during Windows To Go creation, WinToUSB configures this compatible mode automatically, ensuring your drive works on any computer.
USB Drive Requirements for BitLocker include several important considerations. The drive must have sufficient capacity—at least 32GB is recommended for Windows 10/11 with BitLocker, though 64GB or more provides a more comfortable working environment. The drive must be connected via USB 2.0 or faster (USB 3.0/3.1/USB-C recommended for performance). Additionally, some older or low-quality USB drives may experience compatibility issues with BitLocker, particularly during the encryption process. Using reputable brands and models ensures reliable operation. The encryption process itself requires temporary free space on the drive (typically 20-30% free space recommended), so avoid encrypting a nearly full drive.
Administrative Access and Permissions are mandatory for BitLocker operations. You must be logged in as an administrator or have administrator privileges to enable BitLocker encryption. The encryption process modifies critical system structures and boot configuration data, requiring elevated permissions. If you're creating Windows To Go in a corporate environment, ensure your user account has the necessary rights. Group policies may also affect BitLocker configuration, particularly in enterprise environments where IT administrators may have pre-configured settings or requirements for encryption methods, recovery key storage, and authentication methods.
Backup and Recovery Preparation should be completed before enabling BitLocker, especially on existing Windows To Go drives. While the BitLocker encryption process is designed to be non-destructive, having a backup of important data provides an extra layer of security. Additionally, you MUST save your BitLocker recovery key before proceeding—this key is the only way to access your encrypted drive if you forget your password or encounter certain hardware changes. Microsoft offers several recovery key storage options including your Microsoft account, Azure Active Directory (for enterprise users), printing the key, or saving to a file. Choose the method that best fits your workflow and ensures you'll be able to access the key when needed.
Enabling BitLocker During Windows To Go Creation
Hasleo WinToUSB provides the most straightforward method for creating a BitLocker-encrypted Windows To Go drive, integrating the encryption setup directly into the creation wizard. This approach ensures proper configuration and eliminates post-creation setup complexity. Here's a comprehensive guide to creating your encrypted portable Windows.
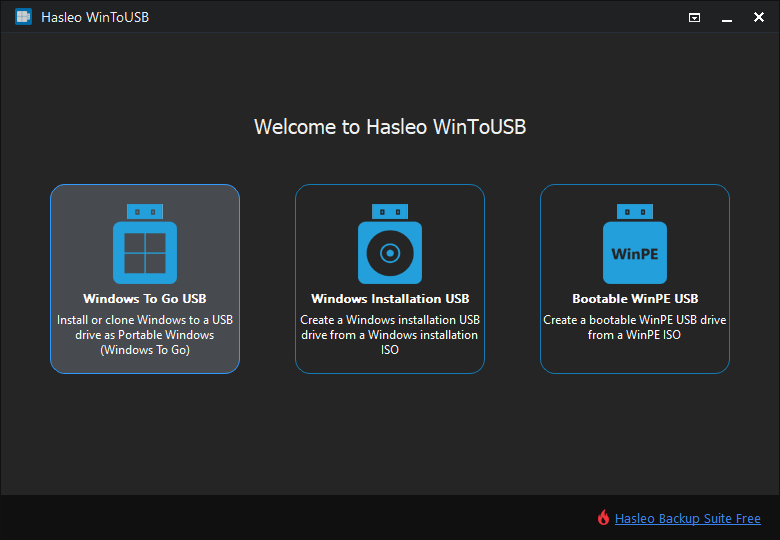
Step 1. Begin by connecting your USB drive to the computer where you'll create the Windows To Go drive. Ensure the drive has sufficient capacity and is formatted appropriately. Download and install Hasleo WinToUSB if you haven't already, then launch the application. The main interface presents several options—click on "Windows To Go USB" to proceed with creating a portable Windows installation. This mode supports both fresh installations from ISO files and cloning from existing Windows installations, with BitLocker available in both scenarios.
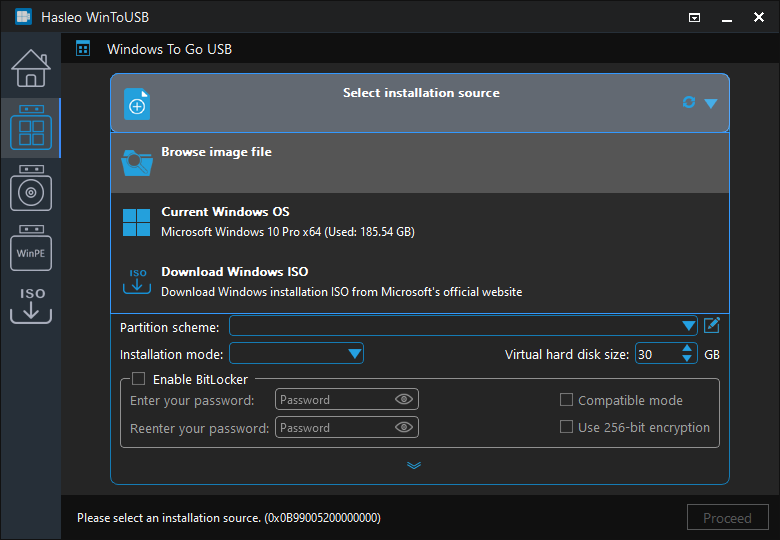
Step 2. Select your installation source by clicking "Select installation source." You can choose to browse for a Windows installation ISO file, select a CD/DVD drive containing Windows installation media, or (for cloning an existing installation) select "Current Windows OS." If you're installing from ISO, navigate to your downloaded Windows 10 or 11 installation file. WinToUSB will then scan the source and display available Windows editions—select the edition you want to install (Pro, Enterprise, or Education for BitLocker support). If you're cloning an existing Windows installation, ensure that installation has BitLocker capability and meets the edition requirements.
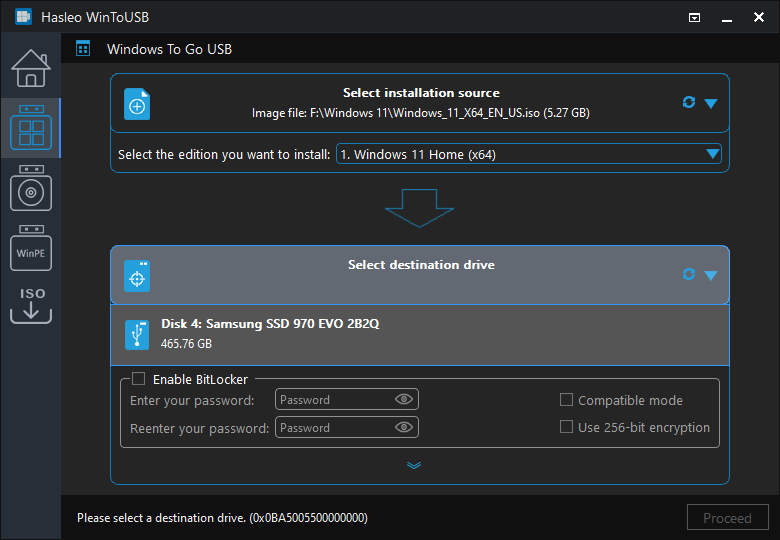
Step 3. Click "Select destination drive" and choose your target USB drive from the list. WinToUSB will display all detected removable drives—carefully verify you've selected the correct drive, as all data on the destination will be erased during the process. If your drive doesn't appear, click the refresh button to rescan, or ensure the drive is properly connected and recognized by Windows.
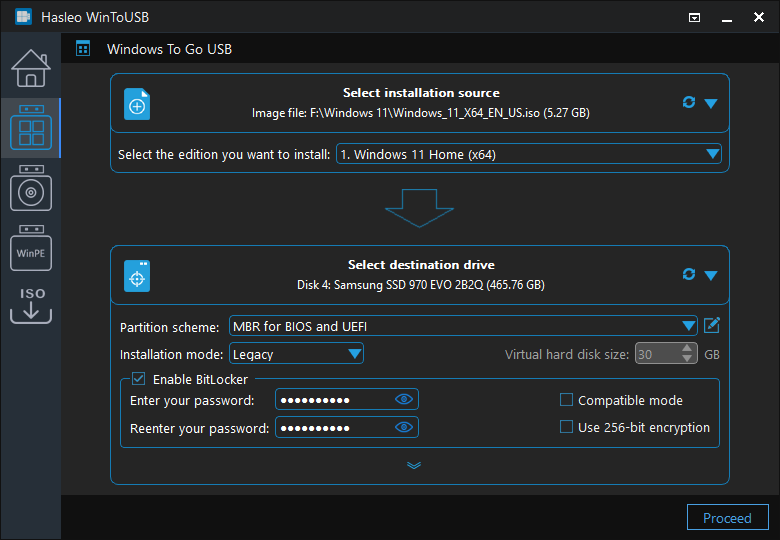
Step 4. The partition scheme selection screen is where you enable BitLocker encryption. After selecting your drive, you'll see options for partition scheme (GPT for UEFI, MBR for BIOS and UEFI, or keeping existing partition scheme) and installation mode. Below these options, you'll find the BitLocker encryption setting—check the box labeled "Enable BitLocker encryption" to activate encryption for your Windows To Go drive. You may also see options for the encryption method (used space only or full drive encryption)—"Used space only" encryption is faster but slightly less secure, while "Full drive encryption" provides complete protection but takes longer initially.
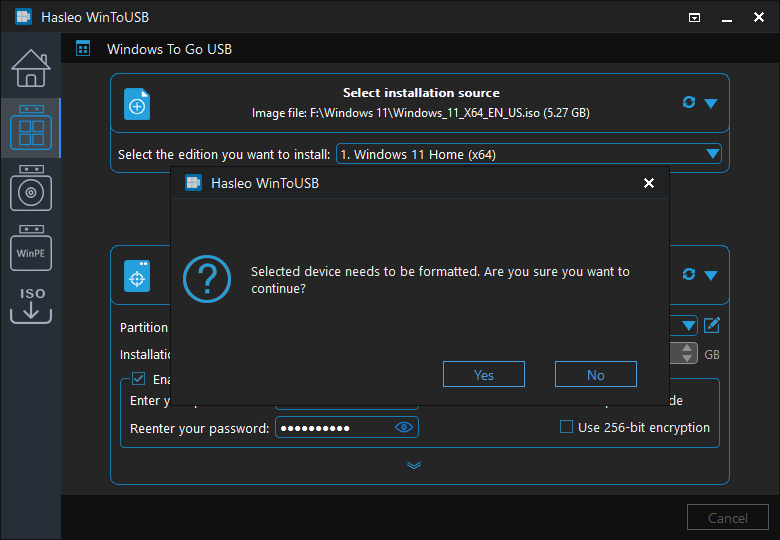
Step 5. After confirming your BitLocker selection, click "Proceed" to continue. WinToUSB will display a warning that the destination drive will be formatted—confirm this action. The Windows To Go creation process will begin, which includes partitioning the drive, copying Windows files, installing boot components, and applying BitLocker encryption. The process may take 15-30 minutes depending on your computer's speed and the USB drive's write performance. BitLocker encryption itself may continue after the initial Windows installation completes, running in the background while you begin using the drive.
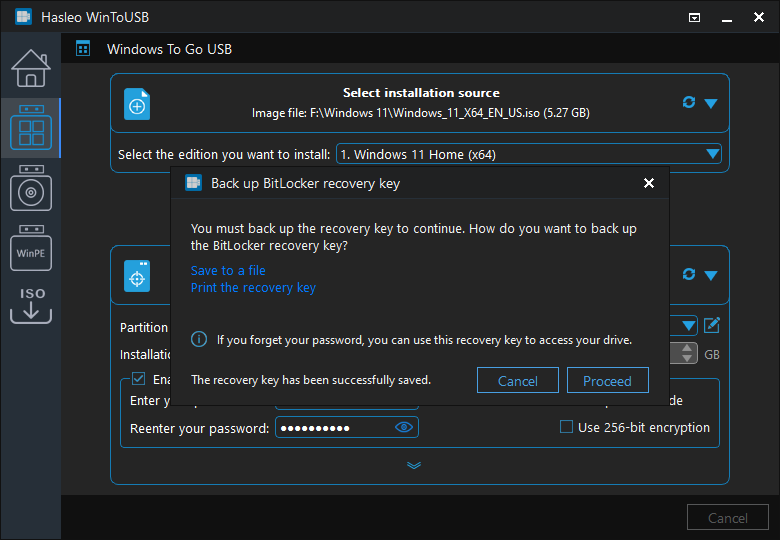
Step 6. Upon completion, WinToUSB will prompt you to configure your BitLocker encryption settings. You'll be asked to create a password for unlocking the encrypted drive—this password will be required each time you boot Windows To Go on a new computer. You'll also be prompted to save your recovery key through your preferred method (Microsoft account, Azure AD, file, or print). The recovery key is CRITICAL—without it, you cannot unlock your encrypted drive if you forget your password or encounter certain system changes. We strongly recommend saving to your Microsoft account for personal use or Azure AD for business environments, as these methods allow key recovery from any internet-connected device.
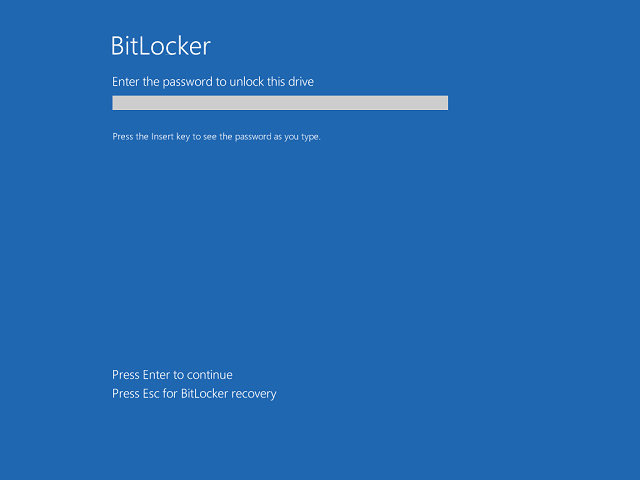
Step 7. After configuration, safely eject your Windows To Go drive and test it on another computer. When you boot from the encrypted Windows To Go drive for the first time, you'll be prompted to enter your BitLocker password before Windows fully loads. This pre-boot authentication ensures that even if someone has physical access to the drive, they cannot access your data without the password. The initial boot may take slightly longer as BitLocker initializes its security measures, but subsequent boots will proceed normally once the encryption is fully configured.
Enabling BitLocker on Existing Windows To Go Drives
If you've already created a Windows To Go drive without BitLocker encryption, you can still enable encryption on the existing installation. This process encrypts all data on the drive and adds BitLocker protection to your portable Windows environment. The steps differ slightly between Windows 10/11 Enterprise/Education (built-in BitLocker) and Windows Home editions.
For Windows 10/11 Pro, Enterprise, or Education editions, enable BitLocker through the Control Panel. Boot into your Windows To Go drive and navigate to Control Panel > System and Security > BitLocker Drive Encryption. You'll see the BitLocker status for your system drive (typically C:). Click "Turn on BitLocker" to begin the encryption setup process. The system will first check for TPM compatibility—since Windows To Go uses compatible mode without TPM, this check will report that the computer doesn't have a compatible TPM. Select "Require password at each startup" to continue in compatible mode.
The setup wizard will prompt you to save your recovery key. Choose your preferred method: save to your Microsoft account (recommended for individual users), save to Azure Active Directory (for business users with organizational accounts), save to a file (you can specify a location on another drive), or print the key. We strongly recommend the Microsoft account option because it allows you to retrieve your recovery key from any computer with internet access—a lifesaver if you need to unlock your drive and don't have your printed key or file available.
After saving the recovery key, you'll be asked to choose encryption settings. "Encrypt used disk space only" is faster and suitable for new drives, while "Encrypt entire drive" is more thorough and recommended for drives that have been in use. You can also choose to run encryption in the background, allowing you to continue using Windows while the process completes. However, for maximum security, consider letting it complete before using the drive for sensitive work. Click "Start encrypting" to begin—the drive will remain usable during encryption, though performance may be slightly reduced.
For Windows 10/11 Home editions, the built-in BitLocker feature is not available. However, you can still encrypt your Windows To Go drive using Hasleo BitLocker Anywhere, which provides BitLocker encryption capabilities for Windows Home editions. The process is similar—install BitLocker Anywhere on your Windows To Go drive, launch the application, and follow the wizard to enable encryption with password protection and recovery key backup. This third-party solution uses the same encryption algorithms as Microsoft's BitLocker, ensuring compatibility and security.
Once BitLocker is enabled on your existing Windows To Go drive, test it by rebooting. You should see the BitLocker pre-boot screen asking for your password before Windows loads. Verify that you can access all your files and applications normally. If you encounter any issues, use your recovery key to unlock the drive and check that the BitLocker status shows as "On" in the BitLocker Drive Encryption control panel.
Managing BitLocker Recovery Keys
Your BitLocker recovery key is the safety net that allows access to your encrypted drive when normal authentication fails. Understanding how to properly manage, store, and retrieve this key is essential for maintaining both security and accessibility. A lost recovery key can mean permanent data loss, making proper key management as important as the encryption itself.
Understanding Recovery Key Scenarios helps you appreciate why reliable key management matters. BitLocker will request the recovery key in several situations: when you start your Windows To Go drive on a computer that differs significantly from where it was originally configured (hardware changes trigger additional authentication), when the boot configuration data becomes damaged or inconsistent, when you forget your BitLocker password, when the TPM reports an invalid measurement (which can happen with certain BIOS/UEFI updates), or when you need to recover data from the drive using another computer. These scenarios aren't hypothetical—many users encounter at least one of these situations during their time using BitLocker-encrypted drives.
Microsoft Account Storage is the most convenient and recommended method for most users. When you save your recovery key to your Microsoft account, it becomes accessible from any computer with internet access by visiting https://account.microsoft.com/devices/recoverykey. This method works across all your devices and provides a centralized, always-available backup of your recovery keys. To save your key to your Microsoft account during initial setup, choose "Save to your Microsoft account" when prompted. For existing encrypted drives, you can add the recovery key to your account through the BitLocker Drive Encryption control panel by selecting "Back up your recovery key" and choosing the Microsoft account option.
Azure Active Directory for Business provides enterprise-grade key management for organizational environments. When users in an Azure AD-connected organization enable BitLocker, their recovery keys are automatically stored in their Azure AD account. IT administrators can view and manage recovery keys through the Azure portal, enabling authorized recovery when employees need assistance. This approach satisfies many compliance requirements and ensures that recovery is possible even if individual users lose their personal copies of the recovery key. If your organization uses Microsoft 365 or Azure AD, this method integrates seamlessly with your existing identity infrastructure.
Printed Recovery Keys provide an offline, physical backup that's immune to online failures or account issues. Printing your recovery key creates a document you can store in a secure location like a safe, locked filing cabinet, or with a trusted colleague. The advantage is independence from technology—printouts don't require internet access or software to read. However, physical documents have their own risks: they can be lost, damaged, destroyed in fires, or stolen. If you choose to print your recovery key, store it in a location that's both secure and accessible to you (or your designated recovery contacts) when needed. Consider making multiple copies stored in different secure locations for redundancy.
File-Based Recovery Key Storage saves your recovery key as a text file that you can store on another drive, network location, or cloud storage service. This method offers convenience—you can easily copy or move the file—but requires the same security considerations as any sensitive file. Never store the recovery key on the same drive you're encrypting (obviously, since you wouldn't be able to access it after encryption). Store it on a different USB drive, in an encrypted cloud storage folder, on a network share with restricted access, or on your internal hard drive. Consider using file encryption or password protection for the recovery key file itself for additional security.
Retrieving Your Recovery Key when needed depends on where you stored it. For Microsoft account keys, visit https://account.microsoft.com/devices/recoverykey from any web browser and sign in with the same Microsoft account you used when backing up the key. You'll see a list of all recovery keys associated with your account, including the key ID to help you identify which drive each key belongs to. For Azure AD keys, your IT administrator can retrieve the key through the Azure portal under Azure Active Directory > Devices > select the device > Recovery keys. For printed or file-based keys, locate your backup and use the key ID displayed on the BitLocker recovery screen to identify the correct key.
Using BitLocker-Encrypted Windows To Go
Once your Windows To Go drive is protected with BitLocker, the daily user experience involves a few additional steps compared to an unencrypted drive. Understanding these steps and optimizing your workflow ensures that security doesn't unnecessarily impede your productivity.
The Pre-Boot Authentication Process is the first interaction you'll have with your encrypted Windows To Go drive after powering on. When you boot from the encrypted drive, you'll see the BitLocker pre-boot screen before Windows loads. This screen displays the drive identifier (helping you confirm you're unlocking the correct drive) and prompts for your password. Enter the password you configured during BitLocker setup and press Enter. On some systems, you might also see options to use a recovery key (if you've saved it to a USB drive) or to temporarily suspend BitLocker (not recommended except for troubleshooting). After successful authentication, Windows proceeds with its normal boot process.
Performance Considerations with BitLocker encryption are generally minimal for modern systems. The AES encryption/decryption operations happen transparently and efficiently, typically causing only 5-15% performance overhead for most operations. Modern CPUs include hardware acceleration for AES encryption, making the performance impact virtually unnoticeable for typical productivity work. The initial boot after powering on may take slightly longer due to the pre-boot authentication process, typically adding 10-30 seconds. During the encryption process (if you enabled BitLocker after Windows was already installed), you might notice reduced performance as the drive completes encryption in the background—plan for this if you have time-sensitive work.
Unlocking on Different Computers is a common workflow for Windows To Go users. Your BitLocker password works regardless of which computer you boot from—the encryption is tied to the drive, not the host system. This is by design and provides the flexibility that makes Windows To Go valuable. However, you might encounter the BitLocker recovery key prompt when booting from computers with significantly different hardware configurations. This is a security feature—BitLocker detects hardware changes and requires additional authentication to ensure the drive hasn't been moved to an unauthorized system. If this happens frequently, you can use the "Resume-BitLockerKeyProtector" PowerShell cmdlet (as administrator) to potentially reduce recovery prompts on trusted systems.
Suspending BitLocker should only be done temporarily and for specific troubleshooting purposes. Suspension disables encryption protection for the drive, making your data accessible without authentication. Microsoft provides this option for situations where BitLocker interferes with system maintenance, such as certain BIOS/UEFI updates, hardware troubleshooting, or corporate imaging processes. To suspend BitLocker on your Windows To Go drive, open an elevated PowerShell or Command Prompt and run "manage-bde -protectors -disable C:" (replacing C: with your system drive letter). Remember to re-enable protection with "manage-bde -protectors -enable C:" when your troubleshooting is complete. Never leave BitLocker suspended on a portable drive that could be lost or stolen.
Managing Multiple Encrypted Drives requires organization if you use several BitLocker-protected storage devices. Each drive has its own password and recovery key, which can become unwieldy if you have many drives. Consider using a password manager to store your BitLocker passwords securely, making them available across all your devices. For the recovery keys, ensure you know which key belongs to which drive—BitLocker includes a key ID that helps identify the correct key. Some organizations use centralized key management through Azure AD, which provides a unified view of all BitLocker-protected devices and their recovery keys.
Data Recovery from Encrypted Drives is possible but requires proper authentication or recovery keys. If your Windows To Go drive becomes inaccessible due to corruption or other issues, Hasleo BitLocker Data Recovery can help recover your files using the recovery key. Never attempt to bypass BitLocker encryption through third-party "hacking" tools—these are typically malware and will compromise your data and system. If you need to recover data from a BitLocker drive on a non-Windows system, Microsoft's BitLocker for macOS and Linux can unlock drives using your password or recovery key.
Troubleshooting Common BitLocker Issues
While BitLocker is a mature and reliable technology, users occasionally encounter issues that require troubleshooting. Understanding common problems and their solutions helps you resolve issues quickly and maintain access to your encrypted Windows To Go drive.
BitLocker Recovery Key Prompts appearing unexpectedly are among the most common issues users face. These prompts typically occur when BitLocker detects significant hardware changes, such as a new motherboard, CPU, or significant firmware updates. If you see an unexpected recovery key prompt, first verify you're using the correct recovery key for that specific drive (check the key ID). If you're at home or in a trusted environment and the computer hardware hasn't changed, the issue might be related to BIOS/UEFI updates, drivers changes, or other system modifications. To prevent frequent recovery prompts on your regular computers, you can configure the system to trust the hardware platform by running "manage-bde -autounlock -enable C:" in an elevated command prompt after successfully booting and authenticating.
Forgotten Password Scenarios require using your recovery key to regain access. If you've forgotten your BitLocker password, restart your computer and boot from the Windows To Go drive. At the BitLocker pre-boot screen, look for an option to use the recovery key instead of the password. If you saved your recovery key to your Microsoft account, you can retrieve it from https://account.microsoft.com/devices/recoverykey. Once you've accessed Windows using the recovery key, you should immediately create a new password through the BitLocker Drive Encryption control panel. Consider updating your password to something more memorable, or using a password manager to remember it going forward.
Performance Issues After Encryption are usually minimal but can occur in specific scenarios. If you notice significantly degraded performance, first ensure you're using a USB 3.0 or faster connection—USB 2.0 connections can struggle with the encryption overhead. Check that your USB drive itself is functioning normally by testing read/write speeds with an unencrypted file transfer. Some low-quality or heavily-used drives may be failing, and encryption exposes underlying performance problems. If the drive is aging or shows signs of failure, migrate your Windows To Go to a new drive using WinToUSB's cloning feature and re-enable BitLocker on the new drive.
Drive Not Recognized After Encryption can occur in several scenarios. If your encrypted Windows To Go drive isn't appearing in the boot menu or BIOS/UEFI boot options, first verify the drive is properly connected and recognized by the computer's BIOS/UEFI as a bootable device. Some older BIOS implementations have limited support for booting from GPT-partitioned drives (which BitLocker typically requires)—switching to MBR partition scheme during creation may resolve this. If the drive appears in Windows but shows as "locked" and you can't access it, ensure you're entering the correct password at the pre-boot screen. If the drive appears RAW or unformatted, this may indicate corruption requiring professional data recovery.
BitLocker Service Not Running errors prevent normal encryption operations. If you see messages about the BitLocker service not running, boot into your Windows To Go drive and open Services (services.msc). Locate "BitLocker Drive Encryption Service" and ensure its startup type is set to "Automatic" and the service is running. If the service fails to start, check Windows Event Viewer for specific error codes that can guide further troubleshooting. In some cases, system file corruption may require repair installation or cloning to a new drive.
Recovery Key Not Available situations are serious but sometimes solvable. If you've lost your recovery key and can't access your drive, options are limited. Check if the key might still be available in your Microsoft account or Azure AD—even if you think you didn't save it there, verify by signing in and checking the recovery key page. For business users, contact your IT administrator—recovery keys may be stored in Azure AD even if you don't have direct access. As a last resort, if the drive was used in a corporate environment, your organization's IT department may have recovery agents that can unlock the drive without your individual recovery key. If no recovery options exist, the encrypted data is effectively irretrievable, emphasizing the critical importance of proper key management.
BitLocker Best Practices for Windows To Go
Implementing BitLocker effectively requires more than just enabling the feature—it involves following established best practices that maximize security while maintaining usability. These recommendations help you get the most protection from BitLocker while avoiding common pitfalls.
Strong Password Selection is your first line of defense. Your BitLocker password should meet or exceed standard password guidelines: minimum 8 characters, ideally 12 or more; mix of uppercase and lowercase letters, numbers, and symbols; avoid dictionary words, personal information, or common patterns. Consider using a passphrase of 4-5 random words strung together—these are both memorable and resistant to brute-force attacks. Never share your BitLocker password with others unless absolutely necessary, and never write it down near the drive itself. Using a password manager to store your BitLocker password ensures you can access it when needed without compromising security.
Regular Recovery Key Verification ensures you can access your drive when needed. Periodically confirm that your recovery key is accessible—test retrieving it from your Microsoft account or verify the printed copy is still in its storage location. Keys stored in Azure AD can be verified through the Azure portal. This verification is especially important if you haven't needed to use the recovery key in some time—you want to discover any access issues before an emergency makes them critical. Set a calendar reminder to check your recovery key accessibility every few months.
Full Encryption vs. Used Space Only choices affect both security and performance. Full encryption encrypts every sector on the drive, including previously deleted data, ensuring complete protection even if data recovery tools are used. Used space only encryption encrypts only the space currently holding data—it's faster initially and offers equivalent protection for active data, but could theoretically leave traces of deleted files. For Windows To Go drives that may contain sensitive information, full encryption is the safer choice. For drives with strictly controlled data and rigorous deletion practices, used space only may offer a practical balance. Once encrypted, you can check your encryption status through the BitLocker Drive Encryption control panel.
Integration with Other Security Measures creates layered protection. BitLocker protects your data at rest—while the drive is powered off or removed. Combine this with other security practices for comprehensive protection: use Windows Hello or Windows Hello for Business for additional authentication within Windows; enable secure boot to prevent unauthorized operating systems; keep Windows updated to protect against vulnerabilities; use VPN when connecting from untrusted networks; implement screen lock when stepping away from your computer even briefly; and use endpoint protection software to guard against malware that could compromise your system while it's running.
Incident Response Planning prepares you for the unlikely but possible scenario of a lost or stolen drive. Know in advance how you'll handle such incidents: report the loss to your IT department (if business-related); if the drive contained sensitive or regulated data, you may have legal reporting obligations; change any passwords that might have been stored on the drive; monitor for suspicious activity that could indicate the data was accessed; and consider whether the encrypted data alone could cause harm if exposed (some data combinations remain sensitive even without credentials). Having a response plan reduces panic and ensures appropriate action if the worst occurs.
Drive Lifecycle Management includes proper disposal when upgrading or retiring Windows To Go drives. Simply deleting files doesn't remove all data from a drive, and even BitLocker-encrypted drives should be properly sanitized before disposal. Windows includes the "cipher /w:C:" command (replace C: with your drive letter) that writes patterns over free space, making data recovery virtually impossible. For complete peace of mind, physical destruction or professional drive destruction services ensure no data can be recovered. If you're migrating to a new drive, use WinToUSB to clone your encrypted drive to the new hardware while maintaining BitLocker protection.
Documentation and Procedures for organizational deployments ensure consistent security. If you're deploying BitLocker-encrypted Windows To Go drives across your organization, document the standard operating procedures for recovery key management, user training requirements, and incident response. Consider using Group Policy to enforce consistent BitLocker settings across all Windows To Go drives. Train users on proper password and recovery key handling, and establish clear procedures for when employees leave or lose their drives. Regular audits can verify that drives remain encrypted and recovery keys are properly stored.
Frequently Asked Questions
A: No, Windows To Go uses BitLocker in 'compatible mode' without TPM requirement. This allows the drive to boot on any computer regardless of TPM availability. Authentication is password-based instead of hardware-based.
A: Microsoft recommends saving to your Microsoft account (for personal use) or Azure Active Directory (for business use). This allows key retrieval from any internet-connected device. Alternative options include printing the key or saving to a file on another drive.
A: Windows Home doesn't include built-in BitLocker, but you can use third-party tools like Hasleo BitLocker Anywhere to encrypt Windows To Go drives. This provides the same AES-256 encryption as Microsoft's BitLocker.
A: BitLocker detects hardware changes and may require the recovery key when booting on computers with significantly different configurations. This is a security feature ensuring the drive hasn't been moved to an unauthorized system.
A: Modern CPUs with AES-NI support have minimal performance overhead (5-15%). USB 3.0 or faster connections are recommended. The initial encryption may slow performance, but normal use afterward is barely affected.
Conclusion
BitLocker encryption transforms your Windows To Go drive from a convenient portable workspace into a secure computing environment that protects your data even if the physical drive is lost or stolen. The integration of BitLocker into Hasleo WinToUSB makes encryption accessible to users without extensive technical knowledge, while the robust underlying technology provides enterprise-grade security for even the most sensitive data.
The key to successful BitLocker implementation lies in understanding the requirements, properly configuring encryption during or after Windows To Go creation, and maintaining good practices around password and recovery key management. With these elements in place, you can enjoy the full flexibility of Windows To Go—working from any computer, anywhere—while maintaining confidence that your data remains protected against unauthorized access.
Whether you're a business professional handling confidential client information, a healthcare worker subject to privacy regulations, or simply someone who values their personal privacy, BitLocker provides essential protection for your portable Windows environment. Take the time to properly configure and understand BitLocker on your Windows To Go drive—your future self will thank you if you ever need to rely on that protection.
Download Hasleo WinToUSB to create your own BitLocker-encrypted Windows To Go drive today and keep your portable system secure wherever you go.


