
- Normal Deletion vs. Permanent Deletion
- Why Shift-Deleted Files Can Be Recovered?
- Method 1: Use Hasleo Data Recovery (Recommended)
- Method 2: Recover from File History
- Method 3: Restore Using Windows Previous Versions
- Method 4: Recover from a Backup
- How to Prevent Accidental File Deletion
- Frequently Asked Questions
- Conclusion
When using a Windows computer, have you ever accidentally pressed the Shift+Delete combination key and instantly deleted an important file? This "permanent deletion" operation bypasses the Recycle Bin and directly removes the file from your computer. In this emergency situation, you may feel anxious and confused—can these files still be recovered?
The answer is: Yes, it is possible! In fact, Shift+Delete does not truly "erase" data from the hard drive—it simply tells the system "this space is now available." As long as no large amount of data has been written to the disk after deletion (such as downloading files or installing software), the data remains in place waiting to be rescued. This tutorial will provide you with a complete solution to recover your files before they are overwritten in the Windows 11/10 system.
🔥Normal Deletion vs. Permanent Deletion
There are two main ways to delete files in Windows:
1. Normal Deletion (Delete Key)
When you press the Delete key to delete a file, the file is moved to the Recycle Bin. This is a safe deletion method because:
- The file is essentially just moved to a different location.
- You can easily recover by opening the Recycle Bin, finding the file, and selecting "Restore" from the right-click menu.
- The data itself remains unchanged on the disk.
2. Permanent Deletion (Shift + Delete)
When you press Shift and Delete simultaneously, Windows will display a confirmation dialog asking if you want to permanently delete the file. After clicking "Yes":
- The file does not go to the Recycle Bin and disappears directly from the file directory.
- It cannot be restored through normal operations (such as Recycle Bin recovery or undo).
- The system marks the disk space occupied by the file as "overwritable" and can be used to store new files.
Why Shift-Deleted Files Can Be Recovered?
When you press Shift+Delete to delete a file in Windows, the data is not actually destroyed. The operating system simply performs a simple "marking" operation at the file system level:
Physical Level: Data Remains Intact
- The original binary data of the file remains completely intact on the disk's physical sectors.
- The operating system only marks the file's record in the "File Allocation Table" or "Master File Table" as "deleted" or "free."
- This is like removing a book from the library catalog, but the book itself still remains on the shelf.
Logical Level: Space is Marked as Available
- The disk space occupied by the deleted file is marked as "overwritable."
- The system considers these areas as free and can write new data when needed.
- However, until new data is actually written, the original file content will remain.
Why Can It Be Recovered?
Data recovery tools scan the physical sectors of the disk directly, looking for file signature information (such as file headers, file footers, and specific format signatures) that remain intact despite being marked as "deleted," thereby reconstructing and recovering the files.
⚠️Key Notes:
- The "life" of deleted files depends on whether they have been overwritten by new data.
- Once new data is written to the original file's sectors, the original content will be physically overwritten.
- To maximize recovery success, stop using the disk partition immediately and avoid any write operations.
👑Method 1: Use Hasleo Data Recovery (Recommended)
If you need to recover files deleted by Shift + Delete, Hasleo Data Recovery is worth trying. This professional data recovery software can help you recover deleted, formatted, or lost files from various storage devices.
The core advantages of Hasleo Data Recovery include:
- ✅Free 2GB Data Recovery: The free version allows users to recover up to 2GB of data, which is fully sufficient for small data recovery needs. If you need to recover more than 2GB or unlimited file sizes, please upgrade to Professional, Ultimate, or Technician versions.
- ✅Wide Device Compatibility: Compatible with hard drives, SSDs, USB drives, SD cards, external hard drives, and other storage devices.
- ✅Multiple File System Support: Supports FAT12/16/32, exFAT, NTFS, HFS+, and other file systems.
- ✅Deep Scan Function: Uses sector-by-sector deep scanning to maximize recovery of lost files.
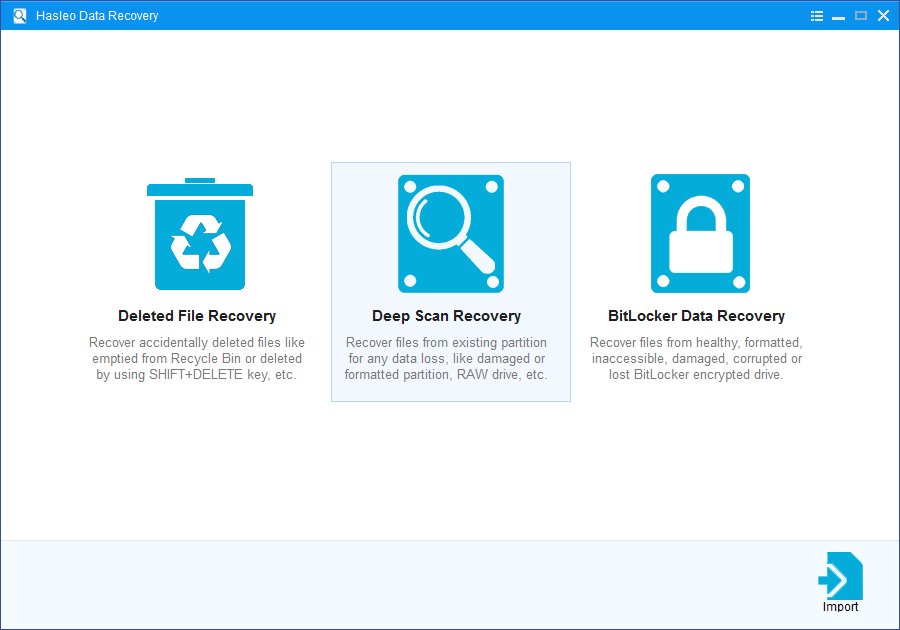
Step 1. Download, install and run Hasleo Data Recovery. On the main interface, you will see three recovery modes. Please select "Deep Scan Recovery" mode. Important: Do not install the software to the disk where data was lost.
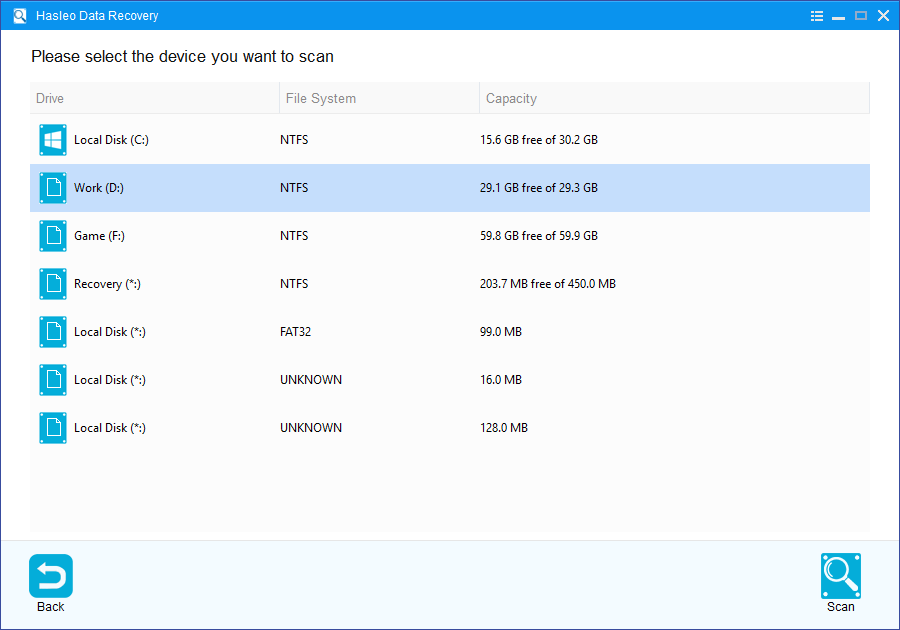
Step 2. Select the hard drive partition or storage device where the file deletion occurred, then click "Scan" to begin. This process may take a few minutes; please be patient.
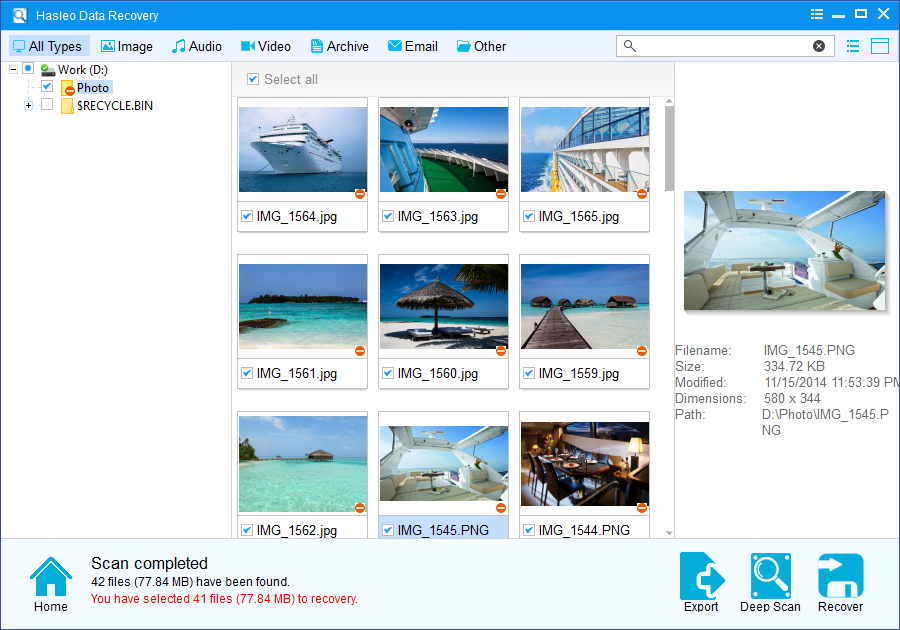
Step 3. After the scan completes, all found files will be displayed in the interface. You can quickly locate target files by path or file type. Before recovery, preview images, documents, videos, and other files to confirm they're intact. Select the files you want to recover, then click the "Recover" button.
💡Tips:
- If your device is encrypted with BitLocker, please upgrade to the Ultimate or Technician version and select "BitLocker Data Recovery" mode.
- The success rate of data recovery depends on whether new data has been written to the original disk after file loss. To avoid file overwriting, it is recommended to stop using the device immediately after discovering file loss and perform recovery as soon as possible.
Method 2: Recover from File History
If you have enabled Windows "File History" feature before deleting files, you can recover files permanently deleted by Shift + Delete through the following steps.
Step 1. Press Win + R, type "control" and press Enter to open the Control Panel.
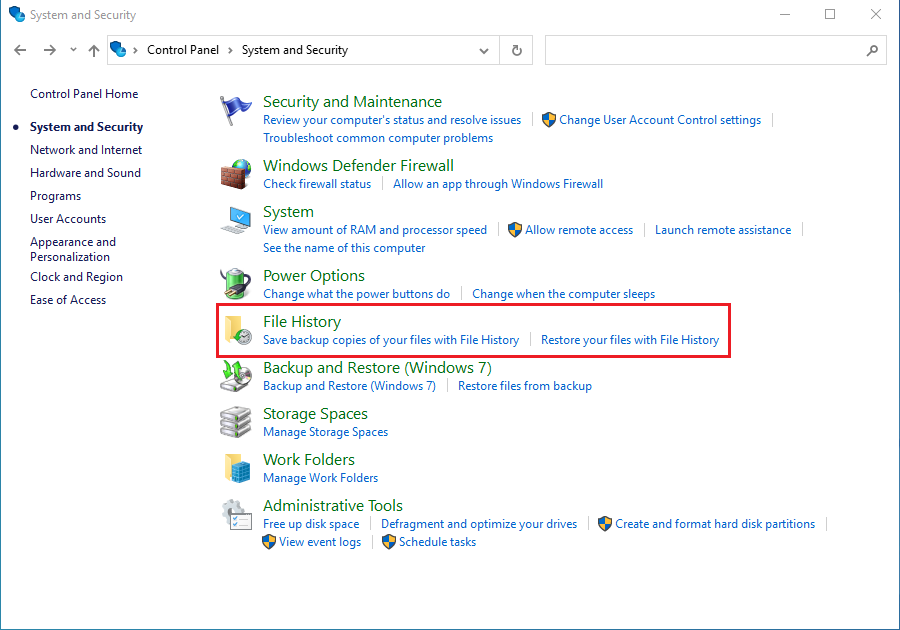
Step 2. Click "System and Security," then select "File History."
Step 3. In the File History window, the left sidebar will show a list of backed-up folders. Navigate to the folder containing the deleted files.
Step 4. After entering the folder, use the left and right arrow buttons at the bottom of window to browse backup versions from different time points (find the date before the file was deleted).
Step 5. After finding the target file, select it, then click the green "Restore" button in the middle of the window. The file will be restored to its original location.
⚠️Tips: This method only works if you have enabled File History before deleting the file and the folder is included in the backup scope.
Method 3: Restore Using Windows Previous Versions
Windows system's built-in "Previous Versions" feature allows you to restore old versions of files or folders from history backups. This feature depends on whether System Protection (automatic restore point creation) or File History has been enabled in advance.
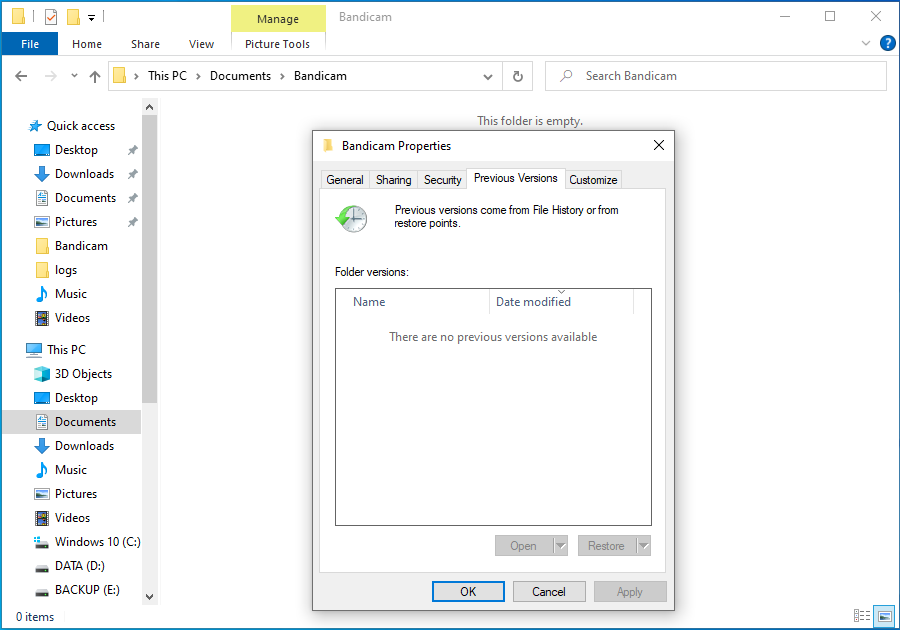
Step 1. Open File Explorer and navigate to the folder where the deleted files were originally located.
Step 2. Right-click on the blank area of the folder (or the folder itself), select "Properties," then switch to the "Previous Versions" tab. The system will list available versions of the folder saved before the current time point.
Step 3. Choose a restore method
- View Content: After selecting a version, click "Open" to browse the files in that version folder and confirm if it contains what you need to recover.
- Safe Extract: If you only want to restore specific files, it is recommended to click "Copy" and save to another location (such as Desktop) to avoid overwriting other files in the current folder.
- Direct Restore: If confirmed, click "Restore" to restore the entire folder to the selected version.
⚠️Tips: If there is no list under the "Previous Versions" tab, it means System Protection or File History is not enabled for that folder, and recovery through this feature is not possible. In this case, please try using Hasleo Data Recovery.
Method 4: Recover from a Backup
If you have created backups before deleting files, recovering files becomes very simple. Here are several common backup recovery methods:
Recover from OneDrive Backup
If you use OneDrive and have enabled "Folder Backup" feature, your files may still exist in the cloud.
Step 1. Visit the OneDrive website and sign in to your Microsoft account.
Step 2. Find and enter the Recycle Bin in the left navigation bar. Recently deleted files are usually kept here for a period of time (typically 30 days).
Step 3. Find the file you need to recover, select it, then click "Restore."
💡Tips: If not found in the Recycle Bin, it may be because the file was modified or overwritten. You can return to the original folder, right-click the file or folder, select "Version History," and view and restore previous versions.
Recover from External Hard Drive Backup
If you have a habit of regularly backing up files to an external hard drive, follow these steps:
Step 1. Connect your backup external hard drive to your computer.
Step 2. Open File Explorer and navigate to your backup hard drive.
Step 3. According to your backup habits, navigate to the corresponding backup folder:
- If it's a manual backup, simply find the folder where backup files are stored.
- If using Windows File History, you can enter the FileHistory folder on the backup hard drive, or search for "File History" in the taskbar and open "Restore personal files" to browse and recover.
Step 4. Find the file or folder you need and copy it to the target location on your computer.
Recover from Hasleo Backup Suite Backup Image
If you have used software like Hasleo Backup Suite to create a complete backup image of the system or disk, you can mount the image to extract files without performing a full system restore.
Step 1. Open Hasleo Backup Suite software, click the "Tools" button in the navigation bar, then click "Mount/Unmount Image" in the operation area.
Step 2. In the pop-up window, select the image file you need to mount and click "Next."
Step 3. The program will parse the image file and display all volumes (partitions) it contains. Click the "Mount" button in the upper right corner, and check the volumes you need to mount (multiple volumes can be mounted simultaneously).
Step 4. Double-click the "Drive Letter" column for the selected volume, and select an unused drive letter from the dropdown menu as the virtual drive letter after mounting.
Step 5. After confirming the settings are correct, click "Continue" to mount the selected image volume. Open Windows Explorer, find and double-click the newly appeared drive letter to browse files in the backup image.
Step 6. Find the file or folder you need to recover. Select them and copy to a target folder on your computer (such as Desktop or D: drive) to complete the restore.
Step 7. After completing file copying, it is recommended to return to the software and unmount the mounted image in the "Mount/Unmount Image" page to release system resources.
💡Tips: For more mount precautions, please refer to: How to use Hasleo Backup Suite to mount, unmount, and recover files from backup images.
🎯How to Prevent Accidental File Deletion
Prevention is always better than recovery. Here are some best practices for protecting important files and preventing accidental deletion:
Enable File History
Follow these steps to enable File History in Windows for automatic file version backup:
- Connect an external hard drive or network location as the backup drive.
- Open "Settings" > "Update & Security" > "Backup" (Windows 11 path: "Settings" > "Accounts" > "Windows backup")
- Click "Add a drive" and select your backup location
- Make sure "Automatically back up my files" is turned on
Use Cloud Storage Services and Leverage Version Control
Synchronize important files to OneDrive, Google Drive, iCloud, or other cloud storage services. This way, even if local files are deleted or the hard drive fails, you can recover from the cloud. Most cloud drives provide file version history features (usually retaining for 30 days). If a file is saved incorrectly after modification, infected by ransomware, or accidentally overwritten, you can recover previous versions from the cloud.
Create System Restore Points Regularly
System restore points can help you roll back system files to a previous state, and in some cases can also be used to recover specific types of files.
Configure Recycle Bin Properly
By default, the Recycle Bin occupies a certain percentage of disk space. You can right-click "Recycle Bin" > "Properties" and adjust the Recycle Bin size for each partition according to actual needs (partitions with important files can have a higher percentage). Check "Display delete confirmation dialog" to add a confirmation step for deletion operations.
Use Shift + Delete Carefully
Before pressing Shift+Delete, please think twice. If you are not sure whether you still need the file, it is recommended to use normal deletion (Delete key) first and send it to the Recycle Bin.
Set File/Folder Permissions
For shared computers or particularly important folders, you can set permissions to prevent accidental deletion:
- Right-click the important folder > "Properties" > "Security" > "Edit"
- Set "Write" or "Modify" permission to "Deny," or directly check "Read-only" attribute
- This way, even if a misoperation occurs, the system will prohibit deletion. Restore permissions temporarily when you need to modify files.
Frequently Asked Questions (FAQ)
A: Shift+Delete bypasses the Recycle Bin and permanently deletes files immediately. The file's entry is removed from the file allocation table, and the space is marked as available for new data. Unlike normal deletion, you cannot restore Shift+deleted files from the Recycle Bin. However, the actual data remains on the drive until overwritten, making recovery possible with specialized software.
A: No, once files are Shift+deleted, they are not sent to the Recycle Bin and cannot be restored through normal Windows means. You cannot use Previous Versions, System Restore, or command-line tools to recover Shift+deleted files. Professional data recovery software like Hasleo Data Recovery is the only way to recover these files before they are overwritten.
A: Shift+deleted files remain recoverable until the disk space they occupied is overwritten by new data. The time varies based on drive usage—with a nearly empty drive, recovery may be possible months later; with heavy usage, the files could be overwritten within hours or days. For best results, stop using the drive immediately and run recovery software as soon as possible.
A: Quick Scan looks at file system records (the MFT or FAT) to find recently deleted files—it works fast but may miss files if records are corrupted. Deep Scan reads every sector of the drive and searches for file signatures (specific byte patterns) to reconstruct files. Deep Scan is slower but much more effective for recovering Shift+deleted files that have been on the drive for some time or where file system records have been partially overwritten.
A: Yes, Hasleo Data Recovery can recover all common file types after Shift+Delete, including documents (DOCX, PDF, XLSX), photos (JPG, PNG, RAW), videos (MP4, AVI), audio files (MP3, WAV), and more. The software organizes recovered files by type and includes preview functionality, allowing you to verify file integrity before recovery. Select only the files you need to recover.
Conclusion
In the Windows system, using the Shift + Delete combination key to delete files bypasses the Recycle Bin, but this does not mean the file data is completely erased. In fact, the operating system only marks the disk space occupied by the file as "overwritable," and the original data remains on the storage medium until it is overwritten by newly written data.
Therefore, before the data is overwritten, using professional data recovery tools (such as Hasleo Data Recovery) to scan for residual file traces on the disk, there is still a chance to recover accidentally deleted important files. It is important to note that recovery success rate is closely related to time—the sooner you attempt recovery, the lower the risk of data being overwritten, and the greater the likelihood of successful recovery. Additionally, developing a good habit of regularly backing up important data is the most reliable and effective strategy to avoid data loss.


