
- What is the Mount/Unmount Image Feature?
- Preparations Before Mounting an Image
- How to Mount a Backup Image Using Hasleo Backup Suite
- How to Access and Copy Files After Mounting
- How to Unmount a Backup Image
- Important Notes for Mounting Images
- Frequently Asked Questions
- Conclusion
In our daily computer usage, we often need to recover specific files or older versions of data from backup images. Performing a full system restore can be time-consuming and may inadvertently overwrite current data on your system, which is far from ideal. The Mount/Unmount Image feature in Hasleo Backup Suite is specifically designed to address this pain point. It allows you to mount a backup image as a separate virtual disk partition without performing a full restore, enabling you to directly browse and copy any files from the image just like using a regular computer hard drive. This tutorial will provide detailed information on how to use this feature, helping you bypass the cumbersome restore process and easily extract the exact files you need, dramatically improving your data recovery efficiency.
What is the Mount/Unmount Image Feature?
Although backup image files comprehensively store your data, they typically cannot be directly opened and browsed like regular files. In the past, users had to perform a complete restore operation to access files stored in backup images. To make it easier for users to directly view and use data from backups, Hasleo Backup Suite provides the image mounting feature.
After mounting an image, the backup image will appear as a virtual drive in Windows Explorer. You can browse files just like using a regular hard drive, and you can directly copy needed files to other locations.
👍This feature is particularly suitable for the following scenarios:
- Quick extraction of individual files: When you only need to recover a specific file or folder from a backup, you can quickly obtain the target file by simply mounting the image, without performing a full system restore.
- Preview backup content: Before restoring, you can first mount the image to preview the files in the backup and confirm whether it contains the data you need.
- Avoid data overwrite: Mounting an image does not affect data on your current system. You can directly copy files from the virtual drive without worrying about overwriting existing files.
- Time-saving: Compared to full restore operations, you can access files immediately after mounting the image, significantly saving time and system resources.
After use, be sure to perform the unmount operation. Unmounting disconnects the virtual drive from the backup image and releases the drive letter and system resources. If you disconnect the backup storage device or close the software without unmounting first, the system may display an error.
⚠️Tips: Since different backup software typically uses its own format to store data, mounting methods are not universal. This tutorial will explain in detail how to specifically mount and unmount backup images using Hasleo Backup Suite.
⭐Preparations Before Mounting an Image
Before you begin mounting a backup image, please ensure the following conditions are met:
Install Dokan Driver (For File Backup Images)
- To browse or extract files from file backup images, you may need to install the Dokan V2.1.0.1000 driver.
- You can download it from the official website or from our website
Install Required Windows Updates (For Windows 7/Server 2008 R2 and Earlier)
- For Windows 7/Server 2008 R2 and earlier versions, you need to install the KB4474419 update to support new driver signing (SHA-2 code signing)
- Please download the KB4474419 update from the Microsoft Update Catalog
- Note: Windows Vista users should install the KB4474419 update for Windows Server 2008
Ensure You Have a Usable Backup Image File
- Make sure you have created a valid system, disk, or file backup using Hasleo Backup Suite
- The backup image file should be stored in an accessible location
How to Mount a Backup Image Using Hasleo Backup Suite👑
Below we will demonstrate step by step how to use Hasleo Backup Suite to mount a backup image as a local drive. After successful mounting, you can browse or recover files from the image just like using a real hard drive; when you no longer need it, you can also easily unmount the image.
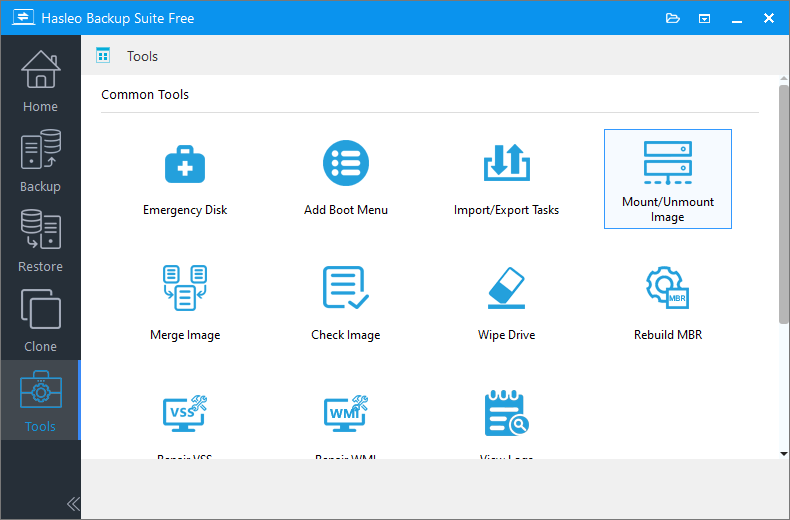
Step 1. Download, install, and run Hasleo Backup Suite. Click the "Tools" button in the navigation bar, then click the "Mount/Unmount Image" button in the operation area.
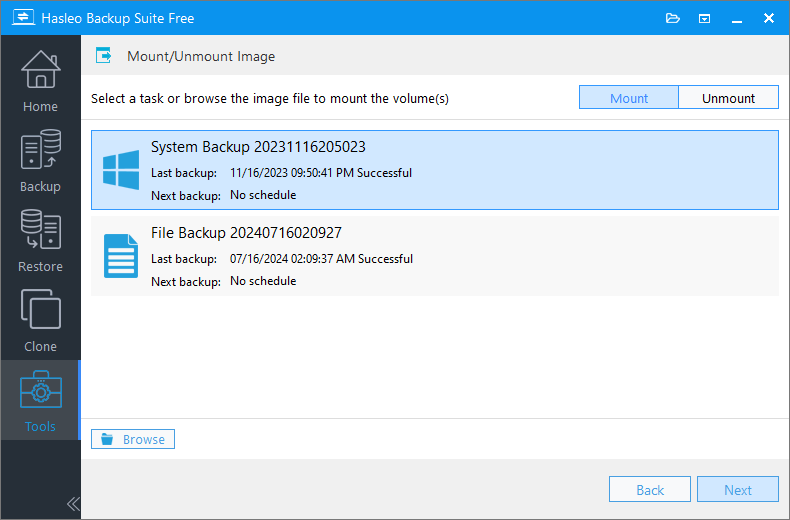
Step 2. In the popup window, you can select an existing backup task or directly browse to select the image file you want to mount. After making your selection, click "Next".
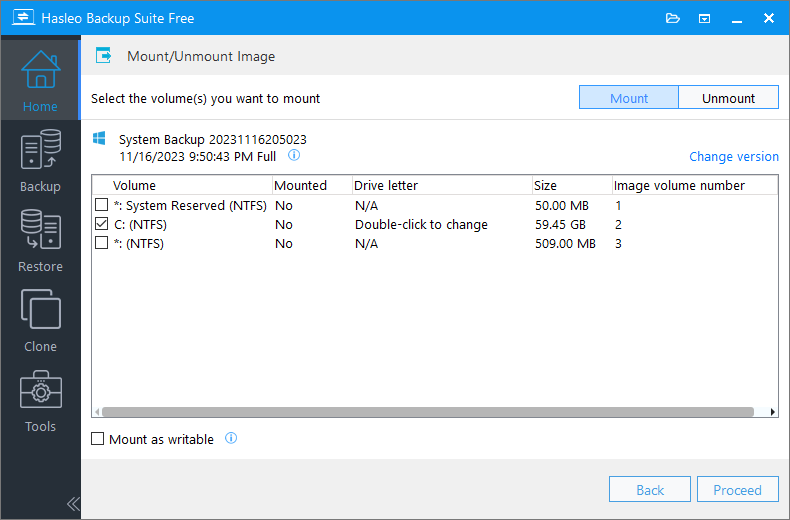
Step 3. The program will parse the image file and display all volumes (partitions) it contains. Then check the volumes you need to mount (you can mount multiple volumes simultaneously).
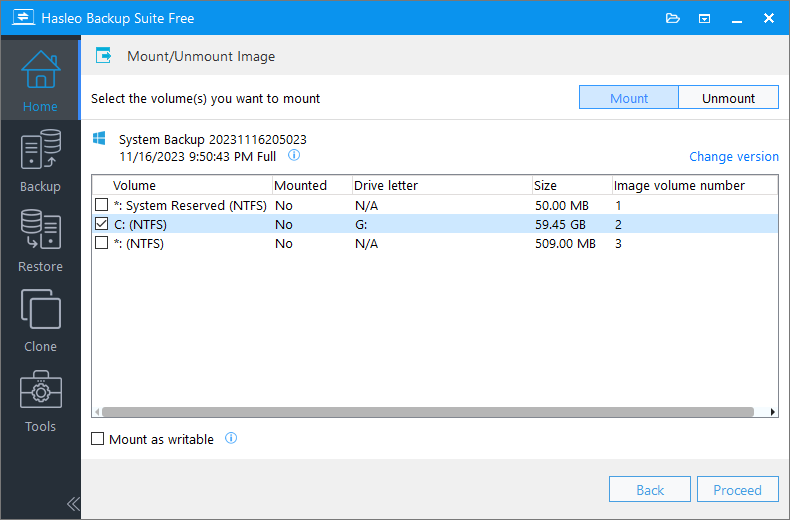
⚠️Mount as writable: Check this option to mount the image file in writable mode. Please note that the changes are temporary and will be discarded after the volume is unmounted.
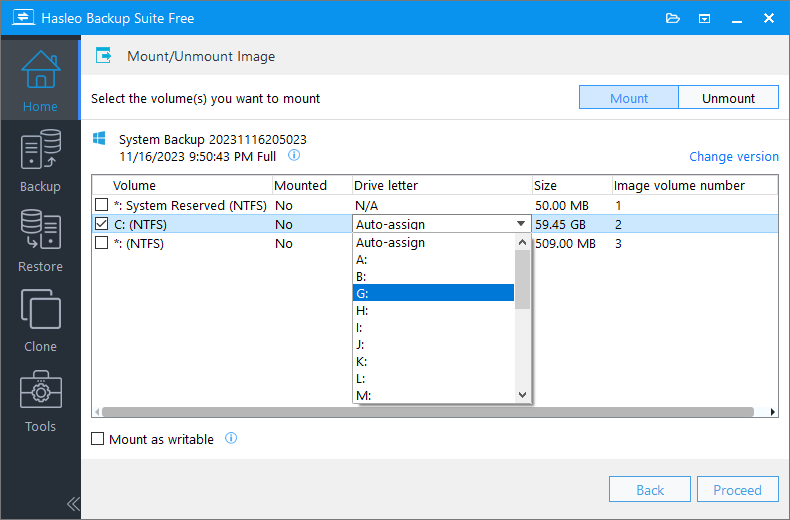
Step 4. Double-click the "Drive Letter" column for the selected volume, then select an unused drive letter from the dropdown (or choose "Auto-assign" to let the program handle it automatically) as the virtual drive letter after mounting.
Step 5. After confirming the settings are correct, click "Continue" and the program will begin mounting the selected image volume.
How to Access and Copy Files After Mounting
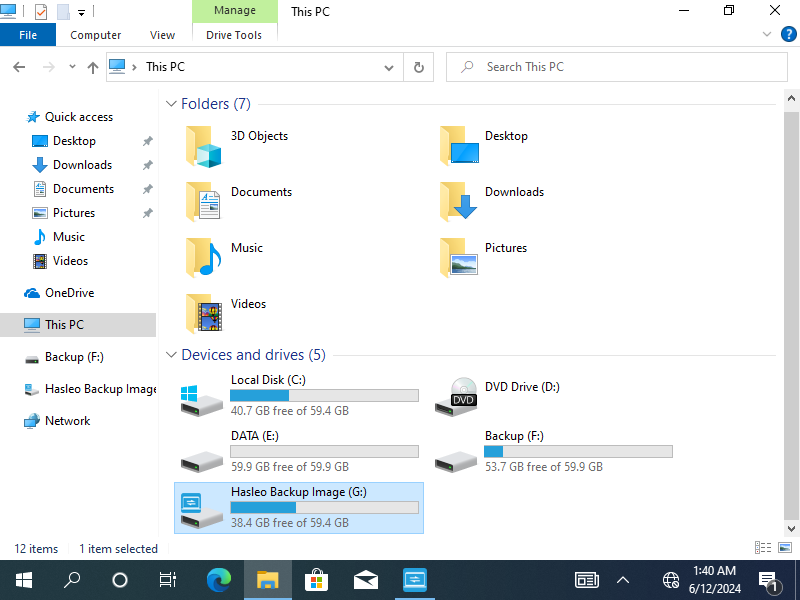
After successful mounting, you will see a new drive letter in Windows Explorer under "This PC". At this point, you can double-click that drive letter to browse all files and folders inside, just like using a regular USB flash drive or hard drive.
Accessing the Mounted Image Volume
Open Windows Explorer, find and double-click the newly appeared drive letter to browse all content in the backup image.
Copying Required Files
In the mounted drive, locate the files or folders you need to recover. Select them, use the shortcut Ctrl + C to copy, then navigate to your desired target folder on your computer (such as Desktop or D: drive), and use Ctrl + V to paste. The entire process is exactly the same as copying files between regular folders.
How to Unmount a Backup Image
When you no longer need to access the mounted backup image, it is recommended to unmount it in a timely manner to release system drive letters and avoid misoperations.
Step 1. Launch Hasleo Backup Suite, click "Tools" on the main interface, then select "Mount/Unmount Image".
Step 2. Click the "Unmount" button in the upper right corner. You will see a list of currently mounted images. Select the backup image entry you want to remove, then click "Proceed" to execute the unmount operation.

Step 3. After successful operation, the temporary drive letter that appeared in Windows Explorer will automatically disappear. The image has now been successfully unmounted from the system.
💡Tip: Although you can quickly unmount by right-clicking the drive letter in Explorer and selecting "Eject", to ensure data integrity and subsequent recovery stability, it is strongly recommended to always use the Hasleo Backup Suite software interface for unmounting operations.
ℹ️Important Notes for Mounting Images
When using the Mount/Unmount Image feature, please pay attention to the following:
Limitations for File Backup Images
- Reparse points are not supported
- EFS encrypted files in file backup images generated by V4.8 and earlier versions are not supported
- File backup images can only be mounted on Windows 7 SP1 and later
- Please unmount the image in a timely manner after use to release system resources
- Before unmounting, make sure no files are being accessed or copied
Frequently Asked Questions
A: Image mounting allows you to access files in backup images as if they were on a regular hard drive, without performing a full restore.
A: Yes, for file backup images, you need Dokan V2.1.0.1000 driver to mount and browse files.
A: Yes, you can browse and copy files just like using a regular hard drive.
A: No, mounting is read-only by default and does not affect your current system data.
A: Writable mode allows changes but they are discarded after unmounting.
A: Always unmount through the software to release drive letters properly.
A: Yes, you can mount encrypted backups but you need to provide the password first.
A: Yes, you can mount multiple backup images simultaneously using different drive letters.
Conclusion
The Mount/Unmount Image feature in Hasleo Backup Suite provides you with great convenience, allowing you to quickly access files in backup images without performing a full system restore. Through this tutorial, you have learned how to mount an image as a drive letter recognizable in Explorer, how to browse and extract files as if using a normal disk, and how to safely unmount the image to release system resources.
As professional Windows backup software, Hasleo Backup Suite offers flexible image mounting functionality along with many other features including full backup, incremental and differential backups, backup task encryption, compression, and scheduled backup plans. It is an ideal choice for your data protection needs.
Related Articles
- How to Back Up and Restore Windows 11 for Free Using Hasleo Backup Suite Free?
- How to Back Up Surface (ARM64) to an External Hard Drive Using Hasleo Backup Suite?
- How to Create Full/Incremental/Differential Backups in Windows Using Hasleo Backup Suite Free?
- How to Merge/Delete Old Backup Files using Hasleo Backup Suite Free?
- How to Encrypt Backup Tasks Using Hasleo Backup Suite Free?


