
- Overview of ARM64 Computers and Windows To Go
- Acquiring and Verifying ARM64 Windows ISO Files
- Prerequisites for Creating Windows To Go for ARM64 Computers
- Detailed Steps to Create Windows To Go for ARM64 Computers Using WinToUSB
- Booting and Configuring ARM64 Windows To Go
- Common Issues and Troubleshooting
- Frequently Asked Questions
- Conclusion
With the increasing popularity of ARM64 architecture devices, more and more users want to use a portable Windows system on ARM64 computers. Unlike traditional x64 architecture, ARM64 devices require a specially compiled Windows operating system. This tutorial will provide a detailed guide on how to create a Windows To Go portable system from ISO files for ARM64 computers.
Overview of ARM64 Computers and Windows To Go
ARM64 (also known as AArch64) is the 64-bit version of ARM architecture, initially applied to mobile devices and embedded systems, and has expanded to personal computers in recent years. Devices equipped with ARM64 processors (such as Qualcomm Snapdragon series) can run Windows 10 and Windows 11 ARM64 versions, providing low power consumption and long battery life while maintaining good computing performance.
Windows To Go is a feature that allows users to install a Windows operating system on a USB drive and boot from that drive. Through Windows To Go, users can carry their own Windows system and use their personalized settings, applications, and data on any compatible ARM64 computer.
Using Windows To Go on ARM64 computers has the following advantages:
- Portability: Use a familiar Windows environment anywhere without reinstalling the system on each computer
- Compatibility: Run native ARM64 applications with better performance and longer battery life
- Security: Data is stored on a portable USB device, reducing the risk of information leakage
- Flexibility: Use the same system environment across multiple ARM64 devices
- Isolation: Run a customized Windows environment without affecting the host system
Acquiring and Verifying ARM64 Windows ISO Files
The first step to creating ARM64 Windows To Go is to obtain the correct Windows ARM64 ISO file. Here are methods to acquire and verify ARM64 Windows ISO files:
1. Official Channels
- Windows 11 ARM64: Microsoft official website provides Windows 11 ARM64 ISO download, which can be obtained through the Windows 11 official download page
- Windows 10 ARM64: Can be obtained through the Windows 10 official download page
- Windows Server ARM64: Enterprise users can obtain it through the Volume Licensing Service Center
2. ISO File Verification
After obtaining the ISO file, please verify its integrity and correctness:
- Check file size: ARM64 Windows 11 ISO file is usually around 5-6GB
- Verify SHA256 hash value: Compare with the hash value provided by the official source
- Confirm architecture: Extract the ISO file and check if the install.wim or install.esd file size matches the ARM64 version
* Tip: For how to download Windows 11 ARM64 ISO, please refer to: How to Download Windows 11 Installation ISO File?
Prerequisites for Creating Windows To Go for ARM64 Computers
Before starting to create Windows To Go for ARM64 computers, you need to meet the following prerequisites:
- ARM64 computer: A Windows device equipped with an ARM64 processor, such as Surface Pro X, laptops with Qualcomm Snapdragon 8cx or newer processors, etc.
- Windows ARM64 ISO file: Windows 10 or Windows 11 ARM64 version ISO file
- USB drive: A USB drive with sufficient capacity (64GB or larger recommended), high-speed USB 3.0/3.1 drive or SSD external hard drive is recommended for better performance
- WinToUSB software: Download and install the latest version of Hasleo WinToUSB, ensuring the version supports ARM64 Windows To Go creation feature
- BIOS/UEFI settings: Ensure the ARM64 device's BIOS/UEFI allows booting from USB and has the appropriate boot options enabled
Important Notes:
- Not all ARM64 devices support booting Windows To Go from USB, please confirm your device supports this feature before proceeding
- Ensure the USB drive's write speed is fast enough, otherwise it will affect system performance
- Some devices may need to update BIOS/UEFI firmware to support ARM64 Windows To Go
Detailed Steps to Create Windows To Go for ARM64 Computers Using WinToUSB
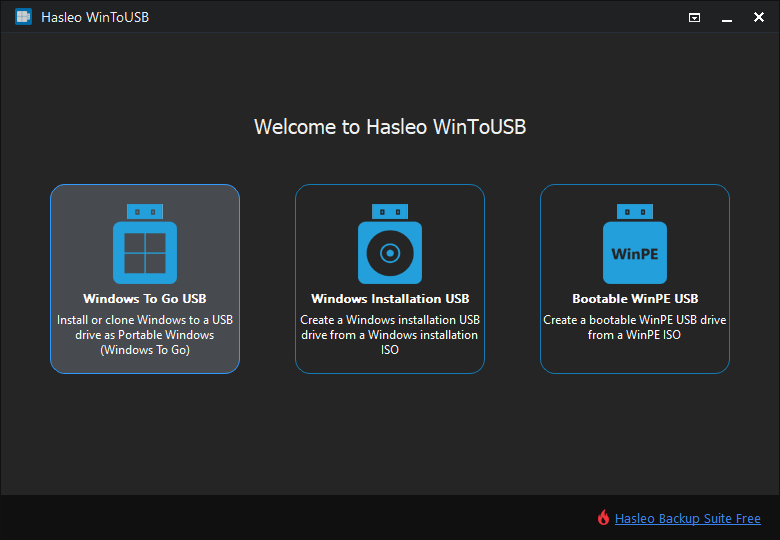
Step 1. Connect the USB drive to your computer. Download, install and run Hasleo WinToUSB, then click the "Windows To Go USB" option.
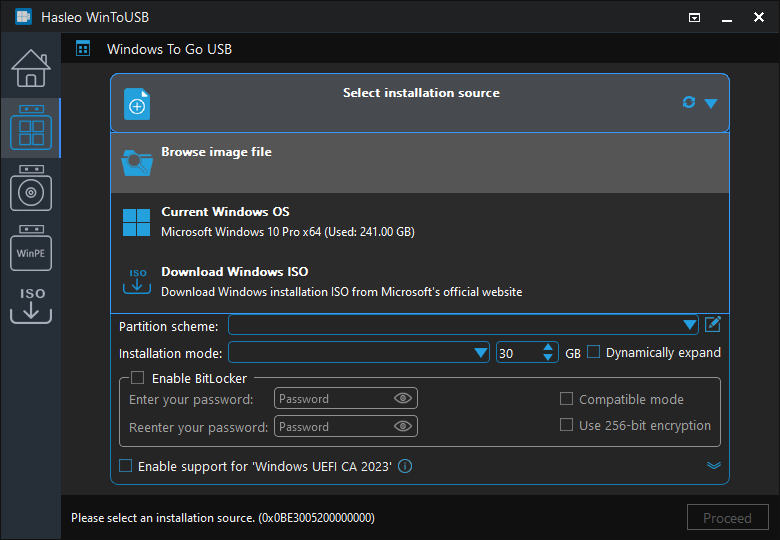
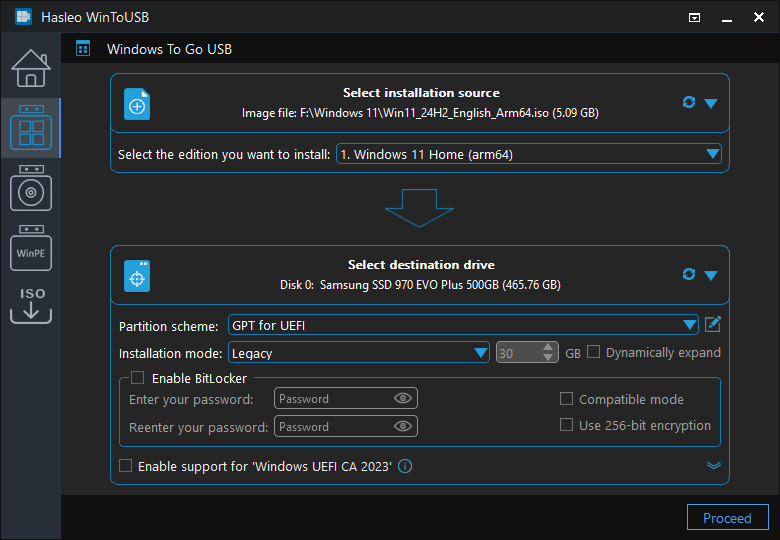
Step 2. Click "Select Installation Source", then select "Browse Image File" from the popup list, navigate to your downloaded Windows ARM64 ISO file and select it.
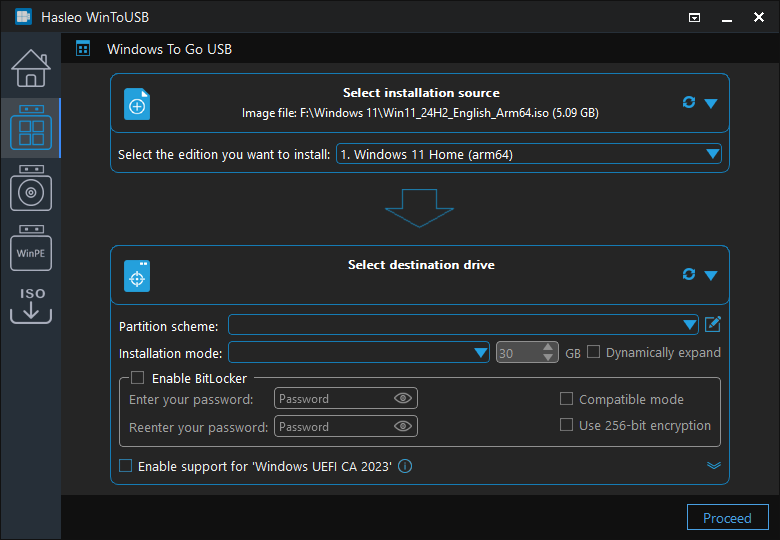
Step 3. WinToUSB will automatically detect the Windows version and architecture in the ISO file. Confirm that the ARM64 version of Windows is selected, then click "Continue".
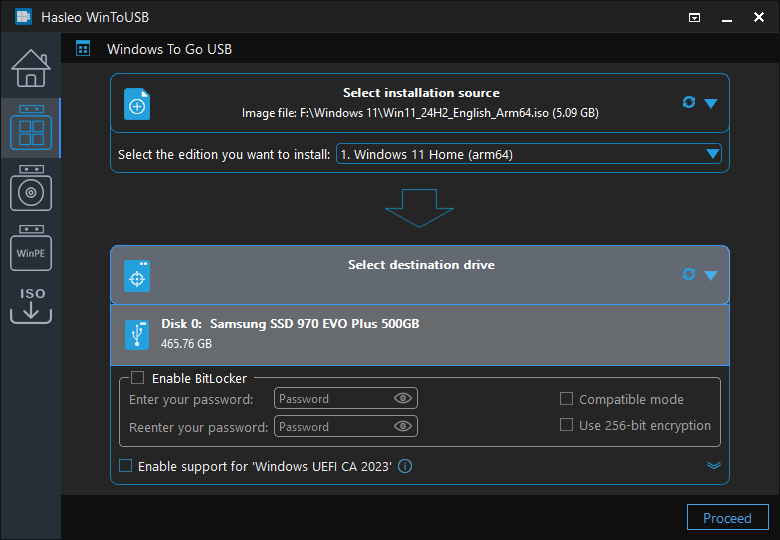
Step 4. Click "Select Destination Drive" and select your USB drive from the popup list.
Step 5. WinToUSB will automatically select the partition scheme suitable for ARM64 (usually GPT). Confirm the settings are correct, then click "Continue".
* Tip: For detailed information about "Partition Scheme", "Installation Mode" and "Enable BitLocker", please refer to: How to Create Windows To Go from Windows Installation ISO?
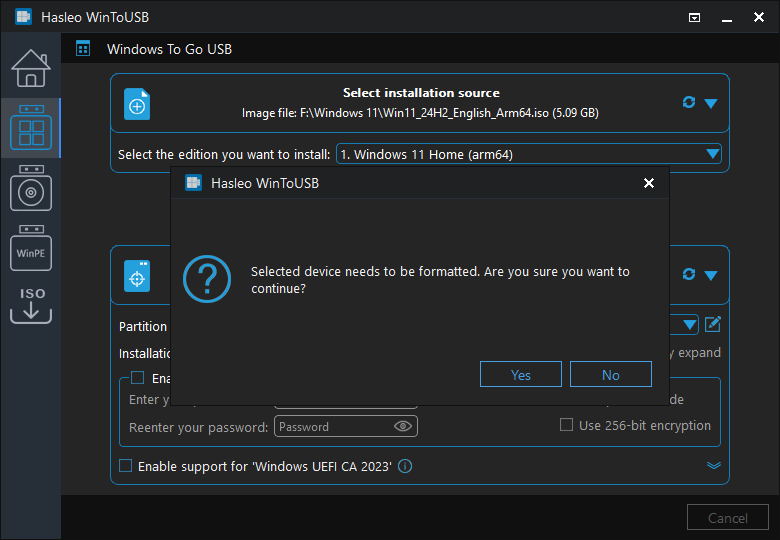
Step 6. After clicking "Continue", a confirmation dialog will appear asking if you want to continue formatting the USB drive. If you accept the operation, click "Yes".
Step 7. After clicking "Yes", WinToUSB will start installing the Windows ARM64 system to the USB drive. The time this process takes depends on the ISO file size and USB drive write speed.
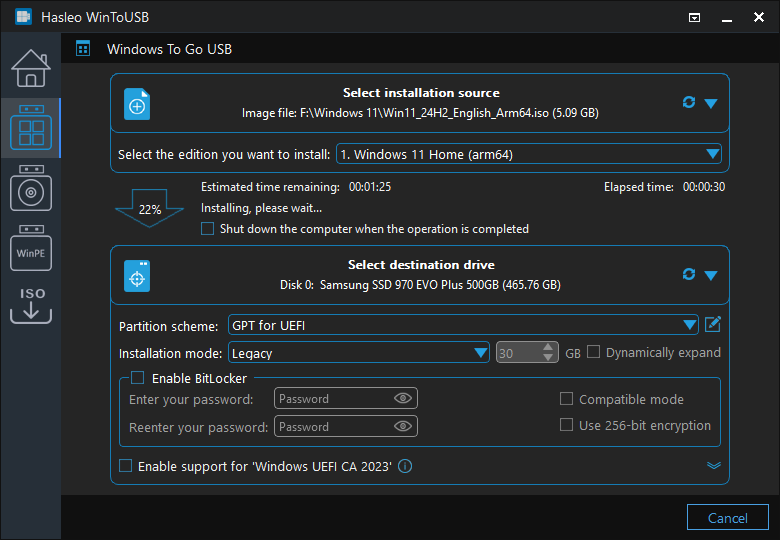
Step 8. Wait for the installation process to complete. After successful completion, restart the ARM64 computer and enter UEFI/BIOS settings, set the USB drive as the first boot device, then boot Windows To Go from USB.
Booting and Configuring ARM64 Windows To Go
After creation, you can boot and use Windows To Go on ARM64 computers. Here are detailed booting and configuration steps:
Step 1: Set USB as Boot Device
By default, most computers boot from the internal disk. To boot Windows from the USB drive, you need to enter UEFI/BIOS settings to set USB as the first boot device.
Step 2: Enter UEFI/BIOS
To enter your computer's UEFI/BIOS, you need to press a specific key when the computer is powered on. Here are BIOS/UEFI access methods for common ARM64 devices (such as Surface Pro X):
- Surface Pro X: Hold down the volume down button and power button simultaneously for about 10 seconds until the Surface logo appears, then release the power button and continue holding the volume down button until entering BIOS
- Other ARM64 devices: Usually enter BIOS/UEFI by pressing F2, Del, or a specific function key
Step 3: Change Boot Order
Detailed steps are as follows:
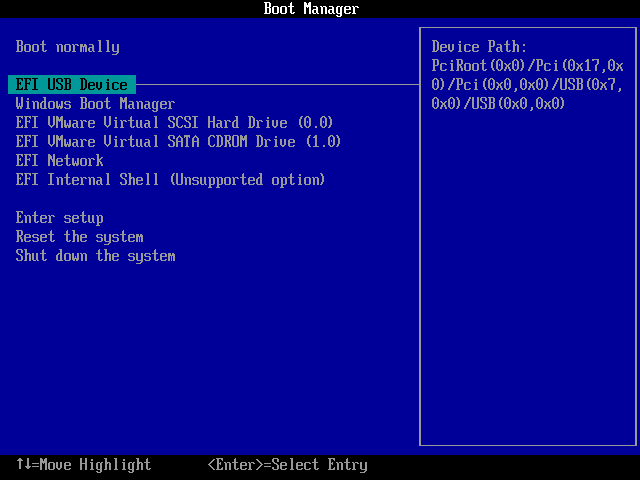
Step a. Connect the USB drive to the ARM64 computer, then turn on the computer power.
Step b. After entering the BIOS/UEFI interface, find the "Boot Order" or "Boot Priority" setting and move the USB drive to the first position.
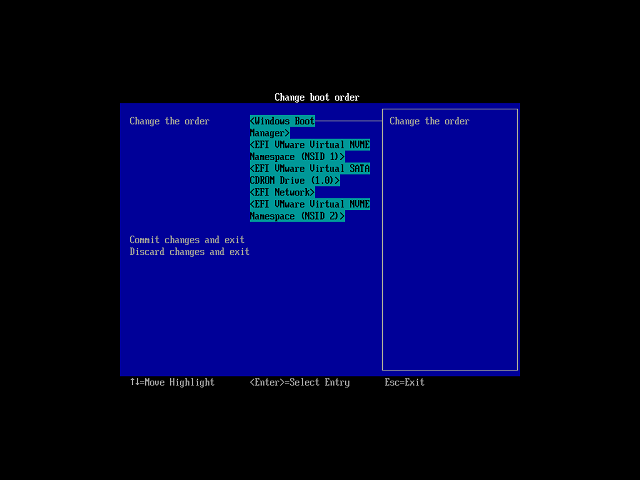
Step c. Save BIOS/UEFI settings and restart the computer. The system will boot Windows ARM64 from the USB drive.
Step 4: Complete Initial Boot Configuration
When booting from USB for the first time, Windows will perform initial setup. Follow the on-screen prompts to complete regional settings, language settings, network connection, Microsoft account login, and other configurations. After completion, you will enter the Windows To Go desktop and can start using your portable Windows system.
Step 5: Install Drivers
After entering the system for the first time, it is recommended to:
- Connect to the network (wired network is recommended for more stable connection)
- Check and install ARM64-specific drivers through Windows Update
- Visit the device manufacturer's website to download the latest ARM64 drivers
Common Issues and Troubleshooting
Issue 1: Cannot Recognize ARM64 ISO File
If WinToUSB cannot recognize your ISO file:
- Confirm the ISO file is ARM64 version, not x64 version
- Check if the ISO file is complete, try downloading again
- Try using virtual drive software to mount the ISO file, then select the mounted drive as the source
- Ensure you are using the latest version of WinToUSB
Issue 2: Cannot Boot from USB
If the ARM64 computer cannot boot from USB:
- Confirm the USB drive is properly connected and recognized by the system
- Enter BIOS/UEFI settings and confirm USB is listed as a valid boot option
- Check boot order settings to ensure the USB drive is before the internal disk
- Some devices may need to enable "USB Boot" option in BIOS
- Try using a different USB port, some ports may not support boot functionality
Issue 3: Blue Screen or Error on Boot
If a blue screen or error occurs during boot:
- USB drive speed is insufficient, it is recommended to use USB 3.0/3.1 or SSD external hard drive
- The Windows version in the ISO file is incompatible with the device
- BIOS/UEFI firmware version is too old, update to the latest version
- Try recreating Windows To Go to ensure no errors during the operation
Issue 4: Poor Performance
If Windows To Go runs slowly:
- Use a faster USB drive (USB 3.1/3.2 or NVMe SSD external hard drive)
- Disable unnecessary startup programs and services
- Perform regular disk cleanup
- Ensure the system has the latest ARM64 drivers and updates installed
Issue 5: Device Recognition Issues
If you encounter device recognition issues in Windows To Go:
- Connect to the network and install necessary drivers through Windows Update
- Visit the device manufacturer's website to download ARM64 version drivers
- Some peripherals may not support ARM64 architecture and need alternative solutions
Issue 6: Cannot Use on Multiple Devices
If Windows To Go cannot boot on different ARM64 devices:
- Confirm the target device also supports booting from USB
- Some devices may require specific drivers, it is recommended to keep network connection during first boot on each device for automatic driver installation
- Some enterprise environments may have group policies restricting the use of external boot devices
Frequently Asked Questions
A: No, you need to download a specifically compiled Windows ARM64 version ISO file. Regular x64 Windows ISO files will not work on ARM64 computers. You can download Windows 11 ARM64 ISO from Microsoft's official website or Windows 10 ARM64 ISO from the Windows 10 download page.
A: ARM64 Windows To Go is supported on devices with ARM64 processors such as Microsoft Surface Pro X, laptops with Qualcomm Snapdragon 8cx or newer processors, and other devices running Windows on ARM architecture. Not all ARM64 devices support USB booting, so check your device specifications first.
A: Yes, ARM64 Windows supports x64 emulation, allowing you to run most x64 applications. However, for better performance, native ARM64 applications are recommended. Some legacy 32-bit x86 applications may not be fully compatible.
A: We recommend using USB 3.0 or faster drives with at least 128GB capacity for ARM64 Windows To Go. USB 3.1/3.2 or NVMe SSD external drives will provide the best performance. Slower USB 2.0 drives may result in significantly reduced system responsiveness.
A: Yes, WinToUSB free version supports creating ARM64 Windows To Go from ISO files. You can download a Windows ARM64 ISO, select it in WinToUSB, and create your portable Windows system on a USB drive without any cost.
Conclusion
As described above, by following these steps, you can use Hasleo WinToUSB to create a Windows To Go portable system from ARM64 Windows ISO files. This method is particularly suitable for the following scenarios:
- Using a portable Windows work environment on ARM64 devices
- Sharing a unified system configuration between different ARM64 devices
- Performing development and testing without affecting the host system
- Data security protection by keeping sensitive data on a portable USB device
As a professional portable Windows creation tool, Hasleo WinToUSB not only supports creating ARM64 Windows To Go from ISO files, but also can create portable Windows systems from installed systems, VHD files, and other sources.
Experience the convenience of using portable Windows on ARM64 devices right away!
Related Guides
- How to create a portable Windows 11/10 USB drive?
- How to create Windows To Go compatible with UEFI CA 2023?
- How to Create a Portable Windows System from an ISO File for Microsoft Surface Devices?
- How to install and run Windows 11 on an external hard drive as portable Windows 11?
- How to clone Windows 11 to an external hard drive as portable Windows 11?


