
- Why Excel Worksheets Get Deleted
- Method 1: Undo with Excel's Built-in Feature
- Method 2: Restore from Excel Version History
- Method 3: Recover via Windows File History
- Method 4: Use Hasleo Data Recovery for Excel Files
- How to Prevent Excel File Loss
- Frequently Asked Questions (FAQ)
- Conclusion
Microsoft Excel is one of the most commonly used software for office work and data processing. Its worksheet feature allows users to create multiple independent data tables within a single workbook. However, in daily use, accidentally deleting Excel worksheets happens from time to time—it may be due to typos, version overwriting, or file corruption, leading to loss of important data.
When you discover that an Excel worksheet has been deleted, please don't panic! Depending on different loss scenarios and timing, there are multiple methods to help you recover deleted Excel worksheets or workbooks. This tutorial will provide detailed information on various effective recovery solutions.
🚨Why Excel Worksheets Get Deleted
In daily office work, the loss of Excel worksheets often occurs suddenly and can be very frustrating. Understanding the underlying reasons can not only help us carry out data recovery more effectively but also enable preventive measures in the future. The following are several typical situations that can lead to the loss of Excel worksheets:
Accidental Deletion
This is the most common human error. When editing a multi-sheet document, a user might accidentally right-click 'Delete' on the tab bar or misuse a shortcut key to delete an entire sheet containing crucial data. If the file is closed and saved immediately after deletion, the undo operation (Ctrl Z) will not work, making data recovery significantly more difficult.
File Overwritten
When an older version of a document is opened for editing and the "Save" (Ctrl S) function is used instead of "Save As", the original file will be permanently overwritten by the new content. This often occurs when one mistakenly believes they have opened a blank file or habitually saves after temporary changes, resulting in the original data being cleared or replaced.
File Corruption
Sudden system crashes, unexpected power outages, unstable read/write on USB drives, or excessively large file sizes can all cause damage to the structure of Excel files. Corrupted files may exhibit: being completely unable to open, displaying garbled text upon opening, or although they can be opened, some sheets may be missing or data may be lost.
File Completely Deleted
Using the Shift + Delete key combination to directly delete an Excel file, or emptying the recycle bin, will cause the file to disappear from the system's visible directories. Technically, the data is not immediately erased from the hard drive but is marked as "overwritable". If new data is saved to the hard drive after discovering the loss, the original file data may be permanently overwritten and difficult to recover.
Virus or Malware Attacks
Certain malware, especially ransomware, can actively encrypt or tamper with Office documents. The affected Excel files may be unable to open, or their file extensions may be altered, making the data unusable directly. Even if the virus is removed, the file itself may already be damaged.
Method 1: Undo with Excel's Built-in Feature
Excel provides a powerful Undo function. If you just deleted a worksheet, you can try to undo immediately:
Undo Shortcut
After deleting a worksheet, immediately press the Ctrl + Z combination key, or click the "Undo" button on the Quick Access Toolbar.
Multiple Undo
If you have performed other actions after the deletion, you can press Ctrl + Z repeatedly until you return to the state that includes the deleted worksheet.
⚠️Important Note: The effectiveness of this method depends on one crucial action—whether the file has been saved.
- If the file has not been saved: Even after performing other actions, it is usually possible to undo multiple times to recover the deleted worksheet.
- If the file has been saved: Once saved, the undo feature cannot restore the deleted worksheet because the save operation has written the deletion status into the file, clearing the undo history. Even reopening the file will not allow the undo function to be used.
Method 2: Restore from Excel Version History
If you are using Microsoft 365 or Excel 2016 and later, and the file is saved to the cloud, you can recover unsaved or overwritten content from the version history:
Step 1. Open your Excel file and click the "File" tab in the top left corner.
Step 2. Click "Info" in the left-hand menu. In the middle of the Info page (or under "Workbook Information"), click the "Version History" button.
Step 3. The "Version History" pane will appear on the right side of the screen, listing all historical versions of the file, each with a timestamp and the name of the person who made the changes.
Step 4. Click the historical version you need, which will open in read-only mode. After confirming the content is correct, you can:
- Click the "Restore" button on the toolbar (this will overwrite the current version with the historical version, so proceed with caution).
- Or directly copy the worksheet content from the historical version and paste it into the current file.
⚠️tips: The Version History feature depends on cloud storage. Your Excel file must be saved on OneDrive, SharePoint, or another cloud service that supports versioning for this feature to be available. If the file is only saved locally, it cannot be recovered using this method.
Method 3: Recover via Windows File History
If you had enabled Windows File History before deleting the Excel file, and the folder was included in the backup scope, you can restore it using the following steps:
Step 1. Type "File History" into the search box on the Windows taskbar, then select "Restore your files with File History".
Step 2. The File History restore interface will open. Browse and locate the folder where you previously saved the Excel file.
Step 3. Navigate to the folder where you saved the Excel file, and use the left and right arrows to select the backup point before deletion.
Step 4. Once you find the target Excel file, select it and then click the green restore button in the middle of the interface. The file will be restored to its original location.
⚠️Tips: This method only applies if the File History feature was enabled in advance and the drive or folder containing the Excel file was successfully backed up. If this feature was not enabled, try other recovery methods.
👑Method 4: Use Hasleo Data Recovery for Excel Files
If you have completely deleted an Excel file (for example, using Shift Delete or emptying the Recycle Bin), the file is removed from the system, but the data does not immediately disappear from the hard drive. At this point, if no new data has been written to the original disk, you can use a professional recovery tool—Hasleo Data Recovery—to scan the disk and recover the lost file.
Hasleo Data Recovery is a powerful data recovery software that can help you recover deleted, formatted or lost Excel files from various storage devices.
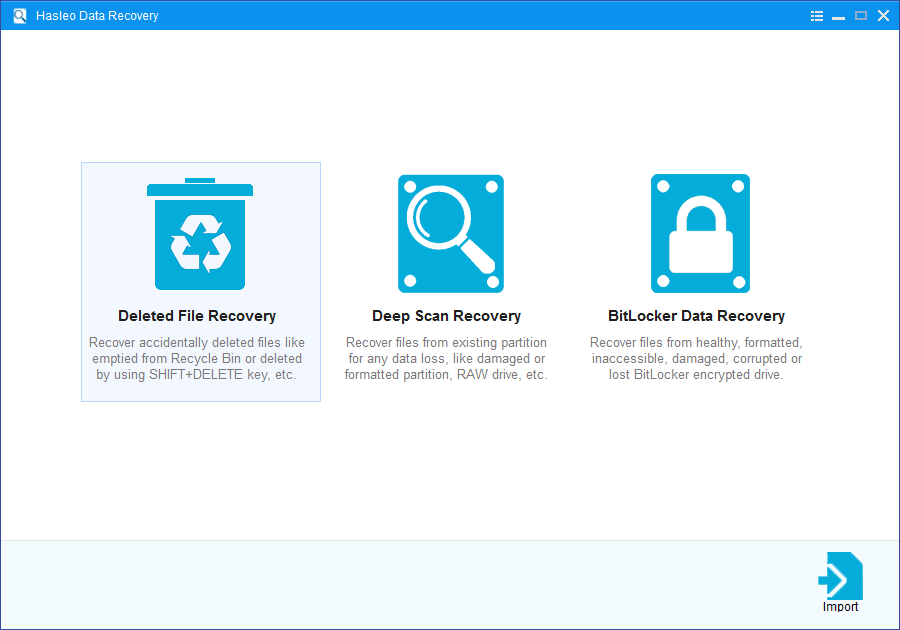
Step 1. Download, install, and run Hasleo Data Recovery. On the main interface, you will see three recovery modes. Please select the "Deleted File Recovery" mode. Note: Do not install the software on the disk partition where data is lost to avoid overwriting the files to be recovered.
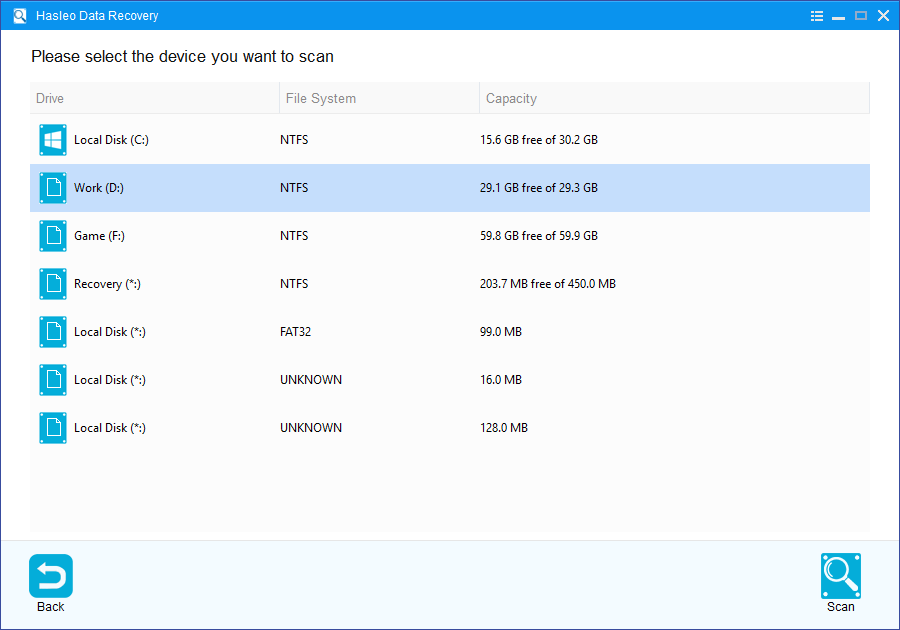
Step 2. Select the hard drive partition or storage device where the Excel file was deleted, then click the "Scan" button to start scanning. This process may take a few minutes, please be patient.
Step 3. After the scan is complete, all found files will be displayed in the interface. You can find Excel files under the "Documents" category on the left, or use the search box in the top right to search directly. Once you find the target file, select it and click the "Recover" button.

⚠️Tips:
- If your Excel file is not found using the 'Delete File Recovery' mode, please click the 'Deep Scan' button for a more thorough scan. Deep scanning takes longer but can find more lost files.
- If the device from which you want to recover data is encrypted with BitLocker, you should use BitLocker data recovery.
- To maximise the chances of successful recovery, stop using the disk partition immediately after file loss to prevent new data from overwriting the deleted files.
- Please save the recovered Excel files to a different disk partition from the original location to avoid overwriting the lost data.
⭐How to Prevent Excel File Loss
Prevention is always more important than recovery. Here are comprehensive best practices for securing your Excel files:
Configure Excel AutoSave and Version History
- Enable AutoRecover: Go to "File" > "Options" > "Save", check "Save AutoRecover information", and set the time interval to 5 minutes. This minimizes data loss caused by program crashes.
- Enable Cloud Real-Time Saving: If you're using Microsoft 365 or a newer version of Excel, save files in OneDrive or SharePoint folders. Turn on the AutoSave switch at the top—every change syncs to the cloud in real time, and you can restore previous versions using Version History.
Follow the 3-2-1 Backup Principle
- 3 copies: Keep at least 1 original and 2 backups.
- 2 types of media: Store backups on different media, such as external hard drives or NAS (Network Attached Storage).
- 1 offsite: Ensure at least 1 backup is stored offsite (e.g., cloud storage like OneDrive or Google Drive) to protect against fire, theft, or local hardware failure.
Turn on Windows File History
Go to "Control Panel" > "File History", and configure it to automatically back up key folders (such as your Documents folder) on a regular basis. This provides a system-level restore point in case files are accidentally modified or deleted.
Develop Safe Operating Habits
- Delete with caution: Avoid using Shift + Delete to permanently delete files. Move important files to the Recycle Bin first and only empty it after confirming they're no longer needed.
- Avoid direct editing: Do not open and edit Excel files directly on USB drives, external hard drives, or network drives for extended periods, as unstable read/write operations can easily cause file corruption. Instead, copy the file to your local hard drive first, edit it there, and then save it back to the original location.
Use Cloud Sync Clients for File Protection
Use desktop clients like OneDrive or Google Drive to sync your Excel work folders. Even if local files are accidentally deleted or your hard drive fails, you can restore them from the cloud. These services typically keep historical versions for up to 30 days.
Frequently Asked Questions (FAQ)
A: Yes, there are several built-in methods: 1) Excel's Undo feature (Ctrl+Z) can restore a worksheet if you just deleted it, 2) If the workbook is saved to OneDrive or SharePoint, you can access Version History, 3) If AutoSave is enabled, Excel may have auto-recovered versions. These methods work within Excel itself, but if the file is closed and changes are saved, you'll need professional recovery software.
A: Excel may fail to save recovery information when: the workbook is saved to a network drive with connectivity issues, the file is stored on a drive with insufficient space, there was a sudden system crash or power failure during save, or AutoSave/AutoRecover features are disabled in Excel options. Always ensure AutoSave is enabled for important workbooks.
A: Hasleo Data Recovery uses Deep Scan to find deleted Excel worksheets by searching for file signatures that indicate XLSX/XLS file structures. Even when the file entry is removed from the file system, the actual data remains on the drive. The software can reconstruct Excel files by finding and assembling file components—headers, content, and formatting data—that match Excel file signatures.
A: An Excel worksheet is a single tab within a workbook (which can contain multiple sheets). Recovering a worksheet means finding one missing tab from a workbook that still exists. Recovering a workbook means finding an entire deleted Excel file. Worksheet recovery within existing files may use Excel's built-in features (Version History, unsaved file recovery), while full workbook recovery requires scanning the drive for the deleted file.
A: Yes, permanently deleted Excel files can be recovered if they haven't been overwritten. When you Shift+Delete or empty the Recycle Bin, Excel files are marked as deleted but the data remains on the drive. Use Hasleo Data Recovery immediately: select Deep Scan mode, scan the location where the file was stored, look for XLSX/XLS file signatures, and save them to a different location. Act quickly—the longer you wait, the higher the chance of overwriting.
Conclusion
After deleting an Excel worksheet, you have several recovery options: from a simple undo operation to using professional data recovery software such as Hasleo Data Recovery. Depending on the time, cause, and specific circumstances of the file loss, choosing the appropriate method can maximise the recovery of your important data.
Remember, time is crucial—the sooner you attempt to recover, the higher the success rate. At the same time, developing the habit of regularly backing up Excel files is the best strategy to prevent data loss.


