
- Why Does Hard Drive Show Space Used But Files Not Visible?
- Method 1: Show Hidden Files and Folders
- Method 2: Use Command Prompt to View Hidden Files
- Method 3: Remove Viruses and Malware
- Method 4: Run CHKDSK to Repair File System Errors
- Method 5: Use Hasleo Data Recovery to Restore Files
- How to Prevent File Loss
- Frequently Asked Questions (FAQ)
- Conclusion
Have you ever encountered this perplexing situation while using your computer: your hard drive clearly shows that a large amount of space is occupied, yet you cannot see any files in File Explorer? This situation can be alarming, especially when you need to recover important data. This tutorial will provide you with comprehensive solutions to help you recover missing files.
🚨Why Does Hard Drive Show Space Used But Files Not Visible?
Before diving into solutions, we first need to understand the root causes of this problem:
- Hidden Files and Folders: Windows system hides certain system files by default. If your files or folders were accidentally set to the "hidden" attribute, they will not display in File Explorer.
- Viruses or Malware: Some malicious software hides your files to make them invisible while consuming storage space in the background. Ransomware is especially dangerous - it may encrypt your files and demand a ransom.
- File System Corruption: Corruption of the file system structure on your hard drive may cause files to fail to display properly. Even though disk space is occupied, file records may be lost or corrupted.
- User Permission Issues: If the account you are using does not have sufficient permissions to access certain folders, the files inside will not be displayed.
- Partition Table or Boot Sector Corruption: A more serious situation is partition table corruption, which may render all files on an entire partition inaccessible.
- Corrupted Shortcuts or Placeholders: Virtual folders or corrupted shortcuts created by certain programs may occupy space without containing actual files.
Method 1: Show Hidden Files and Folders
This is the simplest solution, suitable for most cases where files are not visible due to settings issues.
Step 1. Open any folder (such as "This PC" or "Documents"), and click the "View" tab in the top menu bar.
Step 2. In the "Show/hide" section, check the "Hidden items" checkbox. At this point, all files and folders marked as "hidden" should appear with semi-transparent icons.
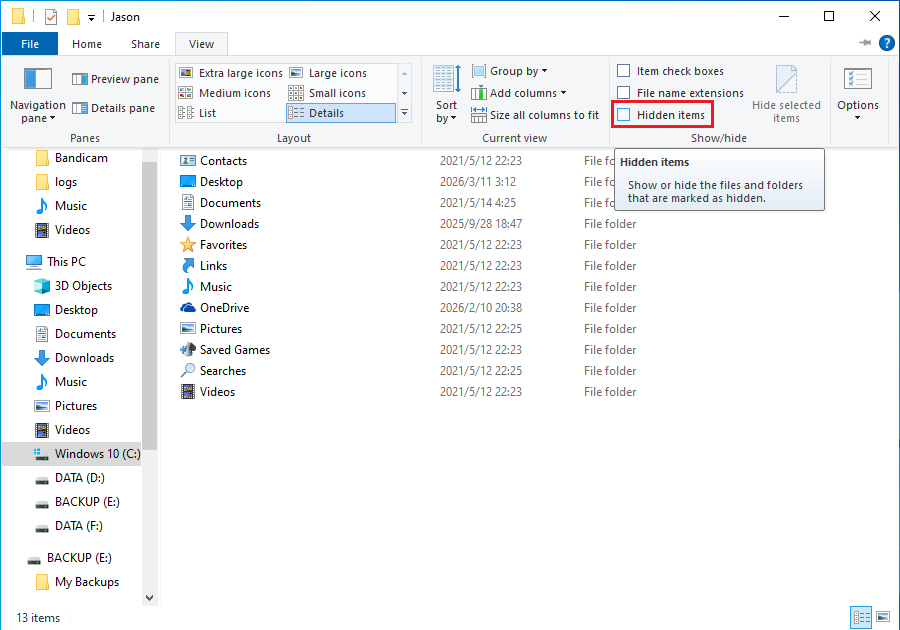
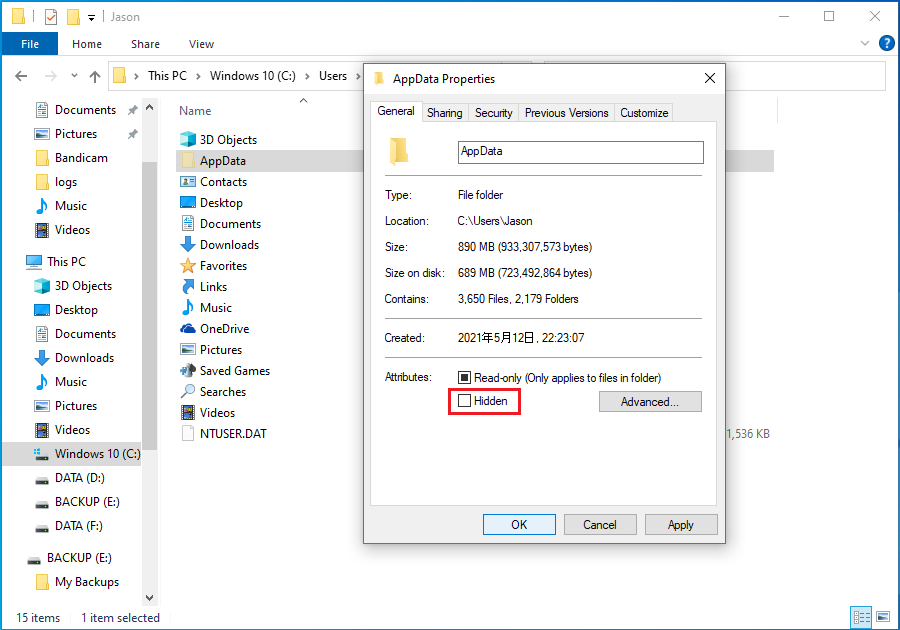
Step 3. If you can see these semi-transparent files/folders, right-click on the file, select "Properties", and under the "General" tab, uncheck the "Hidden" option, then click "OK". The file will then display normally (visible even when you turn off the "Hidden items" switch).
Step 4. If files are still not displayed after checking "Hidden items", it may be because the files are marked as "protected operating system files". Click the "Options" button (at the far right of the "View" tab) again to open the "Folder Options" window.
Step 5. In the advanced settings list on the "View" tab, uncheck "Hide protected operating system files (Recommended)", and select "Show hidden files, folders, and drives" (although it is usually automatically selected), then click "OK".
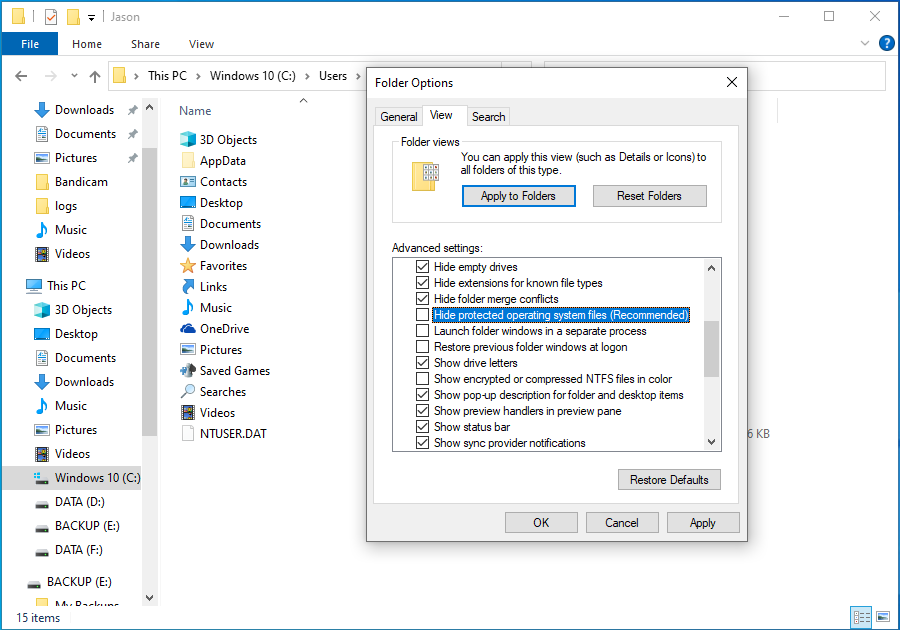
⚠️Warning: Displaying system files may cause you to accidentally modify or delete important system files, thereby affecting normal system operation. Please proceed with caution. After completing your file search or recovery, it is recommended to return to Folder Options, re-check "Hide protected operating system files (Recommended)", and restore the setting to "Don't show hidden files, folders, or drives" for safety.
Method 2: Use Command Prompt to View Hidden Files
If the graphical interface cannot solve the problem, you can try using command-line tools to view and recover files. Please note: This method modifies file attributes. It is recommended to ensure important data is backed up before performing operations, or execute commands step by step with caution.
Step 1. Press "Win + R" to open the Run dialog, type "cmd", then press "Ctrl + Shift + Enter", and click "Yes" in the User Account Control prompt that appears.
Step 2. Assuming your files are on the D drive, enter the following command in the Command Prompt window and press Enter:
D:
Step 3. Enter the following command to only remove the hidden attribute:
attrib -h *.* /s /d
Step 4. If files are still not displayed, remove the system file attribute:
attrib -s *.* /s /d
Parameter explanation:
- -s: Removes system file attribute
- -h: Removes hidden file attribute
- /s: Recursively processes all subdirectories
- /d: Also processes directories (folders)
- *.*: Represents all files
Step 5. Wait for the command to complete. The execution time depends on disk size and number of files. After completion, reopen File Explorer to check if files are displayed normally.
💡Tips: If your files are still not visible, they may have been hidden or moved by a virus to another location. Please continue to try other methods.
Method 3: Remove Viruses and Malware
If your hard drive files have mysteriously disappeared or show abnormalities (such as folders becoming shortcuts), viruses or malware are usually the culprits. Some malicious programs deliberately hide original files, create fake folders to steal data or damage the system, and even disable your antivirus software. Follow the steps below for a thorough check:
Step 1. Before scanning, ensure your antivirus software can detect the latest threats, and first check if files are merely hidden.
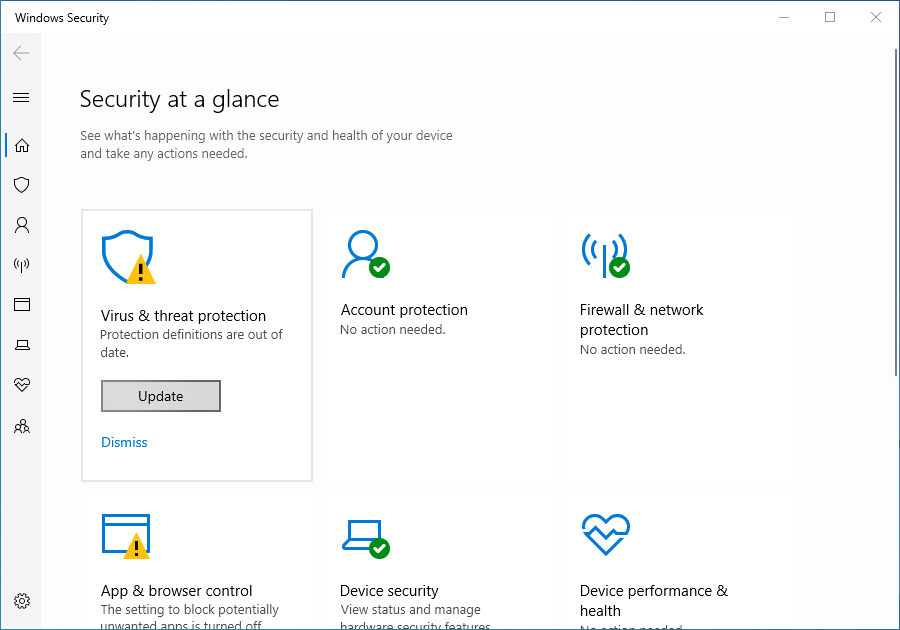
- Update virus definitions: Click the shield icon in the taskbar to open Windows Security. Click "Virus & threat protection", then click "Check for updates" under "Virus & threat protection updates" to ensure virus definitions are up to date.
- Show hidden files: Open any folder (such as "This PC"), click "View" in the top menu, then check "Hidden items". If disappeared files appear in a semi-transparent state, it means they are only hidden. You can right-click the file, select "Properties", and uncheck "Hidden" to restore visibility.
Step 2. A regular quick scan may miss deeply hidden viruses. It is recommended to perform a full disk scan.
- In Windows Security, click "Virus & threat protection".
- Click "Scan options" below.
- Select "Microsoft Defender Offline scanning", then click "Scan now".
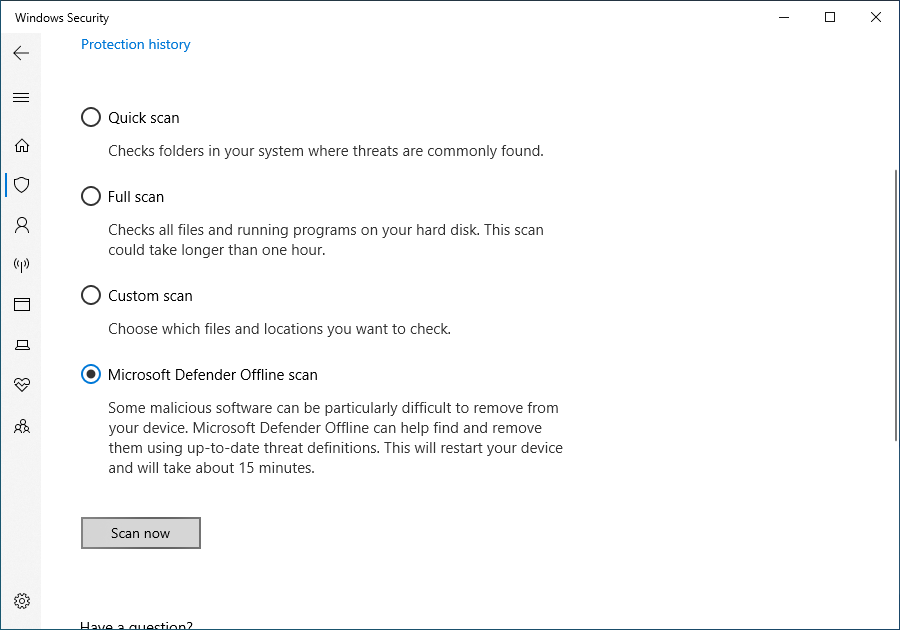
💡Tips: Offline scanning runs in the recovery environment after system restart to remove stubborn viruses that cannot be deleted while running.
Step 3. After scanning completes, the system will list detected threats. Click "Take action" (or similar button) and follow the prompts to select "Quarantine" or "Remove". Quarantine can temporarily retain files for recovery in case of false positives; direct removal will permanently delete the files.
Step 4. A single antivirus software may have missed detections. It is recommended to use a dedicated anti-malware tool for secondary confirmation.
💡Tips: Some advanced malware may disable antivirus software. If you cannot run antivirus programs normally, try starting Windows in Safe Mode, then scan.
Method 4: Run CHKDSK to Repair File System Errors
Logical file system errors may cause file allocation table corruption, making files "disappear" while space remains occupied. Using Windows built-in disk checking tool can repair such issues.
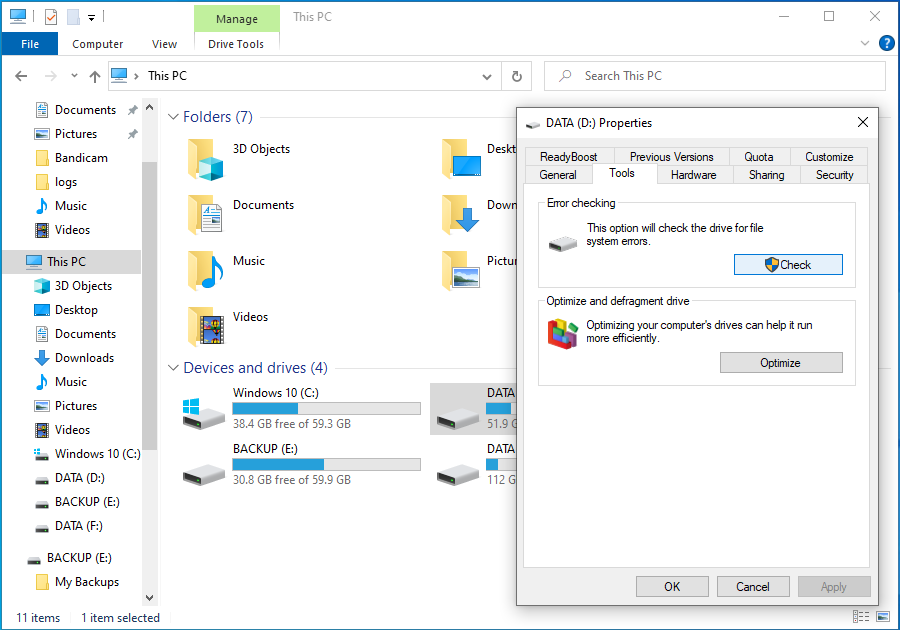
Step 1. Open "File Explorer", right-click on the problematic hard drive partition (such as D:), and select "Properties".
Step 2. In the popup window, switch to the "Tools" tab, and click the "Check" button (located under the "Error checking" section).
Step 3. If the system prompts "You don't need to scan this drive", click "Scan drive" to force a thorough check. The system will start searching for file system errors.
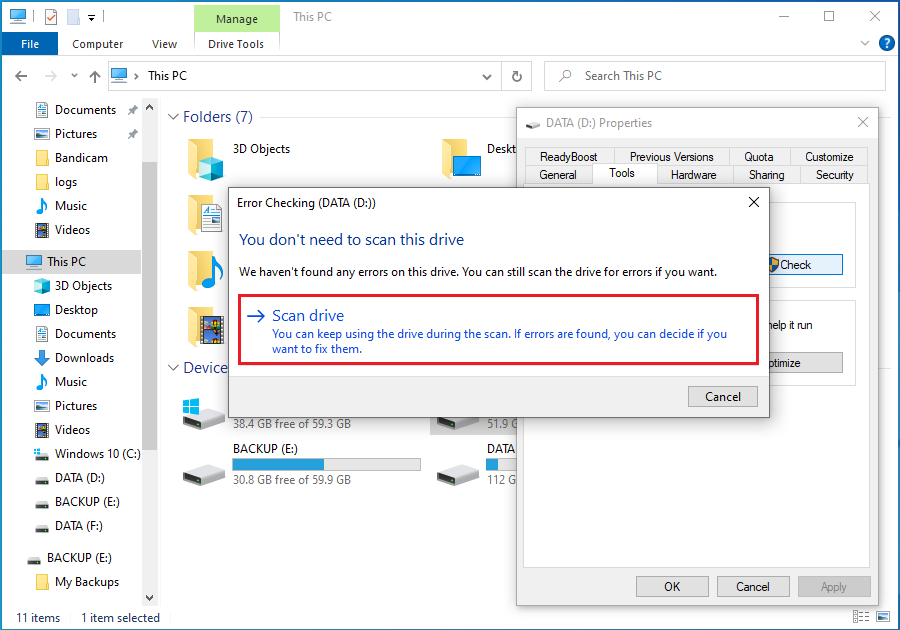
Step 4. If errors are found, a popup will ask if you want to repair. Follow the prompts to proceed; if errors involve system files (usually on C:), the system will prompt "Schedule disk check". Click "Schedule" and restart the computer.
Step 5. After restart, the chkdsk tool will run automatically on the startup screen (blue screen with white text), showing repair progress. Be sure to wait for completion and do not force shutdown midway.
💡Tips:
- If C: is the system drive and cannot be checked immediately, selecting "Schedule check" is the safest approach.
- While the chkdsk tool is relatively safe, any disk repair operation carries minimal data risk. If data on the hard drive is extremely important, it is recommended to try backing up data with other tools first (if it can still be partially read) before running chkdsk.
- If chkdsk reports it cannot repair, or the disk partition becomes "RAW format" (meaning Windows cannot recognize the file system format), immediately stop operations and use professional data recovery software or seek professional help to avoid data overwriting.
👑Method 5: Use Hasleo Data Recovery to Restore Files
If the above methods still cannot help you recover lost files, you can try using Hasleo Data Recovery data recovery software. It can effectively help you recover important files under various data loss scenarios. It is recommended to minimize write operations on the disk after data loss to improve recovery success rate.
The main advantages of Hasleo Data Recovery include:
- Supports recovering data from formatted, corrupted, and RAW file system drives.
- Compatible with various file types and all types of storage devices.
- Provides deep scan function that can discover more hidden or lost files.
- Free version allows users to recover up to 2GB of data.
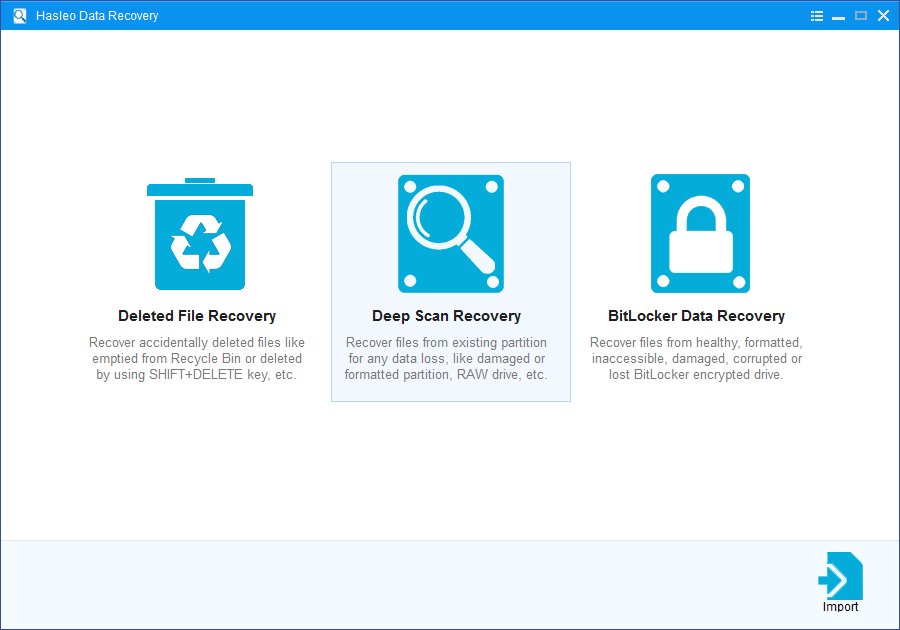
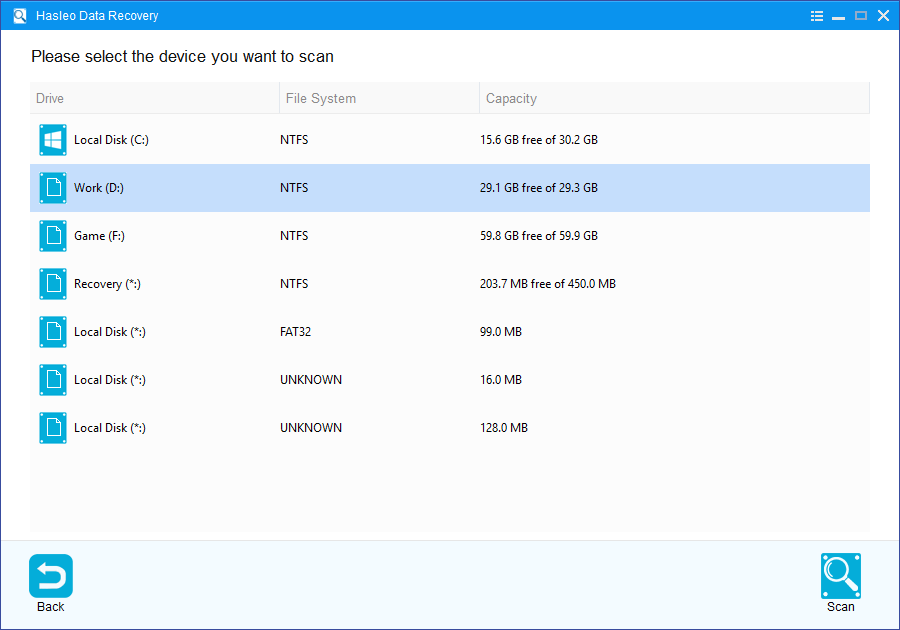
Step 1. Download, install, and run Hasleo Data Recovery. On the main interface, you will see three recovery modes. Please select "Deep Scan Recovery" mode. Important: Do not install the software to the disk where data was lost.
Step 2. Select the problematic hard drive or partition, then click the "Scan" button to start scanning. This process may take from several minutes to several tens of minutes, depending on hard drive capacity.
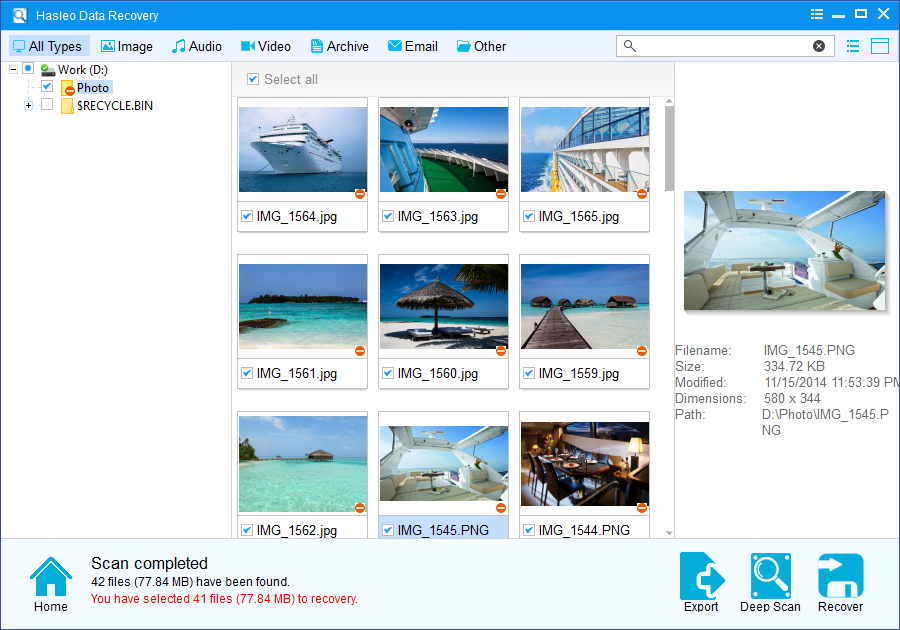
Step 3. After scanning completes, all found files will be displayed in the interface. You can quickly locate target files by path or file type. Before recovery, preview images, documents, videos, and other files to confirm they are intact. Select the files you want to recover, then click the "Recover" button.
💡Tips:
- If your device uses BitLocker Drive Encryption, please use the "BitLocker Data Recovery" function instead.
- Save recovered files to a different disk partition than the original location. This prevents overwriting recoverable data that may still exist in the original location.
🎯How to Prevent File Loss
Prevention is always better than cure. Here are best practices for protecting your data security:
Follow the 3-2-1 Golden Backup Rule
Use Hasleo Backup Suite to regularly and automatically create system backups, and store backups on external hard drives or cloud. Follow the 3-2-1 backup rule: keep three copies of data, use two different media types, and store one copy off-site.
Keep System and Security Software Updated
Regularly update Windows operating system and antivirus software to guard against the latest virus and malware threats.
Safely Eject External Storage Devices
After using USB drives, external hard drives, and other external devices, be sure to properly eject them using the "Safely Remove Hardware" function in the system tray to avoid data corruption.
Avoid Using Computer Under Unstable Power
Sudden power outages may cause file system corruption. Using UPS (Uninterruptible Power Supply) can effectively protect your data security.
Regularly Check Hard Drive Health Status
Use tools like CrystalDiskInfo to monitor hard drive health. If you notice bad sectors or other abnormal signs on your hard drive, replace with a new hard drive promptly.
Be Cautious When Downloading and Installing Software
Only download software from official and trusted sources, and avoid installing programs from unknown sources to reduce malware infection risks.
🔥Frequently Asked Questions (FAQ)
A: This issue can be caused by hidden files and folders, viruses or malware hiding your files, file system corruption, user permission issues, or partition table corruption. The files may still exist on the drive but are not displayed due to these underlying issues.
A: Yes, in most cases you can recover these files. First, try showing hidden files and folders in File Explorer. If that doesn't work, use command prompt to remove hidden attributes. As a last resort, use data recovery software like Hasleo Data Recovery with deep scan to recover lost files.
A: Not necessarily. Most of the time, files are not actually deleted but are hidden due to settings, viruses, or file system errors. Only in severe cases of file system corruption would the data actually be lost. Try the recovery methods in this guide before assuming data is lost.
A: Follow the 3-2-1 backup rule: keep three copies of data, use two different media types, and store one copy off-site. Also keep your system and antivirus software updated, safely eject external storage devices, and regularly check hard drive health status.
A: Yes, viruses and malware are common causes of this issue. Some malicious software hides your files to make them invisible while consuming storage space. Ransomware is especially dangerous as it may encrypt your files. Run a full system scan and use anti-malware tools to remove threats.
Conclusion
Hard drive showing space used but files not visible is a troubling problem, but through the methods introduced in this tutorial, you can recover missing files in most cases. From simple hidden file display settings, to using Hasleo Data Recovery for deep scanning, these solutions cover various possible causes.
Please remember that data recovery success rate is closely related to how promptly you take action. Once you discover files are missing, please immediately stop write operations to the hard drive and try to recover as soon as possible. The earlier you take action, the greater the chance of successful recovery. Additionally, developing good data backup habits is the best strategy for preventing data loss. Regularly backing up your important files ensures that even in the worst-case scenario, your data remains protected.


