
- Advantages and considerations of migrating non-system files from SSD to HDD?
- Best Windows backup software—Hasleo Backup Suite
- How to Move non-system Files from SSD to HDD to Free Up Space?
- Frequently Asked Questions
- Summary
When your solid-state drive (SSD) is running low on space but you want to maintain system speed, you can keep the operating system and frequently used programmes on the SSD, while moving large files and infrequently accessed non-system files to a hard disk drive (HDD). This guide will provide step-by-step instructions on how to safely migrate non-system files from the SSD to the HDD, precisely freeing up SSD space without affecting core system files, helping you achieve the best balance between speed and storage capacity.
Advantages and considerations of migrating non-system files from SSD to HDD?
Migrating documents, photos, videos and other non-system files from SSD to HDD not only frees up SSD space and improves data management efficiency, but also brings the following significant advantages:
- Cost and Capacity Optimization: Given the higher unit cost of SSDs, allocate them for the OS and frequent applications. Use high-capacity HDDs for bulk, archival data, achieving an optimal balance of performance and storage economics.
- System Performance Balance: Keeping the system and commonly used software on the SSD ensures fast booting and smooth operation. Meanwhile, transferring large files on the HDD helps reduce the read and write load on the SSD, lowering system latency.
- SSD Lifespan Extension: SSDs have a limited write lifespan. Migrating frequently written files (such as temporary downloads and system caches) to the HDD can effectively reduce SSD wear and extend its usage time.
Before performing the migration operation, please review the following points carefully to prevent data loss or software issues caused by operational mistakes.
- Check Available Disk Space: Press the "Win + E" keys to open File Explorer, navigate to "This PC", and check whether the remaining space on the HDD is sufficient to accommodate the data to be migrated. If the HDD is new and shows as "Not Initialized" in Disk Management, right-click it and select "Initialize Disk".
- Select Content for Migration: It is recommended to migrate files that do not affect system performance and take up a lot of space, such as documents, photos, videos, music, and compressed files. After moving them, organize the files into appropriate folders for easier management.
- Avoid Migrating System Files: Do not manually migrate important files from the C: such as Windows Files, Program Files, Program Files (x86), AppData and others. These are usually tied to the OS and applications; moving them may cause program damage or boot issues. Keep them on the SSD.
- Create a System Backup: Before performing any major operation, it is recommended to create a full system backup. This allows you to quickly restore the computer to its pre-migration state in case of any issues, effectively safeguarding both data and system security.
Best Windows backup software—Hasleo Backup Suite
It is recommended to use professional backup tools, such as the efficient and user-friendly Hasleo Backup Suite. This solution can safely back up the system, disks/partitions, and files/folders to a specified location. It offers an intuitive graphical interface with clear operation instructions, making backup, restore and clone operations simple and convenient. In addition, it also has the following notable features:
- Comprehensive and powerful: Its backup and restore features let you create system images effortlessly and recover from crashes instantly, while the cloning function promotes seamless data migration.
- Advanced technology and excellent performance: Compatible with all Windows PCs and servers, it supports Windows x86/x64 and ARM64 architectures. It boots in both UEFI and Legacy BIOS modes, ensures safe and stable program running, and operates with high efficiency and low power consumption.
- Multiple backup modes: It supports full, incremental and differential backups. Following an initial full backup, both incremental and differential backups save time and storage space by only copying the data that has changed.
- Features compression and encryption: It allows you to compress backup images to save disk space and encrypt them to protect your important data.
- Practical Toolbox: Here you can access advanced features like creating a WinPE emergency disk, merging backup images, and securely wiping disks.
- Intuitive and user-friendly interface: The interface design is clear, with the main functions immediately obvious, and guided prompts allow even beginners to get started quickly.
How to Move non-system Files from SSD to HDD to Free Up Space?
The following are the steps to move non-system files from SSD to HDD, divided into four parts: new HDD initialization (optional), system backup, system settings migration, and file migration.
1. Initialize the New HDD
Step 1. Install the HDD into your computer (ensure your laptop supports dual drives) and power on. In Windows, right-click the Start menu and select Disk Management.
Step 2. If the new HDD is listed as "Not Initialized", right-click it, select "Initialise Disk", and choose GPT or MBR as your required partition style.
Step 3. Right-click on the unallocated space, select "New Simple Volume", and follow the on-screen wizard to set up the partition.
* Tips: If the hard drive is not new (pre-used) and contains existing data, you can typically skip the initialization part.
2. Create a System Backup
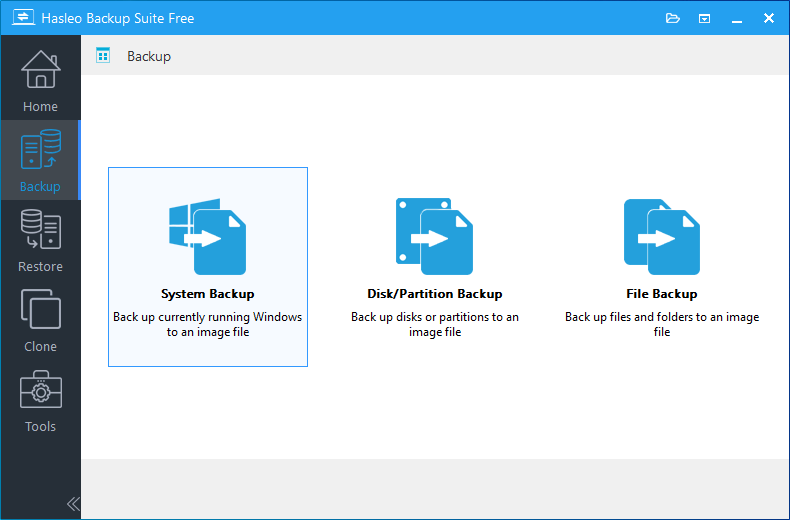
Step 1. Download, install and run Hasleo Backup Suite. Click the "Backup" button in the navigation bar, then select "System Backup" from the action area.
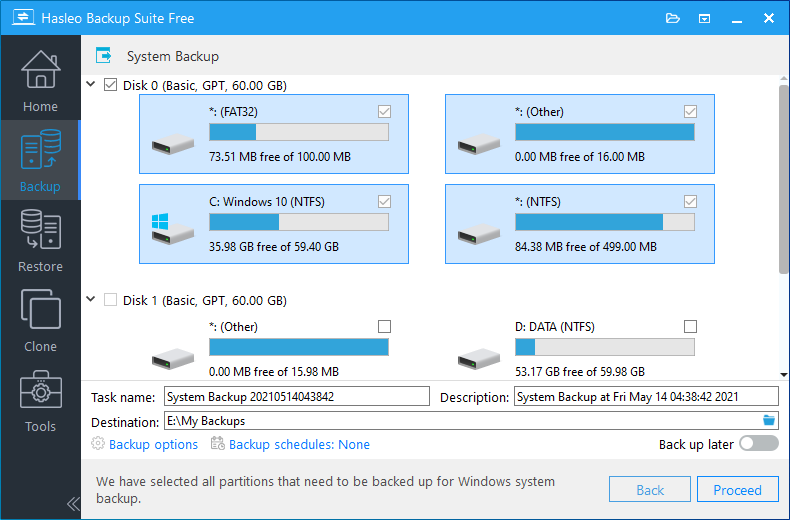
Step 2. Hasleo Backup Suite Free will automatically select all partitions required for Windows system backup. Customize the task name, description, and backup options according to your needs. Simply customize the task name and description, configure the backup options as needed, specify your HDD as the destination. and then click the "Continue" button.
* Tips:
- Task name: Specify a task name so that you can quickly find and manage your backup task later.
- Description: Briefly describe the purpose of the task and any other relevant information.
- Destination: Modify the destination path where the backup image files will be stored by clicking the folder icon.
- Backup options: Advanced backup settings. For more details, please refer to Backup options.
- Backup schedule: Set up backup schedules to automatically perform your backup tasks on a regular basis. For more details, please refer to Backup schedule.
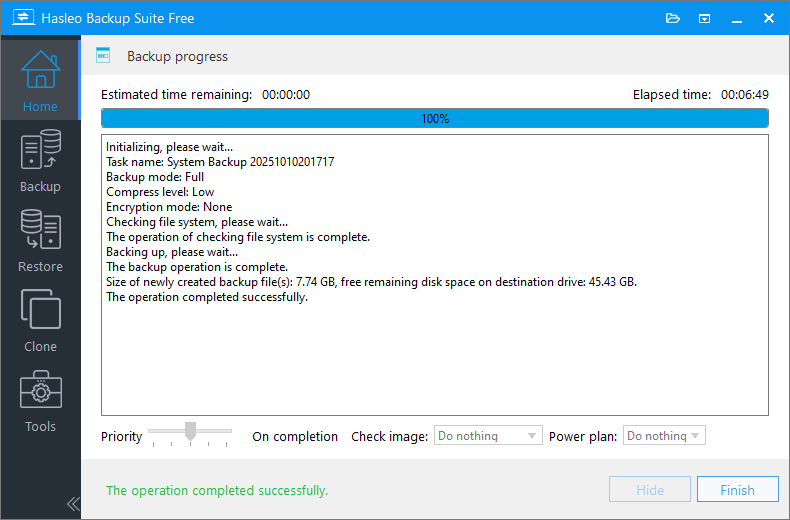
Step 3. After clicking the "Continue" button, Hasleo Backup Suite will begin backing up your Windows operating system to the HDD. Note that the duration depends on the amount of data, so please wait patiently.
* Tips:
- Priority: Specify a priority for the backup process. A higher priority allocates more CPU time to the backup, which may cause other programs to run slower.
- Check image: Verify the integrity of the backup image files upon completion of the backup process.
- Power plan: Perform the power management action after the backup is complete.
3. Migrate System Settings
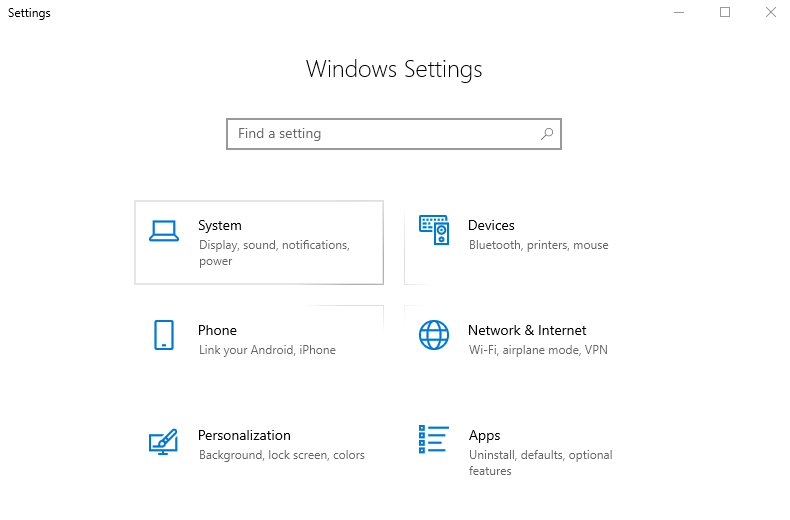
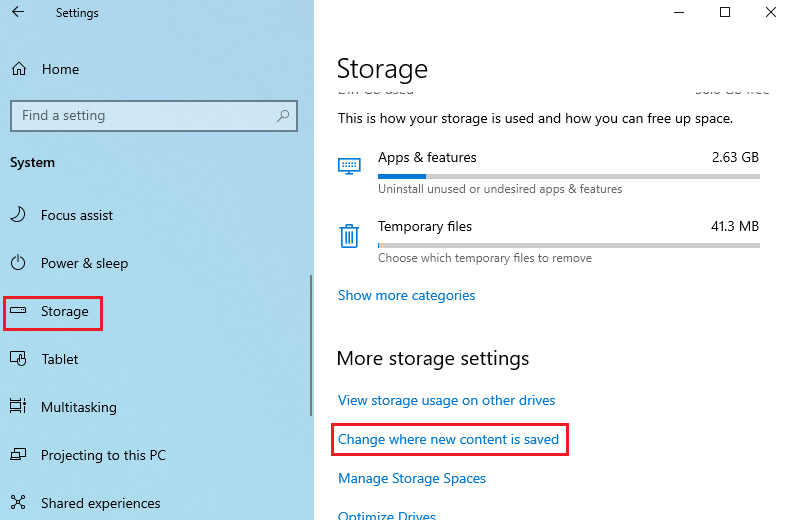
Step 1. Press the "Win + I" keys to open Windows Settings. Select "System", then click "Storage" in the left-hand navigation bar.
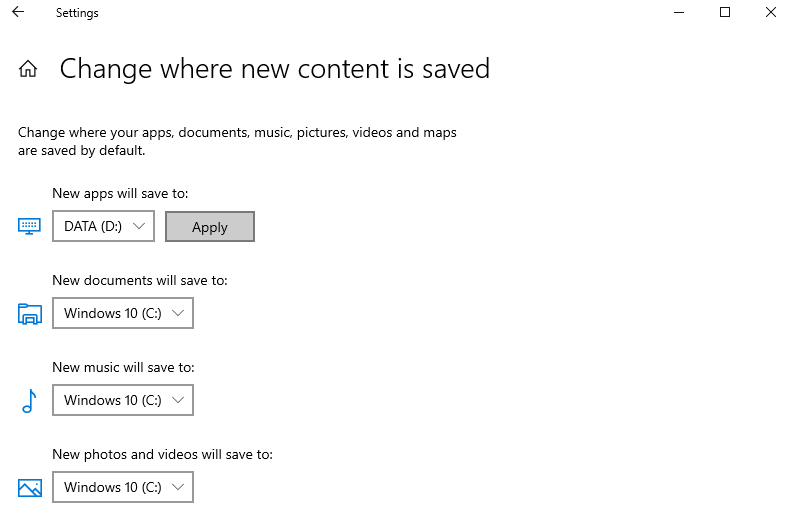
Step 2. Click "Change where new content is saved". Under each category (like New apps, New documents), set the default save location from drive C: to your new HDD.
Step 3. Click "Apply". Note: This only changes the default for future files and does not move existing data.
4. Transfer Files
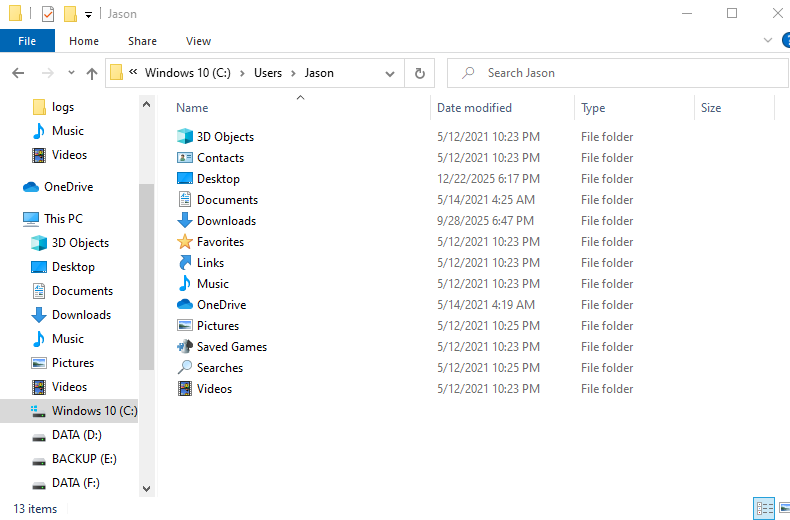
Step 1. Create the target folders on your HDD. Press the "Win + E" keys to open File Explorer, and navigate to C:\Users\YourUsername.
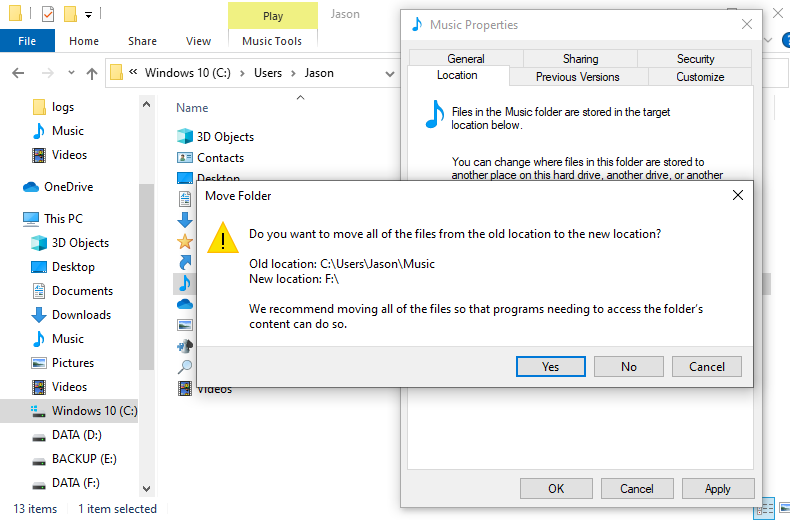
Step 2. Right-click the folder you want to transfer, select "Properties", and go to the "Location" tab. You will see the current path. Click "Move" and choose the destination folder you created on the HDD. Click "OK".
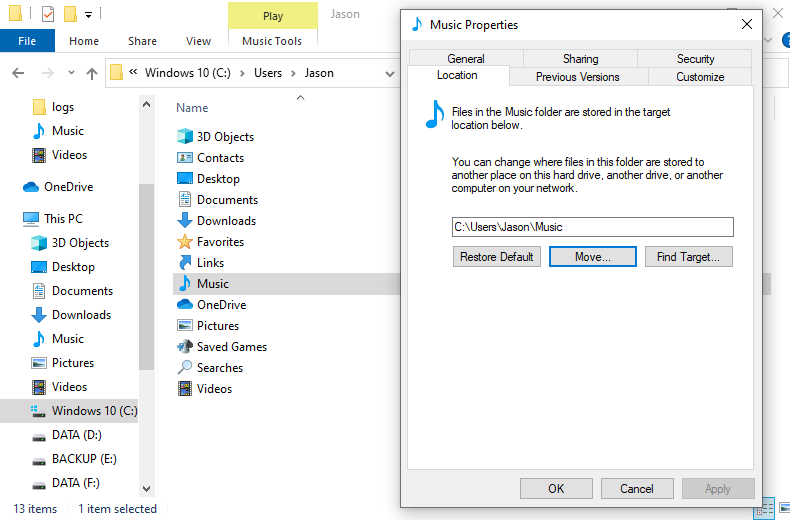
Step 3. When prompted by the system whether to move the original files to the new location, select "Yes". The system will automatically move the files and redirect all program access requests for that folder to the new path.
Frequently Asked Questions
A: Yes, moving large files like videos and archives to HDD frees up SSD space while maintaining fast system performance.
A: Move documents, photos, videos, music, downloads, and archived files. Keep OS and programs on SSD.
A: Using Windows Location tab to move folders keeps programs working. Don't manually move Program Files.
A: Yes, Downloads often contains large files. Move it to HDD to free significant SSD space.
A: Freeing SSD space can improve performance. Keep OS and apps on SSD for best speed.
A: Yes, create a system backup before major changes. This protects against boot issues.
A: Games will load slower on HDD. For best gaming performance, keep games on SSD.
A: No, Windows Storage settings only change where NEW files are saved. Move existing files manually.
Summary
By following the steps above, you can smoothly move non-system files from your SSD to your HDD. This not only frees up valuable SSD space but also helps maintain optimal computer performance and responsiveness. A crucial preparatory step is to back up your system beforehand to prevent potential data loss or boot issues from errors. Using Hasleo Backup Suite to safely and completely back up the system to the HDD can provide reliable security for the entire process.
Hasleo Backup Suite goes beyond core backup and restore, offering advanced features like Delta Clone and WinPE emergency disk creation. This makes it a comprehensive data protection solution designed to fully safeguard your data security.
Related Articles
- How to Merge/Delete Old Backup Files using Hasleo Backup Suite Free?
- How to backup and restore Windows 11 for free?
- How to Compress Backup Files using Hasleo Backup Suite Free?
- How to set up a schedule to automatically back up Windows Server?
- How to Restore Your System From Full/Incremental/Differential Backups?


