

- Advantages of migrating the system from HDD to SSD
- Best Windows backup and cloning software—Hasleo Backup Suite
- How to Clone Windows from HDD to SSD Using Hasleo Backup Suite?
- How to verify the system boots from the SSD
- Troubleshooting common cloning issues
- Frequently Asked Questions
- Conclusion
If your computer has both an HDD and an SSD, you can migrate your system to the SSD to experience faster boot and running speeds. Meanwhile, the original HDD can still serve as a high-capacity storage drive, balancing data storage and cost-effectiveness. This classic storage solution achieves an excellent balance between performance, cost and user experience, making it highly cost-effective for the vast majority of users.
This tutorial covers everything you need for a safe HDD-to-SSD migration with Hasleo Backup Suite: why the upgrade is worth it, what to prepare beforehand, a step-by-step cloning guide, how to confirm the clone succeeded, and how to resolve common issues.
Advantages of migrating the system from HDD to SSD
Migrating the operating system from a traditional mechanical hard drive (HDD) to a solid-state drive (SSD) is far more than a simple data transfer. It represents a comprehensive overhaul of the computer experience, with its core advantages reflected in several aspects:
Enhanced performance and experience
With extremely high random I/O speeds, SSDs enable OS boot within seconds, instant wake-up from sleep mode, significantly reduced application load times, noticeably fewer lags, and an overall smoother user experience.
Perfect balance between cost and capacity
SSDs ensure smooth system performance, while HDDs provide massive storage space. A moderate-sized SSD hosts the OS and core applications for speed, while the same budget can get a larger capacity HDD, effectively controlling costs while significantly expanding overall storage capacity.
Optimized storage lifespan and management
Offloading OS and software I/O (frequent small writes, temp files) to the SSD reduces HDD wear from frequent start-stop cycles and fragmentation, significantly extending its lifespan. Additionally, using a separate system drive and data drive strategy allows for formatting only the SSD system drive in case of a system failure, keeping personal data on a separate drive intact, greatly facilitating data backup and system recovery processes.
Reduced noise and power consumption
SSDs operate completely silently since there are no mechanical components involved, reducing system noise during operation. Moreover, SSDs generally consume less power than HDDs, which is particularly advantageous for laptops and other mobile devices, helping to prolong battery life.
HDD vs SSD at a glance.
| Feature | HDD (Mechanical) | SSD (Solid-State) |
|---|---|---|
| Random read/write speed | Low (~1–2 MB/s) | High (SATA ~50MB/s, NVMe ~80-100MB/s) |
| Typical Windows cold boot time | 30–60 seconds | 3–10 seconds (NVMe) |
| Application launch & wake from sleep | Slow | Near-instant |
| Noise and vibration | Mechanical noise | Completely silent |
| Power consumption | Higher (shorter battery life) | Lower (better for laptops) |
| Price per GB | Lower | Higher |
Best Windows backup and cloning software—Hasleo Backup Suite
Hasleo Backup Suite is a professional backup and cloning software that provides comprehensive data protection for systems, disk partitions, and files and folders. It can not only perform backup and restore of Windows systems, disk partitions, and various files, but also achieve complete cloning of systems, disks, and partitions. As an all-in-one solution integrating backup, restore, and cloning, Hasleo Backup Suite helps users easily tackle diverse data protection tasks with its features of safety, reliability, stable operation, and high efficiency. Regarding the cloning function, it offers the following notable advantages:
- Supports system, disk, and partition cloning with extremely fast speed.
- Provides various disk alignment modes and allows adjusting the size of the target partition.
- Supports Delta clone and sector-by-sector cloning of disks and partitions.
- Supports MBR to GPT or GPT to MBR conversion during the cloning process.
- Compatible with all storage drive types, such as IDE, SATA, SCSI, USB and NVMe.
- Supports running on Windows Vista/Server 2008 and later (both 32-bit and 64-bit architectures).
System Clone vs Disk Clone vs Partition Clone: Which one should you use?
Hasleo Backup Suite provides three cloning modes. Choosing the right one saves time and target-disk space:
| Mode | What it copies | Best for | Time / space |
|---|---|---|---|
| System Clone | Only the partitions required to boot Windows (EFI System / System Reserved, C: and Recovery) | Migrating Windows from HDD to SSD | Fast; small capacity requirement |
| Disk Clone | Every partition on the whole source disk | Replacing an entire disk, including all data partitions | Medium; target must hold the full disk contents |
| Partition Clone | One single partition | Copying a specific partition | Selective |
In this tutorial we use System Clone, which automatically selects only the partitions Windows needs to boot. This is the fastest way to move your OS to an SSD and leaves your old HDD free to keep working as a data drive.
How to Clone Windows from HDD to SSD Using Hasleo Backup Suite?
Quick pre-migration checklist
1. The SSD is installed correctly and recognized by Windows (initialize a brand-new drive in Disk Management first).
2. The used space on the current system partition is smaller than the SSD's total capacity.
3. A full system backup plus a separate backup of your personal data has been created.
4. The SSD contains no important data — everything on the destination drive will be overwritten.
5. You have 15–30 minutes of uninterrupted time for the cloning process (longer for very large systems).
Below is the step-by-step guide for migrating Windows from an HDD to an SSD, mainly divided into four parts: system cloning, changing the BIOS boot order, formatting the HDD as a data disk, and optimization settings.
1. Clone System
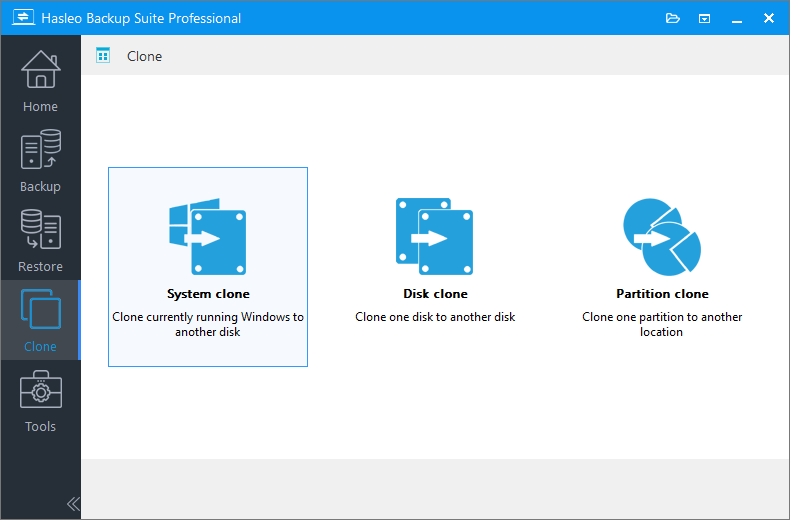
Step 1. Properly install the SSD and ensure your system can recognize this device. Download, install, and run the Hasleo Backup Suite Home/Professional/Server/Enterprise edition. Then, click the "Clone" button in the navigation bar, then click "System Clone" in the operation area.
2. The SSD installation guide for desktop computers and laptops (dual hard drive bays) can be referenced at this link.
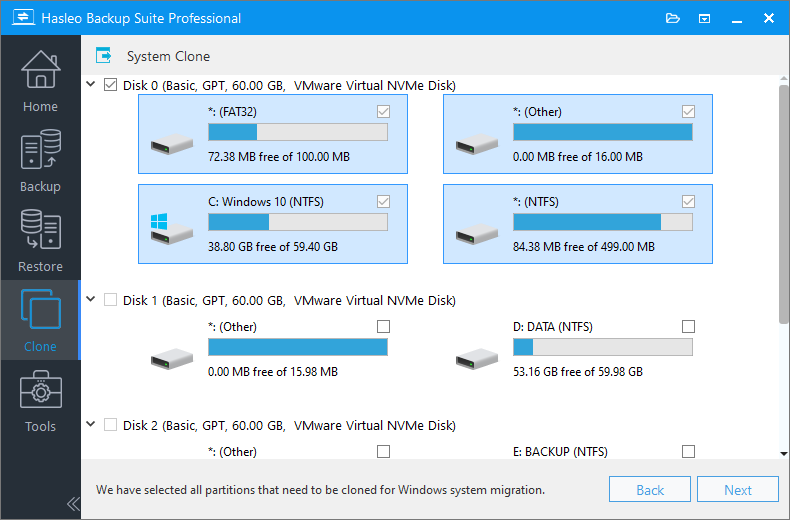
Step 2. Hasleo Backup Suite will automatically select all partitions required for cloning the Windows system. Then, click "Next" to continue.
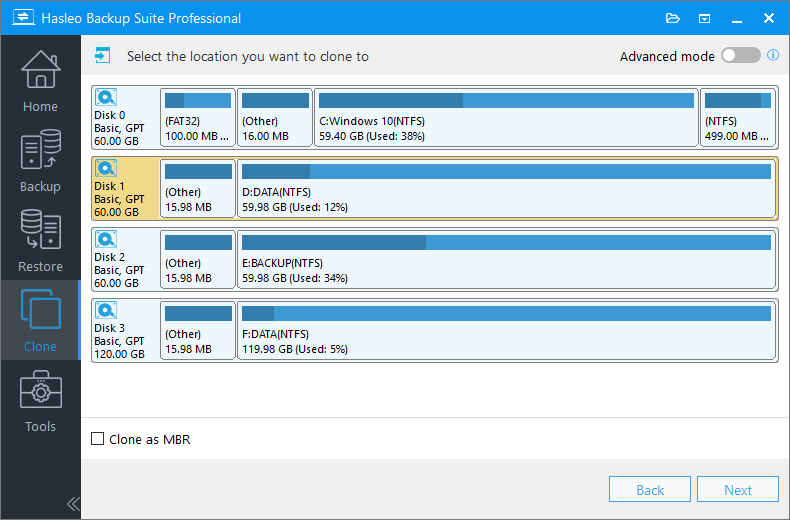
Step 3. Select the SSD as the target disk, then click "Next".
Step 4. Adjust the partition size and location as needed, then click "Proceed".
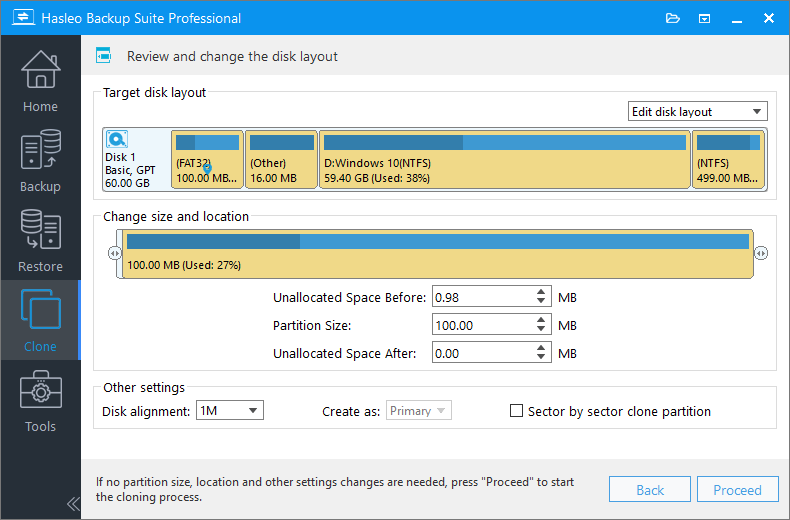
4K: This option ensures the starting sector of every partition is aligned on a 4K bytes, which is very important for the best performance of an SSD.
Cylinder: Ensure the starting sector of each destination partition always starts at the beginning of a cylinder. Windows XP and previous OSs use this alignment mode.
None: The start sector of the destination partitions is not aligned.
Sector by sector clone partition: This option copies every sector from the source partition to the destination partition, including unused sectors.
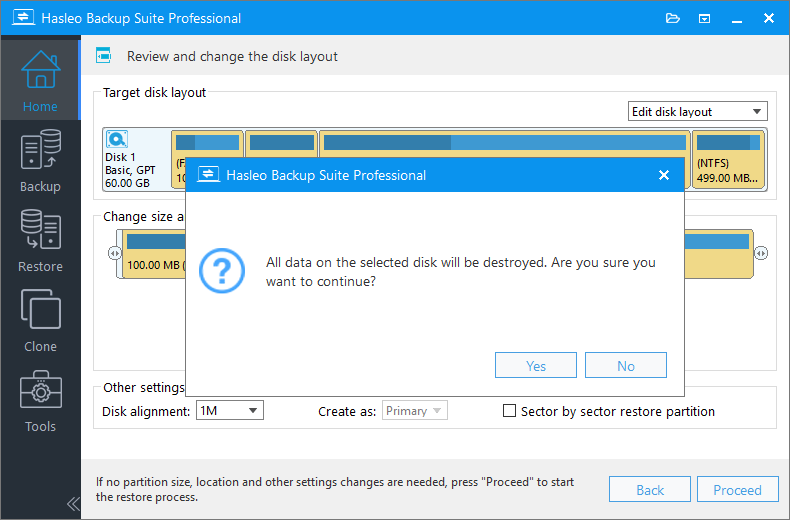
Step 5. A warning message will appear, telling that all data on the destination drive will be destroyed. If the destination disk contains no important data, click "Yes" to continue.
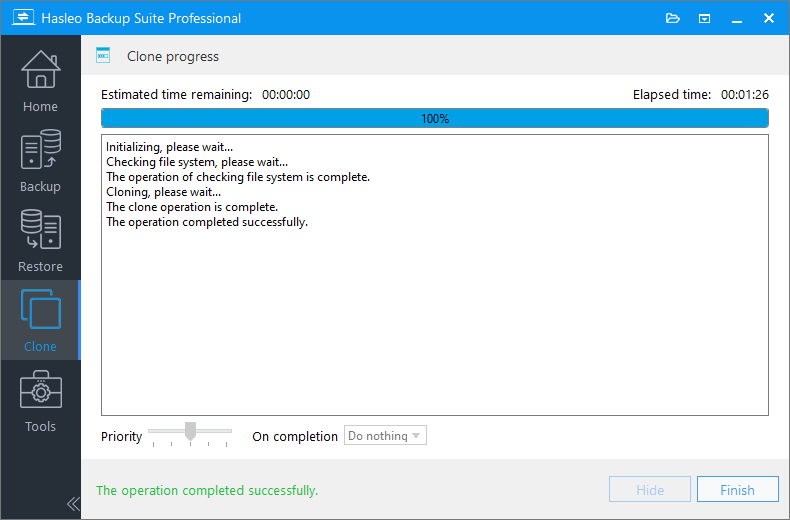
Step 6. Hasleo Backup Suite is now cloning your Windows system from the HDD to the SSD. This process will take some time, please be patient. When finished, you'll need to shut down the computer.
2. Change the BIOS Boot Order
Step 1. After turning on the computer, immediately press the F2/Del/F10/Esc keys repeatedly to enter the UEFI/BIOS interface.
Step 2. Navigate to the "Boot" tab and set the SSD as the first boot option. Save the changes, and exit.
Step 3. Following the migration process, the system will automatically restart and boot from the SSD. A significant improvement in boot speed and application performance will be observed. To verify successful boot from the SSD, confirm that the system drive (typically C:) properties display the correct capacity corresponding to the SSD. This can be done by right-clicking the drive in "This PC" and selecting "Properties". Alternatively, the drive model can be checked in Disk Management.
3. Format the HDD as a Data Disk
Before performing this operation, it is important that you create a full system backup. Additionally, ensure all critical personal data stored on the HDD is backed up separately. These steps are essential to avoid data loss due to accidental operations.
Step 1. After confirming that the system boots from the SSD and all files are correct, right-click the "Start" menu and open "Disk Management". In the disk list, you can distinguish SSDs from HDDs based on disk capacity and partitions marked as "Healthy (Boot, Page File, etc.)".
Step 2. Identify the original EFI System Partition, Recovery Partition, and other partitions related to the operating system on the HDD. Carefully right-click on these partitions and select the "Delete Volume". Keep your data partitions (e.g., D: drive). After deletion, the space will become separate blocks of "Unallocated" space.
Step 3. According to your needs, merge the unallocated space, format it as a new volume, and assign a drive letter. Now your HDD is available as a data disk for storing documents, videos, and various types of files.
4. Optimize Settings
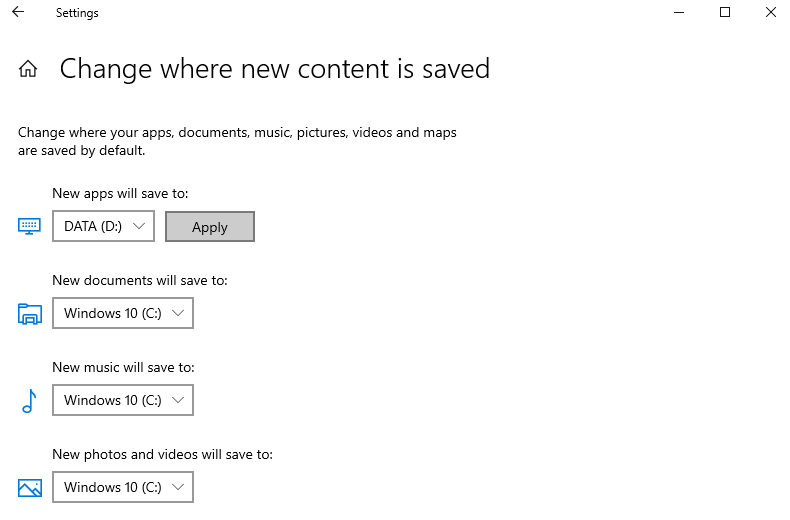
Step 1. Press the "Win + I" keys to open the Windows Settings, select "System", then click "Storage" in the left navigation pane. Find and click on "Change where new content is saved", then change the default save locations for folders like "Documents", "Music", "Videos" to HDD. Click "Apply" to save the changes.
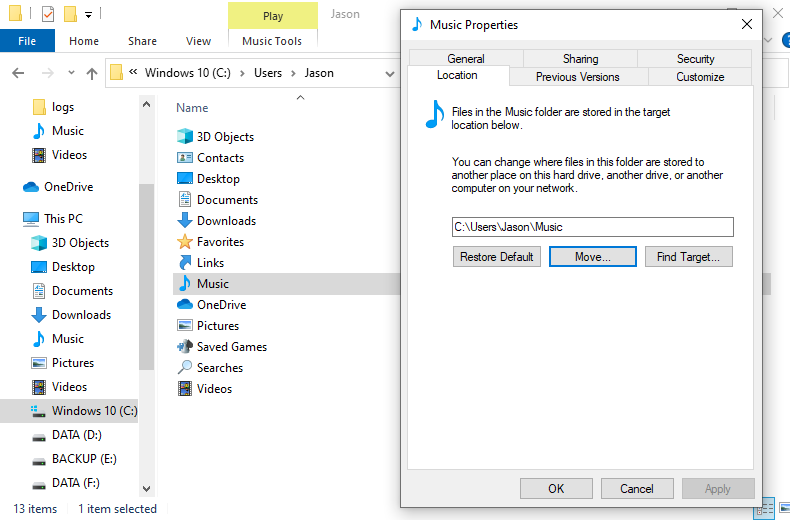
Step 2. Press the "Win + E" keys to open File Explorer, go to the path "C:\Users\YourUsername". Right-click on the library folders such as "Documents", "Downloads", "Pictures" inside the user folder. Then, select "Properties", click "Move" in the "Location" tab, and change their default storage location to the HDD. This can prevent everyday files from occupying SSD space and help maintain the performance and sufficient capacity of the system drive.
Step 3. When installing new software, it is recommended to choose a partition on the HDD data drive, especially for large software.
How to Verify the System Boots from the SSD
After restarting, take a moment to confirm the migration was successful before making any changes to the old HDD.
1. Confirm the SSD is the boot drive
Open Disk Management (right-click Start > Disk Management) and check that the drive marked "Healthy (Boot, Page File, Crash Dump, Primary Partition)" shows the correct SSD capacity and model. Alternatively, open File Explorer, right-click C: > Properties, and compare the displayed capacity with your SSD. If they match, Windows is now running from the SSD.
2. Check 4K alignment
Press Win+R, type msinfo32 and press Enter. Navigate to Components > Storage > Disks and read the "Partition Starting Offset" of each SSD partition. If every offset is divisible by 4096, the partition is 4K-aligned. Hasleo Backup Suite applies the 1M alignment mode by default, which is always 4K-aligned and recommended for best SSD performance.
3. Make sure TRIM is enabled
Open Command Prompt as administrator and run: fsutil behavior query DisableDeleteNotify. A result of 0 means TRIM is enabled and Windows will keep the SSD performing well. If it shows 1, run fsutil behavior set DisableDeleteNotify 0 and restart. You can also open "Optimize Drives" to review the SSD's trim status.
4. Run the SSD for a few days before touching the HDD
Keep both drives connected for a few days to ensure everything works properly. Once you're fully confident, reclaim the old HDD as storage by following the appropriate formatting steps.
Troubleshooting: Common HDD-to-SSD Cloning Issues
The SSD is not detected in the cloning software
Make sure the SSD is properly connected (SATA data and power cables, or a secure NVMe slot) and that the system recognizes it in BIOS and Disk Management. A brand-new drive must be initialized first: right-click Start > Disk Management, right-click the disk, choose "Initialize Disk", and then run System Clone.
The computer still boots from the HDD
The clone was most likely successful, but the BIOS boot order still lists the HDD first. Restart, press F2/Del/F10/Esc to enter UEFI/BIOS, open the Boot tab and set the SSD as the first boot option. You can also use the one-time boot menu key (often F11/F12) to boot from the SSD without changing the default order.
"No bootable device" appears after cloning
This usually means a boot-mode mismatch between the source and target disks. Windows installed in UEFI mode boots from a GPT disk, while legacy BIOS boot requires an MBR disk. Hasleo Backup Suite can convert MBR to GPT or GPT to MBR during cloning. Make the SSD's partition style match your BIOS boot mode, and disable CSM/Legacy mode if you use pure UEFI.
The target SSD is smaller than the source HDD
You can still clone as long as the used space on the system partition fits on the SSD. Use System Clone, which copies only the Windows boot partitions instead of the whole disk, and adjust the target partition size in Step 4. If the used space is still too large, clean temporary files or move large personal files to the HDD first.
Windows asks for activation or a BitLocker recovery key after boot
Activation is normally tied to the hardware (mainly the motherboard), so most users stay activated after cloning. If prompted, sign in with your Microsoft account or re-enter your product key. If your system was BitLocker-encrypted, the clone copies the encryption as-is, so have your BitLocker recovery key ready before you boot from the SSD for the first time.
Frequently Asked Questions
A: Using professional cloning software like Hasleo Backup Suite is the most reliable method. It supports system-only cloning, which automatically selects only the partitions required for Windows to boot, saving time and target disk space.
A: The cloning time depends on the amount of data on your HDD and the speed of both the source and target drives. On average, it takes 15-30 minutes for a 256GB system, and longer for larger capacities. Using SSD as both source and target will significantly speed up the process.
A: No, you don't need to reinstall programs. System cloning copies everything including installed software, settings, and drivers to the SSD, so your system will work exactly as before after the migration.
A: Restart your computer and press F2/Del/F10/Esc (depending on your motherboard) to enter UEFI/BIOS. Navigate to the Boot tab, set your SSD as the first boot priority, save settings, and exit. Your system will now boot from the SSD.
A: Your SSD should be at least equal to the used space on your current system drive (usually C:). If your Windows installation uses 150GB, a 256GB SSD is the minimum recommended. For better performance and longevity, a larger capacity SSD (500GB or more) is recommended.
A: Cloning your system to an SSD does not void your computer's warranty and is a standard upgrade procedure. It does not modify the original system on your HDD unless you choose to format it. Just ensure you follow proper procedures and back up your data before proceeding.
A: Yes. The clone copies the encrypted partitions as-is. After the first boot from the SSD, Windows will ask for your BitLocker recovery key, so keep it accessible before starting the migration. After booting, you can manage BitLocker normally in the Control Panel.
A: In most cases yes, because activation is tied to the hardware (mainly the motherboard) rather than the storage drive. If Windows asks for activation after the migration, sign in with your Microsoft account or choose "Change product key" under Activation settings and enter your existing license key.
Conclusion
Following the steps above, Hasleo Backup Suite enables a seamless system migration from your HDD to an SSD. This setup allows you to boot and run applications from the high-speed SSD, while utilizing the larger HDD for data storage—combining optimal performance with enough capacity.
As professional backup and cloning software, Hasleo Backup Suite delivers comprehensive data protection. Beyond essential compression and encryption for image files, it offers advanced capabilities like Delta Clone and Delta Restore. Experience the security and convenience of a professional-grade tool — download now to safeguard your data.
Related Articles
- How to Merge/Delete Old Backup Files using Hasleo Backup Suite Free?
- How to back up and restore Windows 11 for free?
- How to Compress Backup Files using Hasleo Backup Suite Free?
- How to set up a schedule to automatically back up Windows Server?
- How to Restore Your System From Full/Differential/Incremental Backups?


