
- Overview of Secure Hard Drive Erasure
- Using Hasleo Backup Suite to Wipe Hard Drive👑
- Other Hard Drive Erasure Methods
- Verification and Handling After Hard Drive Erasure
- Frequently Asked Questions
- Summary
In daily life and work, when we sell, lend, or dispose of old hard drives, we often think that deleting files or formatting the hard drive is sufficient. However, this is a common misconception: ordinary file deletion and quick formatting do not truly erase data. Through professional data recovery tools, these "deleted" photos, documents, and account passwords can still be easily recovered. To protect personal privacy and prevent data leaks, you must perform complete, irreversible data wiping before a hard drive leaves your control. This tutorial will introduce multiple methods to safely and completely wipe hard drive data, building the last line of defense for your digital assets.
Overview of Secure Hard Drive Erasure
In the digital age, protecting personal privacy data is becoming increasingly important. Many users believe that dragging files to the Recycle Bin and emptying it, or formatting the hard drive, will make data disappear forever. In reality, this understanding has serious security risks.
Is Regular Deletion and Formatting Really Safe?
- Regular Deletion: When you delete a file, the operating system simply marks the space occupied by the file as "reusable," but the file data itself still physically exists on the hard drive. Using professional data recovery software, you can easily recover these "deleted" files.
- Quick Format: Quick format only resets the file system (such as NTFS, FAT32) index table, deleting all file directory information. However, the actual data on the hard drive remains completely intact. Anyone using data recovery tools can scan and recover this data.
- Full Format (Windows example): Although this process checks for bad sectors, it usually does not overwrite existing data. After formatting is complete, the original data still sits on the disk waiting to be recovered.
🚨In short: As long as data is not physically overwritten by new content, it always exists and can be recovered at any time.
⚠️Tips: Before selling, giving away, repairing, or disposing of a computer, secure erasure is an indispensable step in protecting personal privacy. Especially for hard drives that have stored sensitive information (such as identity documents, financial data, business secrets), once they fall into the wrong hands, the consequences can be disastrous.
Common Scenarios for Hard Drive Erasure
Understanding the applicable scenarios for hard drive erasure helps you take correct measures to prevent data leak risks at key points in the hard drive lifecycle.
- Second-hand Trading: Before selling or transferring hard drives in second-hand markets, you must perform complete data erasure. Otherwise, buyers may easily obtain your personal information, account passwords, work documents, and other sensitive data through data recovery tools.
- Temporary Lending: When lending hard drives to others, you should perform data erasure both before lending and after return to ensure personal privacy is not accessed during the period when the device is out of your control.
- Disposal: When hard drives fail or reach end of life and need to be disposed of, simple deletion or formatting cannot prevent data recovery. At this point, secure erasure or direct physical destruction should be performed to eliminate information leaks.
- Enterprise Equipment Replacement: When enterprises replace office computers or servers, old hard drives must be securely erased to protect business secrets and customer data, meet compliance requirements, and avoid legal risks.
- Purpose Change: When moving hard drives from one computer to another, or converting from system drive to data drive, it is recommended to erase the original data first to avoid system conflicts or accidental leaks from old data.
- Privacy Protection: For hard drives that have stored highly sensitive data such as medical records, legal documents, and personal images, secure erasure must be performed before sharing, donating, or discarding to ensure privacy leaves no traces.
⭐Preparations Before Hard Drive Erasure
Hard drive erasure is an irreversible operation. Sufficient preparation ensures data security and smooth process.
- Backup and Verification: After confirming valuable data on the target drive, back it up to external storage. After backing up, be sure to physically disconnect the backup drive to prevent accidental erasure.
- Precise Identification: Confirm the target drive through three identifiers: model, capacity, and serial number. It is recommended that before operation, only keep the drive to be erased connected and remove other hard drives.
- Prepare Boot Media (For System Drive): If erasing the system drive, you need to create a WinPE bootable disk in advance (note that the creation process will erase all data on the USB drive), and set the UEFI/BIOS to boot from this media.
- Power Supply Guarantee: Erasure takes a long time. You must connect the power adapter (for laptops) or use UPS (for desktop computers) to prevent interruption of erasure or even hard drive damage caused by power outages.
Using Hasleo Backup Suite to Wipe Hard Drive👑
Hasleo Backup Suite is not only professional backup, restore, and cloning software, but also integrates multiple tools. Its "Wipe Drive" feature can safely and completely erase hard drive data. After erasure, data cannot be recovered, effectively protecting your privacy and security. In addition, Hasleo Backup Suite can also encrypt backup files to ensure your data security.
Method 1: Erase Non-System Drive (Such as Data Drive, External Hard Drive)
If the hard drive you want to erase does not have Windows installed, you can operate directly within Windows.
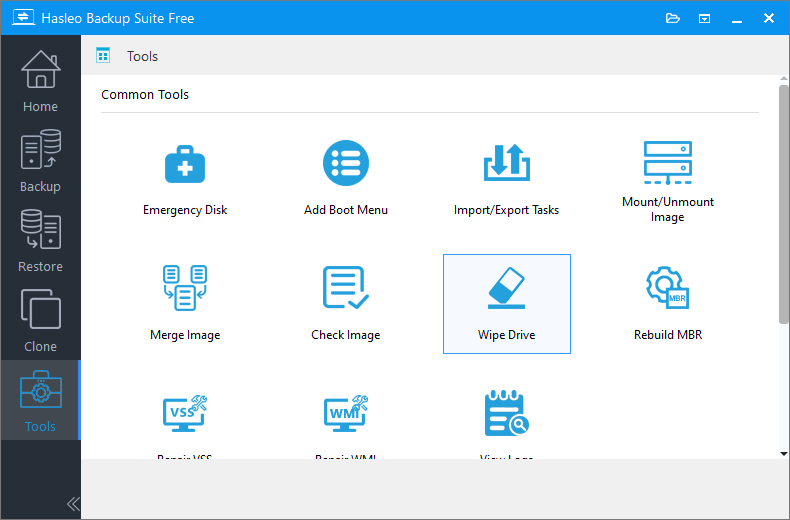
Step 1: Download, install and run Hasleo Backup Suite. Click the "Tools" button in the navigation bar, then select "Wipe Drive" in the operation area.
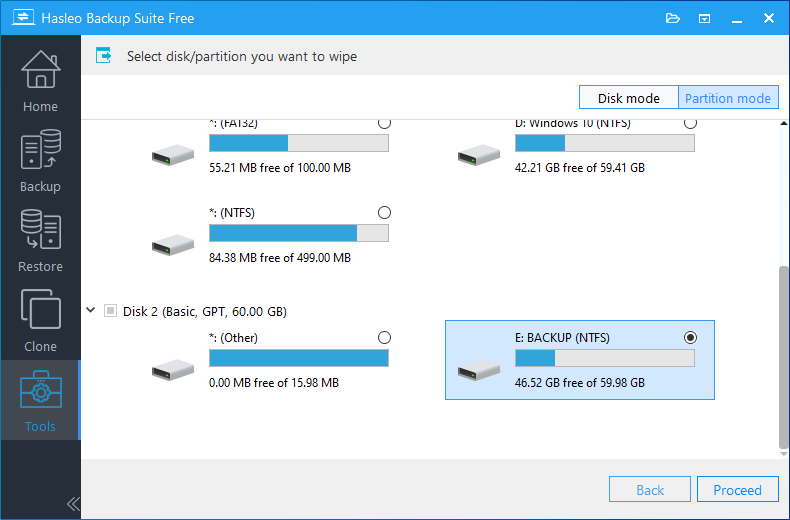
Step 2: In the popup window, you can see all available disks and partitions on the computer. Select the hard drive or partition you need to erase data from, then click the "Continue" button.
⚠️Tips:
- If you want to erase the entire hard drive, click "Disk Mode" in the upper right corner
- If you only want to erase a specific partition, select "Partition Mode"
- Be sure to carefully confirm the selected hard drive or partition - erasure is irreversible!
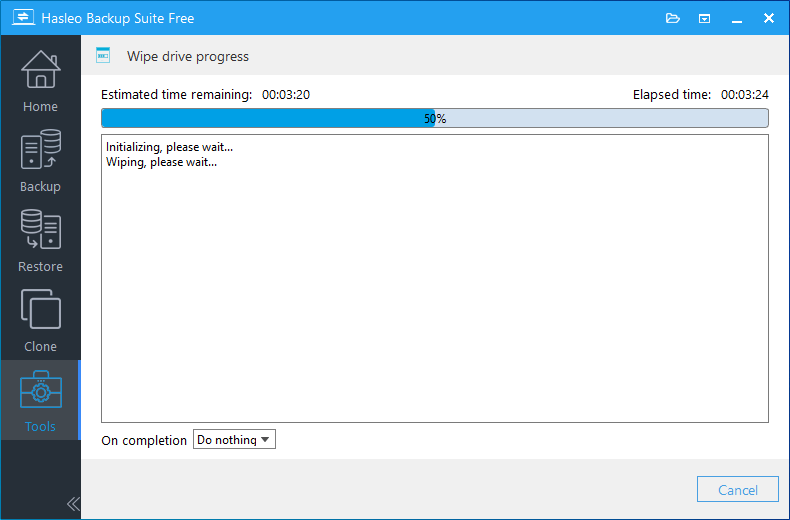
Step 3: After confirming the selection, Hasleo Backup Suite will start erasing the hard drive data. The time required depends on the hard drive capacity and erasure method. Please wait patiently until completion. Do not turn off the computer or interrupt the operation during this period. After erasure is complete, all data on the hard drive has been completely wiped and cannot be recovered by any data recovery tools.
Method 2: Wipe System Drive (Such as C: Drive)
If the hard drive you want to erase is the currently running Windows system drive (usually C: drive), you need to create a WinPE bootable disk to bypass system protection for operation.
Step 1: Use Hasleo Backup Suite to create a WinPE bootable disk. For detailed operations, please refer to the tutorial: How to Create Windows PE Bootable Disk.
Step 2: Insert the prepared USB drive into the computer, restart and enter UEFI/BIOS settings to set the USB drive as the first boot item. After saving, you can boot from the USB drive into the WinPE environment.
Step 3: Open Hasleo Backup Suite in the WinPE environment, then follow the steps in "Method 1" above to select and erase your original system drive.
💡Tips:
- After erasing the system drive, the hard drive will no longer boot any system. If you plan to sell or give away this hard drive, this is the correct way to protect personal privacy.
- If you plan to continue using this hard drive after erasure (for example, as a storage drive), you can re-create partitions and format it in the Disk Management tool to use it normally.
Other Hard Drive Erasure Methods
Method 3: Using Windows Disk Management Tool to Format
Windows system has built-in Disk Management tool that provides convenient formatting functions, suitable for basic hard drive cleaning, but not suitable for scenarios involving personal privacy or sensitive data.
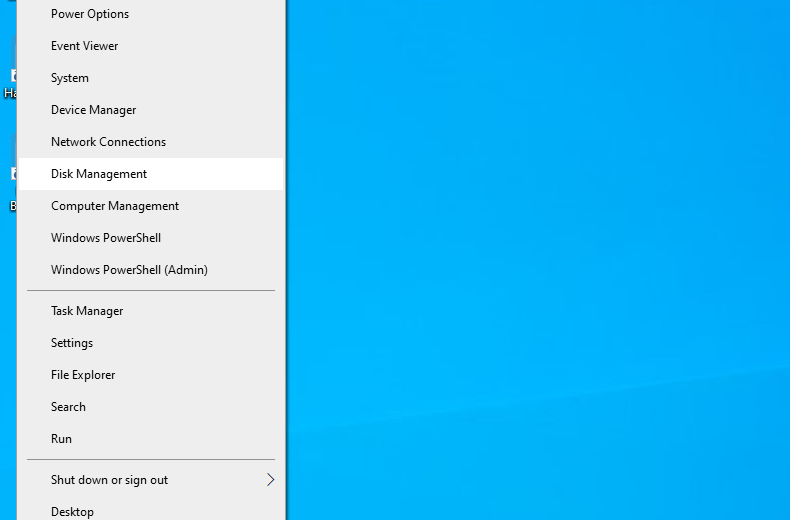
Step 1: Right-click the "Start" menu and select "Disk Management".
Step 2: In the Disk Management window, find the hard drive or partition you need to erase. Be sure to carefully check the drive letter and capacity before operation to avoid selecting the wrong one.
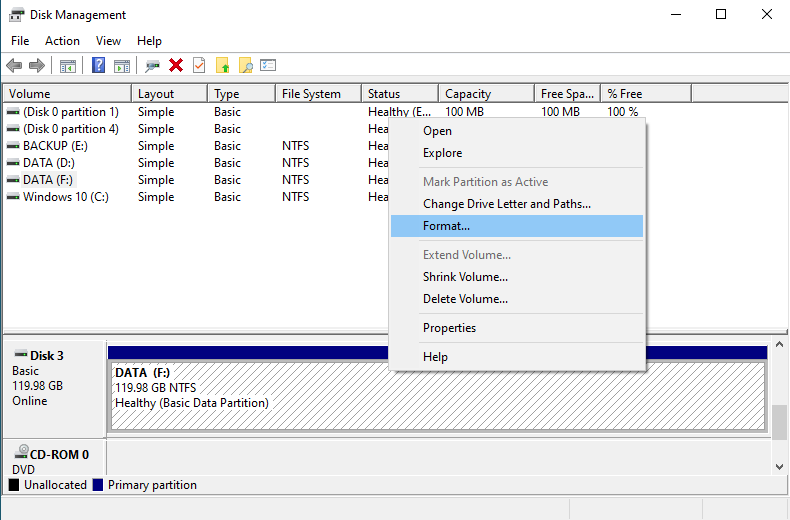
Step 3: Right-click the partition to format and select "Format".
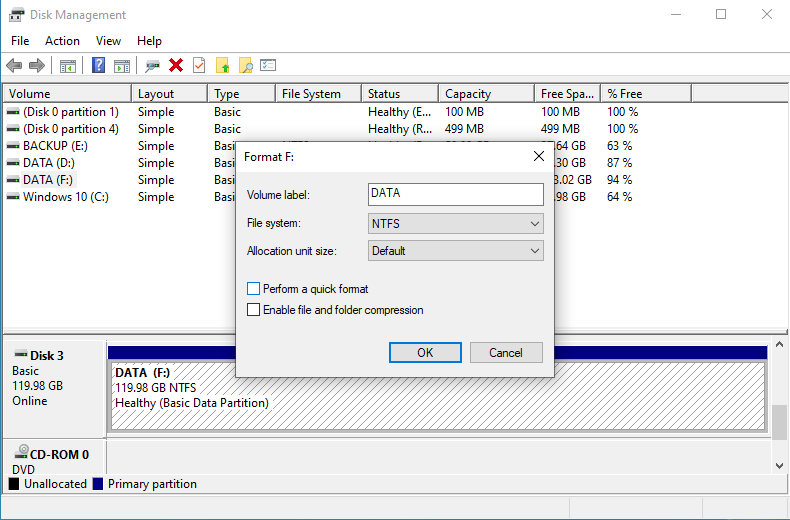
Step 4: In the format dialog, set the file system (NTFS is recommended), allocation unit size, enter the volume label, then uncheck "Perform a quick format" (if you need more thorough formatting).
Step 5: Click "OK". After confirming again in the warning prompt, formatting will start. The entire process may take a long time depending on the hard drive capacity and type.
⚠️Tips: Quick format only deletes file indexes - data can still be recovered; full format is more thorough but data can still possibly be recovered by professional tools. This method is only suitable for scenarios not involving sensitive data.
Method 4: Using diskpart Command for Thorough Erasure
diskpart is a Windows built-in disk management command-line tool that can perform more thorough disk erasure operations than regular formatting.
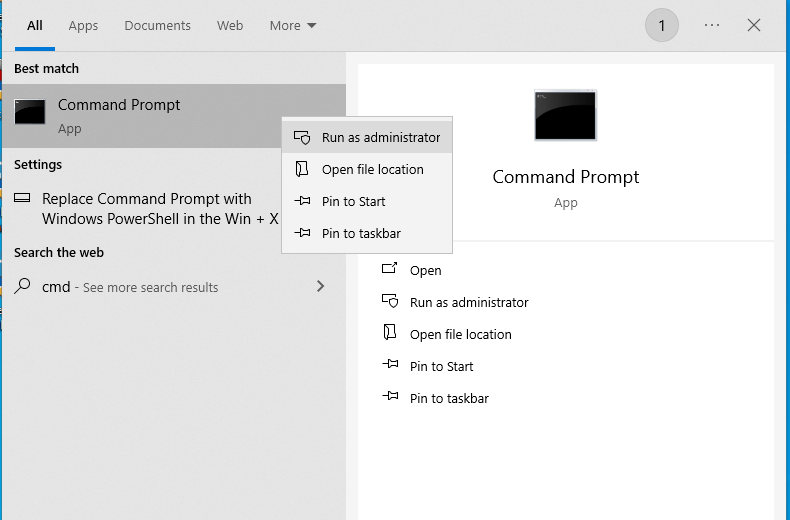
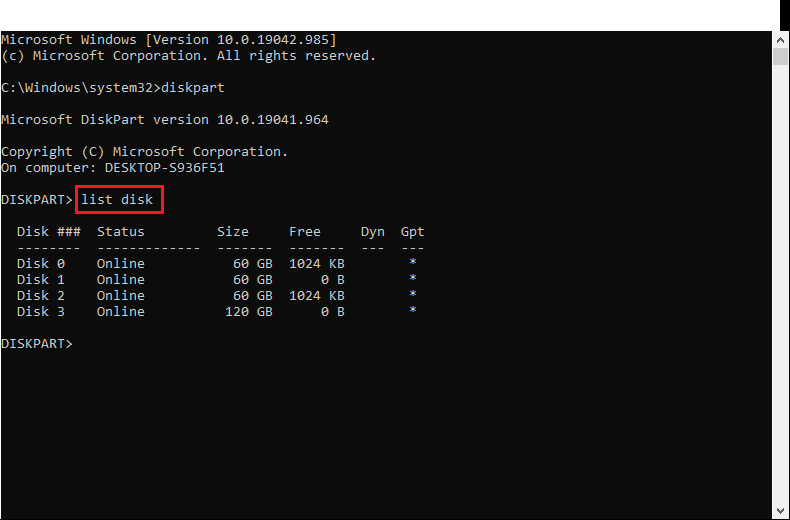
Step 1: Click the taskbar, type "cmd". Then right-click "Command Prompt" and select "Run as administrator".
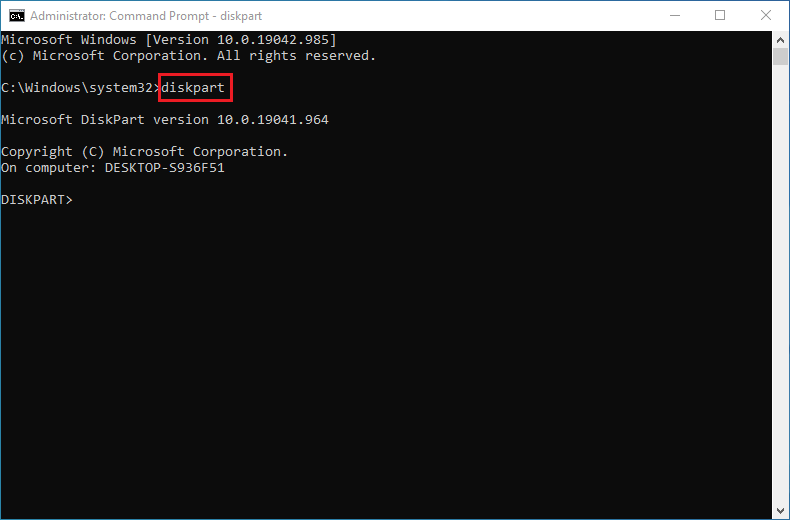
Step 2: Enter "diskpart" and press Enter to enter the diskpart interactive interface.
Step 3: Enter "list disk" to view all disks and confirm the disk number to be erased.
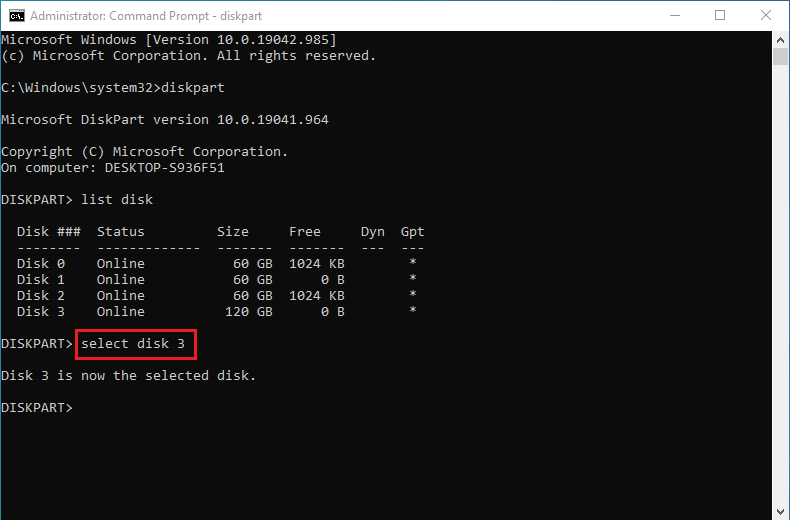
Step 4: Enter "select disk X" (X is the disk number) to select the disk to erase.
Step 5: Enter the following command to erase:
clean
or
clean all
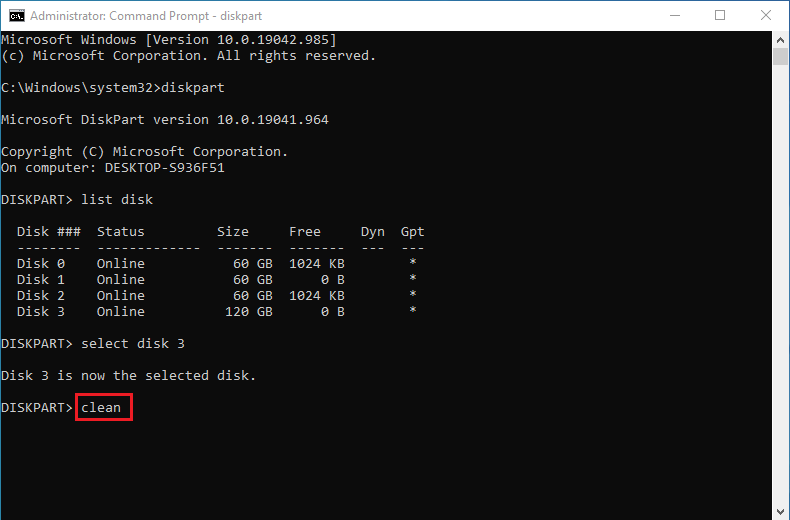
💡Tips: The "clean" command quickly clears disk metadata - data can be recovered; the "clean all" command fills every sector with zeros - more thorough but takes longer (1TB hard drive may take several hours).
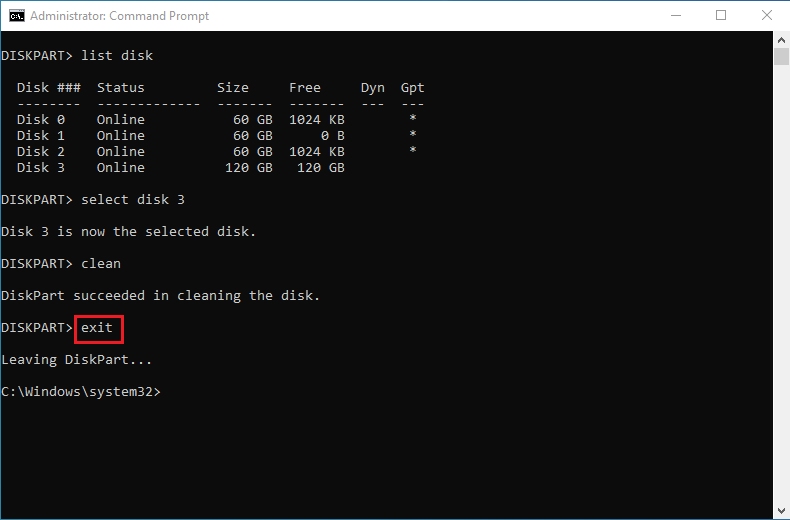
Step 6: After erasure is complete, enter "exit" to exit diskpart.
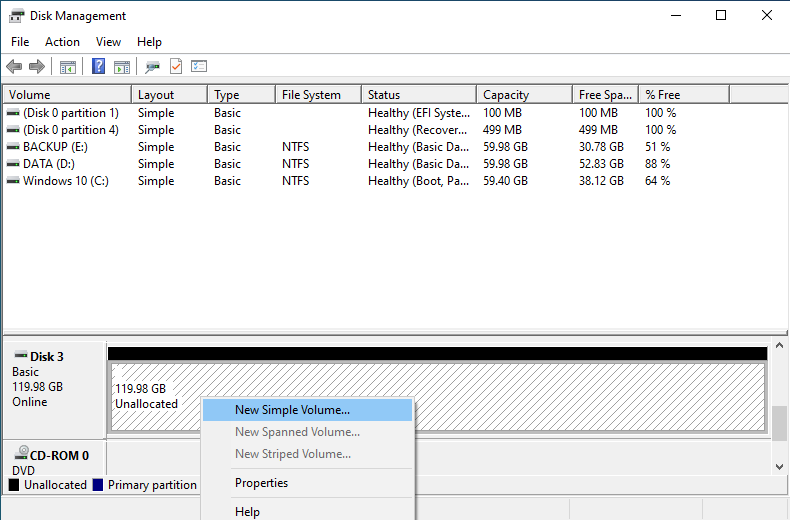
Step 7: Open "Disk Management" tool (right-click "Start" > Disk Management), find the erased disk (shows as "Unallocated" or "Not initialized"). Right-click, select "New Simple Volume" or "Initialize Disk", and follow the wizard to complete partition creation.
⚠️Tips:
- When using the "clean all" command, be sure to select the correct disk number - data cannot be recovered after erasure.
- clean all performs full disk writes on SSDs, which may affect lifespan and performance.
Method 5: Using Reset This PC Feature in Windows Settings
Windows 10 and 11 systems provide the "Reset This PC" feature, which can clear all apps and settings while keeping personal files, or choose to completely clean all data. The operation steps are as follows:
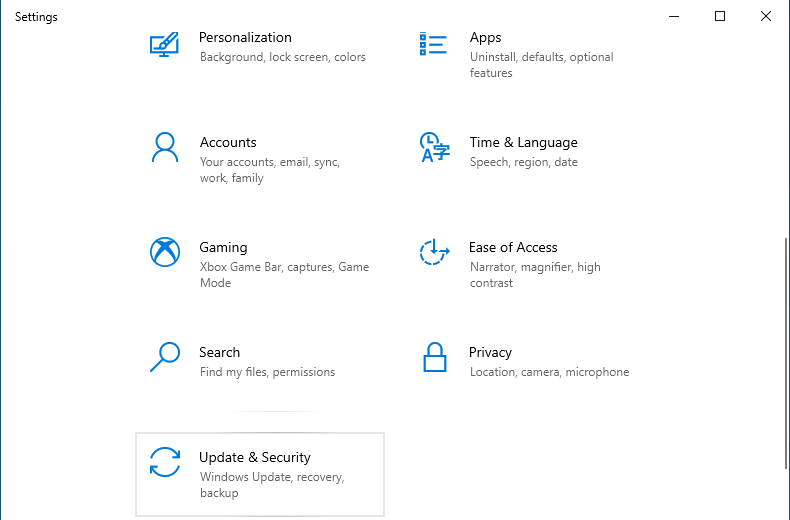
Step 1: Press "Win+I" to open Windows settings. According to your system version, enter the corresponding option:
- Windows 10: Click "Update & Security" > "Recovery"
- Windows 11: Click "System" > "Recovery"
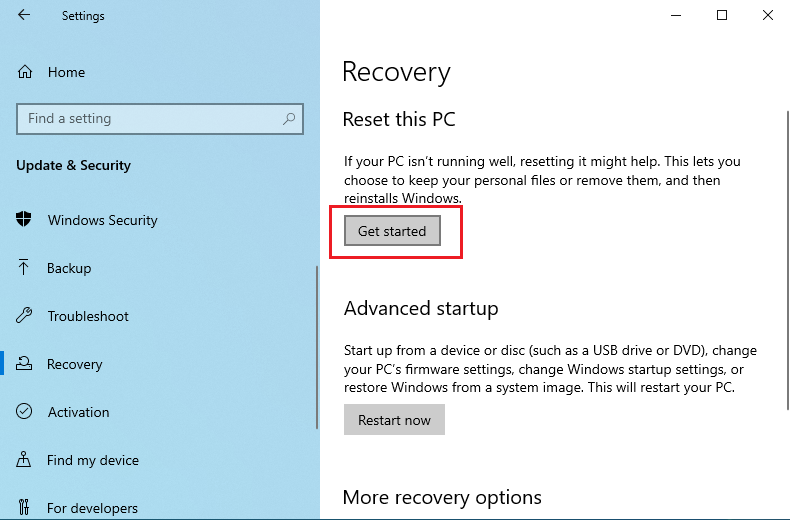
Step 2: On the "Recovery" page, find the Reset this PC option and click the "Get started" button on the right side.
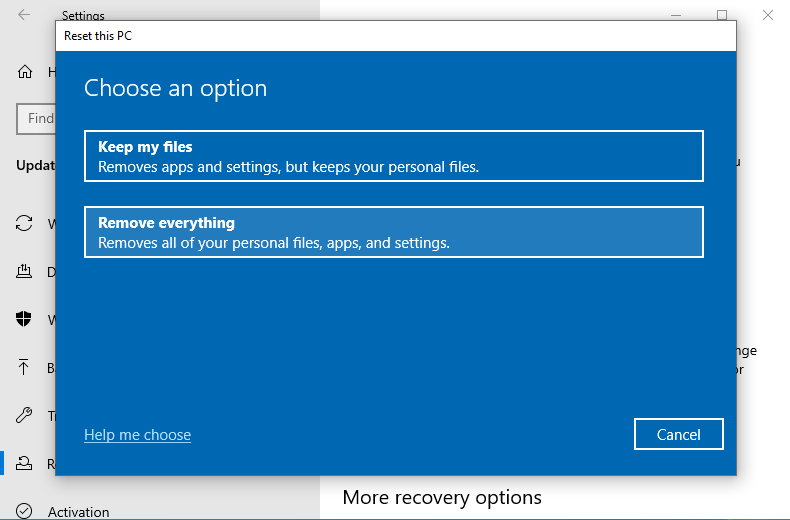
Step 3: Choose the reset method:
- Keep my files: Removes all installed apps and drivers, restores system settings to default, but keeps personal files (documents, photos, etc. in the "Users" folder).
- Remove everything: Clears all personal files, apps, and settings, equivalent to a fresh installation.
Step 4: If you choose "Remove everything", the system will further ask about the cleaning method:
- Just remove my files: Quick reset, suitable for when the computer will continue to be used by yourself
- Fully clean the drive: Performs more thorough erasure operation, file recovery difficulty is greatly increased, suitable for preparing to dispose of or give away the computer (takes longer time)
Step 5: Follow the on-screen prompts to complete the operation.
💡Tips: This feature primarily operates on the system drive (usually C: drive). If you need to completely erase other hard drive partitions, it is recommended to use dedicated hard drive erasure tools for separate processing.
Method 6: Using cipher Command to Securely Erase Free Disk Space
cipher is a built-in file encryption and security tool in Windows systems. The /w parameter can overwrite free disk space, making previously deleted files completely unrecoverable.
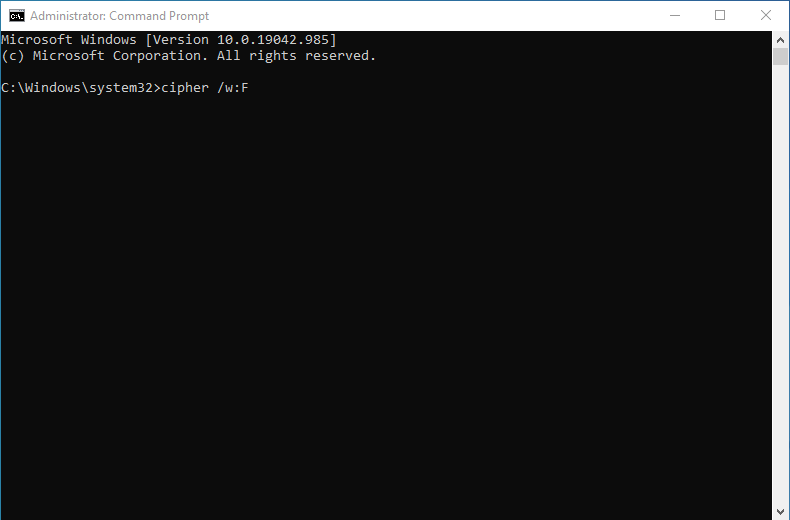
Step 1: Click the taskbar, type "cmd". Then right-click "Command Prompt" and select "Run as administrator".
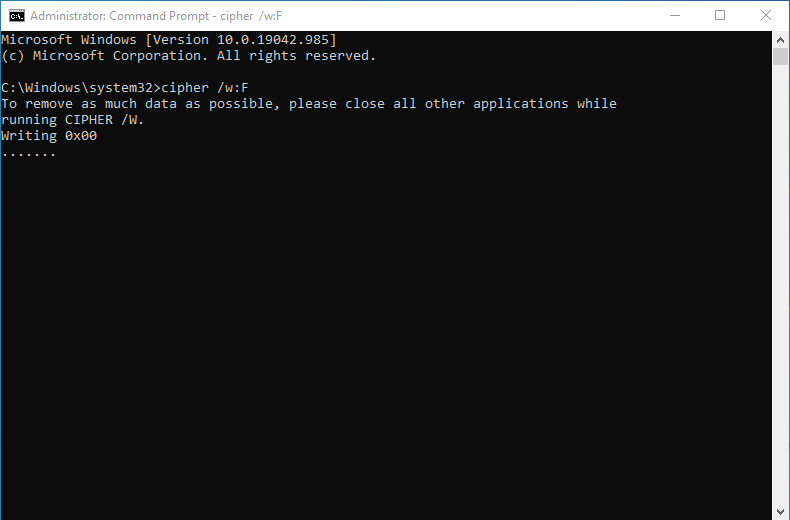
Step 2: Enter the following command to start overwriting free space:
cipher /w:C:
💡Tips: Replace C: with the drive letter of the partition you want to clean (such as D:, E:, etc.)
Step 3: Wait for the command to complete - time depends on the amount of free space on the hard drive.
⚠️Tips: This method can only erase free space from deleted files, not currently existing files. Suitable for adding an extra layer of security after regular formatting.
Comparison of Different Methods
| Method | Security Level | Difficulty | Time Required | Best For |
| Wipe Drive in Hasleo Backup Suite👍 | High | Easy | Medium | Recommended for daily use |
| Disk Management Format | Low | Easy | Short | Non-sensitive data |
| diskpart clean all | Medium-High | Medium | Long | Users comfortable with command-line tools |
| Windows Reset Feature | Medium | Easy | Medium | System drive reset |
| cipher /w | Medium | Easy | Longer | Adding an extra security layer after deletion |
Verification and Handling After Hard Drive Erasure
After completing hard drive erasure, it is recommended to perform the following verification and handling to ensure data security:
➢Verify Erasure Results
- Use data recovery software to scan the hard drive and confirm no data can be recovered
- Check if the hard drive shows as "Unallocated"
- If the hard drive needs to continue being used, re-partition and format it
➢Re-partition and Format
If the erased hard drive needs to continue being used:
- Open Windows Disk Management tool (press Win+X, select "Disk Management")
- Find the erased hard drive, right-click and select "New Simple Volume"
- Follow the wizard to complete partition creation and formatting
- NTFS file system is recommended for better compatibility and file permission control capabilities
💡Tips: Formatting (especially quick formatting) itself does not enhance data security. If the hard drive will continue to process sensitive data in the future, it is recommended to enable BitLocker (or similar encryption tools) for full disk encryption after formatting. This way, when the hard drive needs to be disposed of in the future, you only need to destroy the key - no need to perform physical erasure again.
➢(Optional) Physical Handling
For hard drives that will no longer be used or scenarios with high security requirements, consider physical destruction:
- Physical Shredding: Use professional hard drive shredders to physically destroy the hard drive
- Disk Destruction: Professional destruction services that completely destroy the hard drive platters
- Puncture Destruction: Use tools to puncture the hard drive platters, destroying data storage areas
⚠️Tips: Physical destruction will completely scrap the hard drive and it cannot be used anymore. If the hard drive still needs to be used, please only perform data erasure.
Frequently Asked Questions
A: No. Regular deletion only marks the space as reusable - the data still exists and can be recovered using data recovery tools. To truly protect privacy, you must use secure erasure methods like Hasleo Backup Suite's Wipe Drive feature.
A: No. Quick format only deletes the file system index table, but the actual data remains on the disk and can be easily recovered. Only secure erasure that overwrites all sectors can permanently remove data.
A: Erasure time depends on the drive capacity and erasure method. A 1TB hard drive may take several minutes using quick wipe, or several hours using more thorough methods like zero-fill. Larger drives take proportionally longer.
A: Yes. Hasleo Backup Suite supports both disk mode and partition mode erasure. You can select specific partitions to erase while keeping other partitions on the same disk intact.
A: After secure erasure with proper overwriting, data cannot be recovered by any known data recovery methods. This is why secure erasure is essential before selling or disposing of hard drives.
A: Unfortunately, secure erasure is irreversible. This is why preparation is critical: verify the drive model, capacity, and serial number before operation. Only keep the target drive connected if possible.
A: The process is similar, but SSDs have wear-leveling that may affect erasure thoroughness. For SSDs, using secure erase commands (like ATA Secure Erase) built into the SSD controller is more effective than software-based overwriting.
A: Software erasure makes data unrecoverable but keeps the drive reusable - ideal for selling or repurposing. Physical destruction destroys the drive completely - best for highest-security scenarios but wastes the hardware.
Summary
In the digital age, personal privacy data protection is crucial. Through this tutorial, you have learned about the necessity of secure data erasure, common application scenarios, preparation work, and how to perform erasure operations. Remember: Regular deletion and formatting cannot truly erase data. Only by using professional hard drive erasure tools for secure erasure can you effectively prevent privacy data leaks. Before selling, lending, or disposing of hard drives, be sure to perform hard drive erasure operations to protect your personal privacy and data security.
Related Articles
- How to Merge/Delete Old Backup Files using Hasleo Backup Suite Free?
- How to Back Up and Restore Windows 11 for Free Using Hasleo Backup Suite Free?
- How to Clone Data from One Hard Drive to Another Using Hasleo Backup Suite?
- How to Backup Windows 11 to an External Hard Drive?
- How to Back Up Windows Automatically on a Regular Basis?


