
- The Benefits of backing up to a Network Shared Drive
- Best Windows 10/11 Backup Software - Hasleo Backup Suite
- How to Back Up Windows 10/11 to a Network Shared Drive?
- Frequently Asked Questions
- Summary
A network shared drive, such as an SMB (Server Message Block) share or a NAS (Network Attached Storage) device, is a folder or entire disk located on another computer or server that Windows exposes to you as if it were a local drive. The key idea: multiple users or devices can access the same files over the network, with permissions controlling who can read, write, or modify them.
These drives, as the target for a backup, are an alternative to USB large-capacity drives or internal disks providing convenience, flexibility, and security for your system and data.
The Benefits of backing up to a Network Shared Drive 👍
Backing up Windows to a Network Shared Drive gives you several concrete advantages over using USB drives or internal disks.
Centralized Backups
All PCs, laptops, VMs, and test machines can back up to one shared location, eliminating scattered USB drives.
Always-Online Automation
Scheduled backups run reliably without needing to plug in external storage.
Redundancy Via RAID
NAS arrays protect your backup repository from drive failures - something USB drives cannot do.
Long-Term Retention & Versioning
Large storage pools allow for months or years of backup history.
Fast Network Restores
Gigabit/2.5 GbE restores are often faster than a USB drive.
Off-Device Protection
Backups survive PC failure, corruption, SSD death, or boot environment issues.
Accessible From WinPE/WinRE
Rescue media can restore images directly from the NAS even when Windows won't boot.
Scalable Storage
Expand capacity by adding drives or enlarging RAID pools without replacing hardware.
Best Windows 10/11 Backup and Cloning Software - Hasleo Backup Suite 👑
Hasleo Backup Suite is a professional all-in-one backup, restore, and cloning solution designed for safe, stable, and efficient data protection across Windows systems, disks, partitions, and files. It supports full system imaging, flexible restore options, and high-performance cloning, making it suitable for both everyday users and those who require continuous data synchronization.
Its standout Delta Clone feature updates only changed data blocks after the initial clone, greatly improving cloning efficiency for frequently updated systems. The cloning engine also provides fast system/disk/partition cloning, multiple disk-alignment modes with adjustable target partition sizes, sector-by-sector cloning, MBR↔GPT conversion during cloning, broad compatibility with IDE/SATA/SCSI/USB/NVMe drives, and support for Windows Vista/Server 2008 and later version in both 32-bit and 64-bit architectures.
How to Back Up Windows 10/11 to a Network Shared Drive Using Hasleo Backup Suite?
Step 1. Download, install, and run Hasleo Backup Suite. lick the Tools in the navigation bar, then select the Storage Management icon in the Tools menu to select Storage Path Management in the operation area.
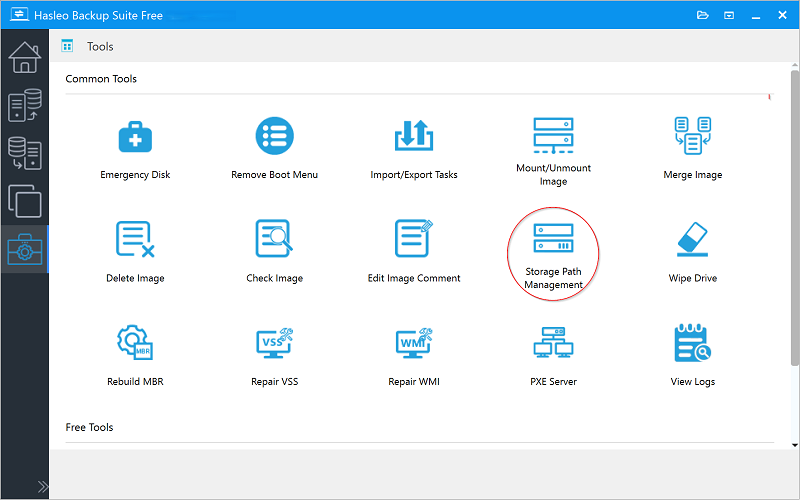
Step 2. Use the Folder icon to open a File Explorer menu to select the address of the network shared drive.
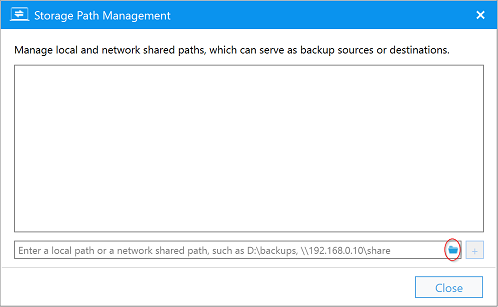
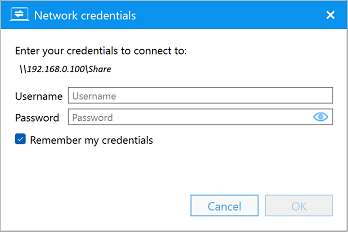
Step 3. Enter the network credentials for the network shared drive, e.g. \\192.168.0.100\share or an assigned folder name. Then enter the Username and Password. If the network drive has an assigned name, then the Username may need to have that added, e.g., MyNAS\username. If the network drive is another PC on the network, then the Username will be the network name plus the Windows account name, e.g., MyOtherPC\[email protected].
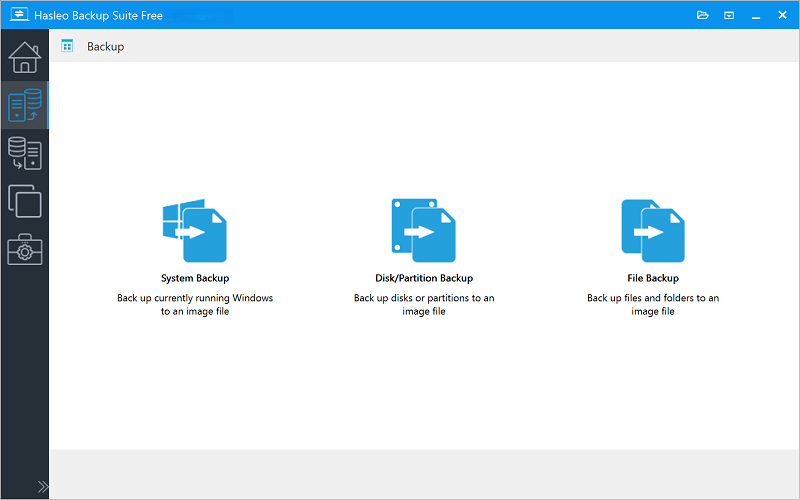
Step 4. The network shared drive must be accessible to the network on your computer. The connection to the network may either be using wi-fi or ethernet. Click the Backup button in the navigation bar, then select System Backup in the operation area.
Step 5. Hasleo Backup Suite will automatically select all partitions required for a Windows 10/11 system backup. Then, customize the task name, description, backup options according to your needs, and set the network shared drive as the destination. Finally, click Proceed to begin the backup process.
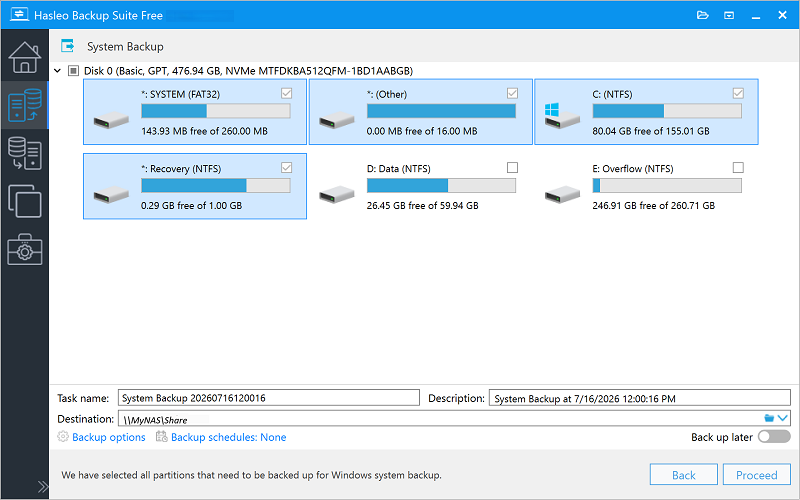
Description: Briefly describe the purpose of the task and any other relevant information.
Destination: Modify the destination path where the backup image files will be stored by clicking the folder icon.
Backup options: Advanced backup settings. For more details, please refer to Backup options.
Backup schedule: Set up backup schedules to automatically perform your backup tasks on a regular basis. For more details, please refer to Backup schedule.
Step 6. Hasleo Backup Suite is now backing up Windows 10/11 to the target network shared drive. This process may take some time, so please be patient.
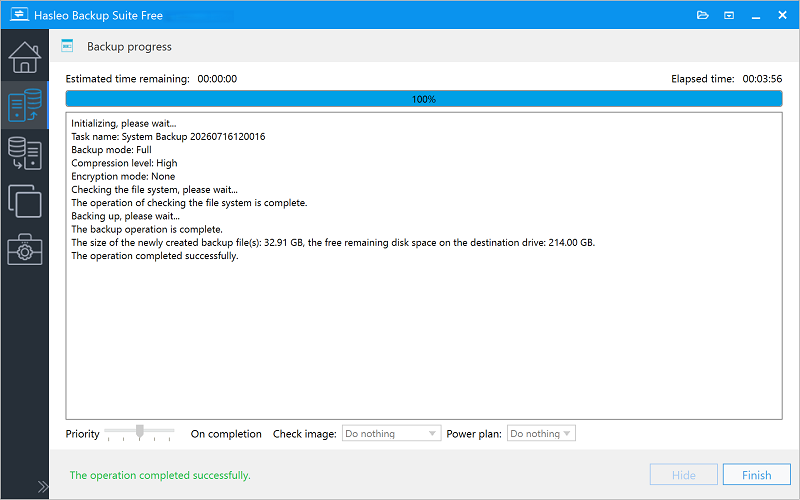
Check image: Verify the integrity of the backup image files upon completion of the backup process.
Power plan: Perform the power management action after the backup is complete.
Frequently Asked Questions 🔥
Q: How do I back up Windows 10/11 to a network shared drive?
Connect to the network drive, run Hasleo Backup Suite, click Backup > System Backup, select your Windows 10/11 partitions, choose the network shared drive as destination, and click Proceed to start the backup.
Q: What size network shared drive do I need for Windows 10/11 backup?
It is recommended to use a network shared drive with capacity at least 1.5 times the used space of your Windows 10/11 system drive. Network shared drive consisting of SSDs are recommended for speed and durability, while HDDs offer better cost-effectiveness for large storage.
Q: How long does it take to back up Windows 10/11 to a network shared drive?
Backup time depends on the size of your Windows 10/11 system partition, the network speed and the drive speed. A typical Windows 10/11 installation takes about 20-40 minutes.
Q: Can I schedule automatic backups to a network shared drive?
Yes, Hasleo Backup Suite supports backup scheduling. You can set up Daily, Weekly, Monthly, or Event Trigger schedules to automatically back up Windows 10/11 to your network shared drive.
Q: How do I restore Windows 10/11 from a network shared drive backup?
You need a WinPE emergency recovery disk. Boot from the WinPE media, then use Hasleo Backup Suite to connect to your network, then select your backup image from the network shared drive and restore Windows 10/11.
Q: Can I encrypt my Windows 10/11 backup images on a network shared drive?
Yes, Hasleo Backup Suite supports AES 128/256-bit encryption for backup images. You can enable encryption in backup options to protect sensitive data.
Q: What is the best software to back up Windows 10/11 to a network shared drive?
Hasleo Backup Suite is the best free Windows 10/11 backup software. It supports full, incremental, and differential backups, compression, encryption, and automatic backup scheduling.
Summary
To back up Windows 10/11 to a network shared drive with Hasleo Backup Suite, set the shared folder as a storage path under Tools > Storage Path Management. Select the network location, enter the correct credentials (including device-name prefixes if required).
Start System Backup from the Backup menu. Hasleo Backup Suite automatically selects all Windows 10/11 system partitions; you simply name the task, adjust options, and choose the network shared drive as the destination. Click Proceed to begin. Backups typically take 20-40 minutes, depending on system size and network speed.
Hasleo Backup Suite supports scheduling, encryption, image verification, and priority settings. To restore, boot from a WinPE recovery disk, reconnect to the network, and select the backup image.
A network drive should have at least 1.5x the used space of your Windows system partition; SSD-based network storage is faster, while HDDs are more cost-effective.