- Overview of Hasleo Backup Suite
- Understanding the Partition Adjustment Interface
- How to Flexibly Adjust Target Partition Size When Cloning a Disk: A Step-by-Step Guide
- Frequently Asked Questions
- Conclusion
When cloning a system, the destination disk's capacity - whether it's a larger HDD or a smaller SSD - often differs from the source. Hasleo Backup Suite's cloning feature accounts for this, letting you flexibly adjust the size and location of the destination partition during the process. This ensures the disk is ready for immediate use after cloning, with no need for additional partitioning tools.
Overview of Hasleo Backup Suite
Hasleo Backup Suite is a professional, all-in-one Windows backup and restore solution that seamlessly integrates three core modules - Backup, Restore, and Clone - along with practical tools like WinPE emergency boot disk creation. It combines powerful performance with a smooth, intuitive user experience. Its clear workflow and straightforward interface make it easy for anyone - technical or not - to handle data backup, system restore, and disk migration with confidence.
In terms of cloning capabilities, the system utilizes Delta Clone technology to significantly improve efficiency and supports the following three cloning types:
🖥️ System Clone
Target: All system-required partitions
Main Purpose: Migrate Windows to a new disk without reinstalling the OS
💾 Disk Clone
Target: Entire physical disk
Main Purpose: Create a full disk copy for upgrade or replacement
🧩 Partition Clone
Target: A single specified partition
Main Purpose: Back up or migrate data from a specific partition
Precautions Before Cloning
Before beginning the cloning process, please verify the following:
| Checklist | Notes |
|---|---|
| Back Up Important Data | All data on the destination disk will be overwritten during cloning. Please back up any important files in advance. |
| Verify Destination Disk Capacity | The total capacity of the destination disk must be greater than or equal to the total amount of data used on the source disk. |
| Clean Up the Source Disk | Delete temporary and junk files from the source disk to reduce cloning time and improve efficiency. |
| Connect the Destination Disk | For laptops with a single drive bay, connect the destination disk externally using a SATA-to-USB adapter cable. |
Understanding the Partition Adjustment Interface
After launching Hasleo Backup Suite, you'll see the graphical main interface. Click the Clone button in the left navigation bar to access the cloning interface. During partition adjustment, the interface clearly shows each partition's capacity and location on the target disk. The main interface is divided into three sections - Target disk layout, Change size and location, and Other settings - so you can quickly find and perform the desired operations.

Target Disk Layout
This area shows a preview of the target disk layout. The top section lists basic attributes - disk number, type, partition table format, and total capacity - so you can confirm this is the correct target disk.

The colored section shows the partitions to be written after cloning, along with each partition's size, file system, and usage percentage. Clicking any cloned partition reveals a blue pointer icon that indicates the currently selected item for modification.

Click the Edit disk layout button in the upper-right corner to select a disk layout strategy that best suits your needs. Available options for adjusting partition sizes, positions, and other settings vary by mode.

Edit disk layout
In this mode, you can manually edit the core parameters of the selected partition to flexibly adjust its size, location, and other settings.
Automatic disk layout
Hasleo Disk Clone automatically adjusts partition size and location based on the destination disk's total capacity. In this mode, the Change size and location and Other settings sections are locked and cannot be modified.
Keep disk layout
Preserves the source disk's original partition layout. Partition sizes remain unchanged. If the target disk is larger than the source, the extra space becomes unallocated. In this mode, the Change size and location section is locked; only the Sector by sector clone partition option is available under Other settings.
Keep partition size
Partition sizes are locked to match the source disk and cannot be changed. You can adjust partition locations by modifying the start and end offsets. The Other settings section remains fully configurable.
Change Size and Location
This area is the core parameter editor for the currently selected partition. The colored section at the top visually represents the partition's total capacity and used percentage - dark blue indicates used space, while light blue shows available space. Offset values for the partition's start and end positions are displayed on both side; you can adjust its size and position by dragging the sliders.

If there is free space before or after a partition, you can also click the partition, hold down the mouse button, and drag it left or right to adjust its position (available only in Edit disk layout and Keep partition size modes).
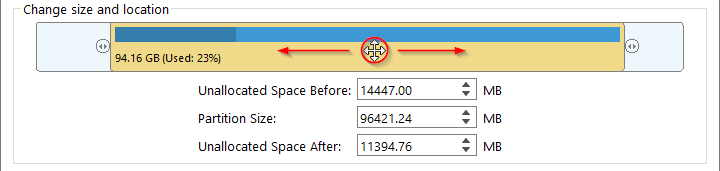
The three numeric input fields below allow you to precisely adjust the partition's size and position.

Unallocated Space Before
This value is 0.00 MB, indicating that the partition is adjacent to the previous one with no free space in front. Increasing this value will shift the entire partition to the right, creating free space in front of it.
Partition Size
Adjusting this value changes the partition's capacity, within the limits of used data and available free space on both sides.
Unallocated Space After
This value is 0.00 MB, indicating that there is almost no free space after the partition. Increasing this value will shrink the partition, freeing up space after the partition.
Other Settings
This section provides additional configuration options, including disk alignment, partition types, and sector-level cloning.
Disk alignment

1M (Recommended): 1M alignment is a subset of 4K alignment. Partitions aligned to 1MB are always 4K-aligned, which helps you get the best SSD performance. In Windows Vista and later operating systems, partitions created using Windows Disk Management are always aligned to 1MB bytes, regardless of whether the disk is an SSD.
4K: This option ensures the starting sector of every partition is aligned to 4K bytes, which is very important for the best performance of an SSD.
Cylinder: Ensure the starting sector of each destination partition always starts at the beginning of a cylinder. Windows XP and previous OSs use this alignment mode.
None: The start sector of each of the destination partitions is not aligned.
Create as
The current setting is Primary, which specifies the partition type. This option determines whether the partition is created as primary or logical. On GPT disks, all partitions are primary by default; on MBR disks, this option distinguishes between primary and logical partitions.
Sector by sector clone partition
Select this option to perform a sector-by-sector copy of the source partition, including unused sectors.

How to Flexibly Adjust Target Partition Size When Cloning a Disk: A Step-by-Step Guide
Taking system cloning as an example: when migrating Windows to a larger target disk, you need to properly partition the additional unallocated space. The specific steps are as follows:
Step 1. Please connect the target disk to your computer in advance. After downloading, installing, and launching Hasleo Backup Suite, click the Clone option in the left navigation bar. Then select System Clone from the cloning interface.

Step 2. The system automatically selects all partitions required to clone Windows. Simply click Next.

Step 3. In the disk list, select the newly connected disk with the most available space as the target disk, then click Next.

Clone as MBR/GPT : allows you to clone a Windows OS from an MBR disk to a GPT disk or from a GPT disk to an MBR disk.
Delta Clone: appears only when the system detects that a complete copy of the selected partition already exists on the target disk. When enabled, it clones only the data blocks that have changed since that copy was created, significantly improving efficiency.
Step 4. Select the Edit disk layout option, then click the partition you want to adjust. Drag the slider or modify the value to change the partition's capacity and location. You can also configure disk alignment and sector-by-sector cloning options as needed. Once everything is confirmed, click Proceed.

4K: This option ensures the starting sector of every partition is aligned to 4K bytes, which is very important for the best performance of an SSD.
Cylinder: Ensure the starting sector of each destination partition always starts at the beginning of a cylinder. Windows XP and previous OSs use this alignment mode.
None: The start sector of each of the destination partitions is not aligned.
Step 4. If you select the Automatic disk layout strategy, the system will automatically adjust the partition sizes and locations. All you need to do is confirm and click Proceed.

Step 4. If you select the Keep disk layout strategy, the source disk's original partition structure will be preserved, with each partition retaining the same capacity as on the source. Any remaining space will be left as unallocated. You only need to configure the Clone sector-by-sector option. After confirming everything is correct, click Proceed to continue.

Step 4. Select the Keep partition size layout strategy to preserve the original partition sizes. Click the partition you want to adjust,then either modify its start and end offset values or simply drag the sliders to reposition it. Configure disk alignment and sector-by-sector cloning as needed, then click Proceed after verifying all settings.

4K: This option ensures the starting sector of every partition is aligned to 4K bytes, which is very important for the best performance of an SSD.
Cylinder: Ensure the starting sector of each destination partition always starts at the beginning of a cylinder. Windows XP and previous OSs use this alignment mode.
None: The start sector of each of the destination partitions is not aligned.
Step 5. The system will display a warning that all data on the selected drive will be deleted. Please back up important data beforehand. If you have already backed up or don't need to, click Yes to continue.

Step 6. Hasleo Backup Suite has started migrating Windows to the destination disk. The time required depends on the amount of data being migrated. Please wait.

Frequently Asked Questions 🔥
Q: Can I resize partitions when cloning to a smaller SSD?
Yes, as long as the target disk's total capacity is greater than or equal to the source disk's used data space. The Edit disk layout mode allows you to manually shrink partitions to fit the smaller target. Hasleo Backup Suite also supports intelligent resize for automatic adjustment.
Q: What is the recommended disk alignment setting for SSDs?
For modern SSDs and Windows Vista and later systems, 1M alignment is recommended. This aligns partitions to 1MB boundaries, which is compatible with 4K sector formatting and optimizes SSD performance. For Windows XP and older systems, Cylinder alignment is used.
Q: Does adjusting partition size during clone affect existing data on the source?
No. Partition size adjustment only affects the target disk layout. The source disk remains completely untouched. However, all data on the target disk will be overwritten during the cloning process, so please back up any important files on the target disk beforehand.
Q: What is sector-by-sector cloning and when should I use it?
Sector-by-sector cloning creates an exact bit-for-bit replica by copying every sector from the source partition to the target, including unused and empty sectors. Use this mode when you need a forensic copy, such as for data recovery or compliance. Note that this process is slower than standard cloning because it copies all sectors regardless of content.
Conclusion
Based on the information above, you should now understand how to use Hasleo Backup Suite to flexibly adjust partition sizes during system cloning - effectively completing data migration and optimizing disk space in one process.
⚠ Important Reminder: Cloning involves comprehensive, low-level writes to the target disk. Any interruption or incorrect operation may result in data loss. Before proceeding, double-check that no important files remain on the target disk, or make a full backup in advance.
Once you've completed all necessary preparations, follow the steps in this tutorial and let Hasleo Backup Suite handle the rest. We wish you a smooth process and success on your first attempt! ❤️ ❤️