
- Common Causes of Search Bar Issues
- Solution 1: Restart the Windows Search Service
- Solution 2: Rebuild the Search Index
- Solution 3: Clear the Search Cache
- Solution 4: Run the Windows Search Troubleshooter
- Solution 5: Check Windows Updates
- Solution 6: Run SFC and DISM to Repair System Files
- Solution 7: Reset the Search App
- Solution 8: Create a New User Account
- What If Nothing Works? Restore from a System Backup
- Frequently Asked Questions
- Conclusion
Windows search function is one of the most frequently used features in the operating system. Whether quickly finding applications, opening files, or searching for system settings, the search bar is essential. However, you may sometimes encounter issues such as the search bar not responding after clicking, empty search results after entering keywords, or complete search function failure. This not only affects daily usage efficiency but may also prevent important files from being found quickly.
A non-functional search bar is often a symptom of broader system instability—corrupted files, misconfigured services, or failing hardware. While this tutorial provides 8 proven fixes to restore Windows search, the smartest first step before attempting any repair is to create a system backup. A complete backup image made with Hasleo Backup Suite ensures you can instantly revert to a working state if any fix causes additional issues—or if the underlying problem turns out to be more serious than a broken search bar.
Try the following fixes in order. If none resolves the problem, restoring from a system backup is your most reliable fallback option.
Common Causes of Search Bar Issues 🎯
When Windows search bar doesn't work normally, it's usually caused by one of the following reasons. Understanding the root cause helps you pinpoint the problem more accurately and avoid blind operations:
- Windows Search Service Stopped: As the core background service for search functionality, it may be in a stopped state due to system optimization, unexpected crashes, or startup type modifications.
- Background Process Blocked: Some security software (like firewalls, antivirus) or system cleanup tools may mistakenly identify and disable or block search-related processes (such as SearchUI.exe).
- Search Index Corrupted: Windows relies on the index database to quickly locate files. If this database is corrupted, it leads to blank or incomplete search results or no response when clicking.
- Incomplete Index Location: The system may not have included your commonly used folders (like Documents, Desktop) or applications in the index scope, resulting in only a small amount of search results.
- Search Cache Issues: Corrupted or accumulated cache files causing search function abnormalities
- System File Corruption: Core operating system files (especially DLL files related to search functionality) are lost or corrupted due to improper shutdown, virus infection, or update failures.
- User Profile Error: The currently logged-in Windows user account profile is partially corrupted, causing the search service to fail to properly load that user's settings and permissions.
💡Tips: Before attempting any repair operations (such as rebuilding index, running system file checker, or modifying registry), it is strongly recommended to back up your system first. You can use third-party tools like Hasleo Backup Suite for complete backup, or use Windows' built-in system restore point creation feature. This allows easy restoration to normal state when unexpected issues occur.
Solution 1: Restart the Windows Search Service
👍This is the simplest and most effective solution. Restarting the search service can refresh the search functionality and resolve temporary faults.
Step 1. Press "Win+R", type "services.msc" and press Enter to open the Services window.
Step 2. In the services list, scroll down to find "Windows Search" or "Windows Search Service".
Step 3. Right-click the service and select "Restart". If "Restart" is grayed out, you can first click "Stop", wait a few seconds, then click "Start".
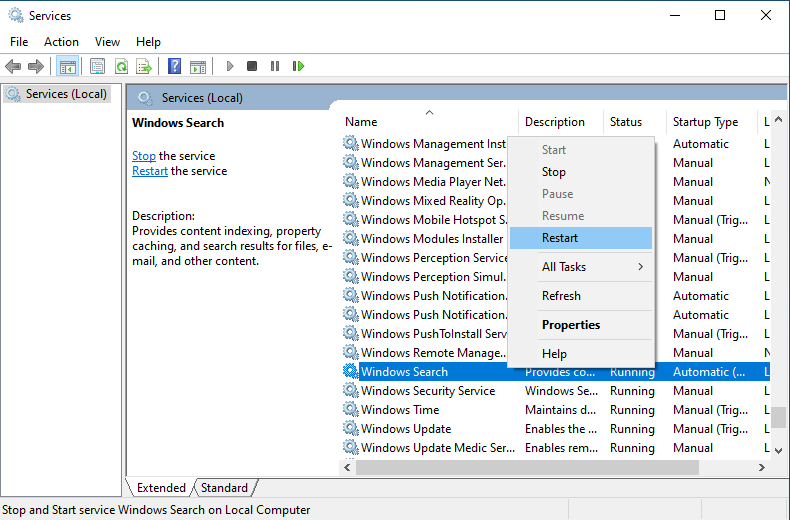
Step 4. Double-click the service and set "Startup type" to "Automatic" to ensure the service starts automatically with the system.
💡Tips: If the service cannot start or stops frequently, there may be deeper issues that require further investigation.
Solution 2: Rebuild the Search Index
Corrupted search index is a common cause of search function abnormalities. Rebuilding the index can restore normal search functionality.
Step 1. Press "Win+R", type "control" to open Control Panel. Find and click "Indexing Options" in Control Panel (or directly type "Index" in the search box to find it quickly).
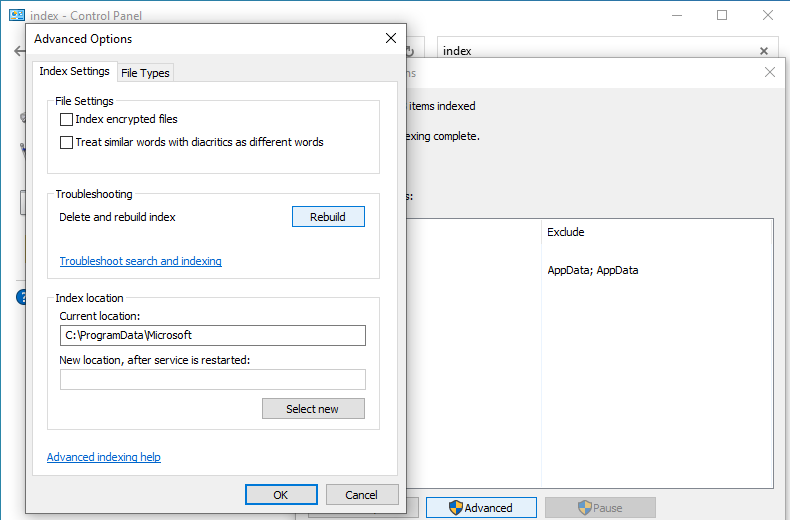
Step 2. In the Indexing Options window, click the "Advanced" button at the bottom. If the system prompts for UAC (User Account Control), click "Yes" to allow execution.
Step 3. In the advanced options window, find the "Index Settings" tab, then click the "Rebuild" button. The system will prompt: "Rebuilding the index may take a long time to complete... Are you sure you want to continue?" Click "OK" to start rebuilding.
Step 4. The index rebuilding process may take a long time, depending on the number of files on your hard drive. During rebuilding, you can use the computer normally, but search functionality may be temporarily limited or results may be incomplete.
💡Tips:
- If the "Rebuild" button is grayed out, please first click "Stop Service" (or Pause) in the advanced options window, wait a few seconds, then click "Start Service", and try clicking "Rebuild" again.
- If you cannot search files on a specific disk partition (like D: or E:), please click "Modify" in the Indexing Options window to ensure that partition is checked and included in the index scope.
Solution 3: Clear the Search Cache
Corrupted or accumulated search cache files may cause search to be slow or ineffective. Clearing the cache can solve these problems. Here are two safe and effective clearing methods:
Manually Delete Search Cache Files
Step 1. Press "Win+R", type the following path and press Enter:
%localappdata%\Packages\Microsoft.Windows.Search_8wekyb3d8bbwe\LocalState
Step 2. In the opened folder, find and delete cache-related files and folders:
- If there's a Cache folder, right-click and select "Delete"
- If you can't find the Cache folder, you can delete cache files like ImageCache, IconCache, or clear all contents in the LocalState folder (Note: Only delete internal files, do not delete the LocalState folder itself)
Step 3. Close the folder window and restart the computer for changes to take effect.
Use Disk Cleanup Tool
Step 1. In the taskbar search box, type "Disk Cleanup", click to open the Disk Cleanup tool.
Step 2. Select the drive to clean (usually C:), click "OK".
Step 3. In the "Files to delete" list, check "Indexing" (may also display as "Index files" or "Index"). You can also check other file types you don't need based on your needs.
Step 4. Click "OK" to start cleaning.
💡Tips:
- After deleting the cache, Windows search index will automatically rebuild, which may take several hours to fully return to normal (depending on file count and system performance)
- During rebuilding, searches may be incomplete or slow - this is normal
- It is recommended to keep the computer on and connected to power during rebuilding
- If the problem persists, you can refer to Solution 4 to run Windows Troubleshooter
Solution 4: Run the Windows Search Troubleshooter
Windows built-in search troubleshooter can automatically detect and fix common search issues such as search box not accepting input, no response when clicking, or abnormal search results.
Step 1. Press "Win+I" to open Windows Settings.
- Windows 10 users: Click "Update & Security".
- Windows 11 users: Click "System" on the left, then scroll down the page.
Step 2. Enter Troubleshooter
- In Windows 10's "Update & Security" page, click "Troubleshoot" on the left menu.
- In Windows 11's "System" page, click "Troubleshoot" at the bottom.
Step 3. Find Search Troubleshooter
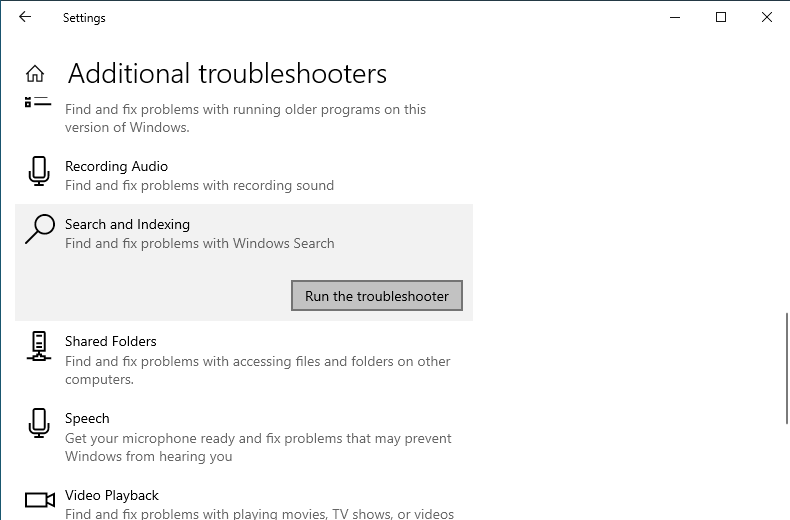
- Click "Additional troubleshooters".
- Find "Search and Indexing" or "Windows Search" in the list.
- Click the "Run" button on the right side of that item.
Step 4. Follow the Prompts
- When the troubleshooter starts, if there's an administrator permission prompt, it is recommended to check "Apply repairs as Administrator" (if this option exists) for more thorough repairs.
- The program will automatically detect issues related to Windows Search (such as service not running, corrupted index, etc.).
- Follow the on-screen prompts to complete the operation. It may take a few minutes.
Step 5. After repair is complete, restart the computer and test if the taskbar search function is working normally.
Solution 5: Check and Manage Windows Updates
Sometimes, search function abnormalities may be caused by missing system update components or compatibility issues between certain update patches and the system. Updating the system to the latest version or uninstalling problematic updates may solve this issue.
Step 1. Press "Win+I" to open Windows Settings, click "Windows Update" on the left.
Step 2. Click "Check for updates" button, the system will automatically check for available updates.
Step 3. If there are available updates, click "Download and install". After the update completes, restart the computer as prompted to finish the update.
Step 4. If the search problem started after a recent system update, you can try uninstalling that update:
- Go to "Settings" > "Windows Update" > "Update history".
- Find and click "Uninstall updates" at the top of the page or in related settings.
- Find the most recent updates in the list (usually sorted by installation date), select them and click "Uninstall", then follow the prompts to complete.
💡Tips: After uninstalling updates, Windows may reinstall it during subsequent automatic updates. It is recommended to pause updates for a few days after solving the problem, waiting for Microsoft to release a fixed version of the patch before reinstalling.
Solution 6: Run SFC and DISM to Repair System Files
If Windows search function abnormalities are caused by system file corruption, you can use the built-in SFC (System File Checker) and DISM (Deployment Imaging Service and Management Tool) to scan and repair.
Step 1. Right-click the Start menu (or use the shortcut "Win+X"), select "Windows Terminal (Admin)" or "Command Prompt (Admin)". When the User Account Control prompt appears, click "Yes" to allow execution.
Step 2. Run System File Checker (SFC) Scan
In the command line window, type the following command and press Enter. The system will start scanning all protected system files and automatically repair corrupted or missing files. This process may take some time, please wait patiently until the scan completes (it usually displays "Windows Resource Protection found corrupted files and successfully repaired them" or similar message).
sfc /scannow
Step 3. Run DISM Tool to Repair System Image
If SFC scan cannot fix the problem, or it indicates corruption but repair failed, you can continue using the DISM command to repair the Windows system image. Type the following command and press Enter. The system will connect to Windows Update server, download required files and fix image corruption. This operation usually takes a long time (may last 10-20 minutes), please keep network connection stable and do not close the command prompt window.
DISM /Online /Cleanup-Image /RestoreHealth
Step 4. After DISM command completes (displaying "The restore operation completed successfully"), close the command prompt and restart the computer. Restart ensures all repaired system files are properly loaded for the fix to take effect. After restart, please check if Windows search function has returned to normal.
Solution 7: Reset the Search App
If the above methods don't work, you can try resetting the Windows search app.
Step 1. Press "Win+I" to open Settings, click "Apps".
Step 2. Go to "Apps & features" (or click installed apps directly), search in the app list. You may not find it by searching "Windows Search" directly, you need to scroll down or search for "Search".
- In Windows 10, look for "Search and Cortana" or "Search Windows".
- In Windows 11, look for "Search".
Step 3. Click that app, then click "Advanced options".
Step 4. In Advanced options, scroll down to find the "Reset" button, click Reset. The system may ask for confirmation, click "Reset" again.
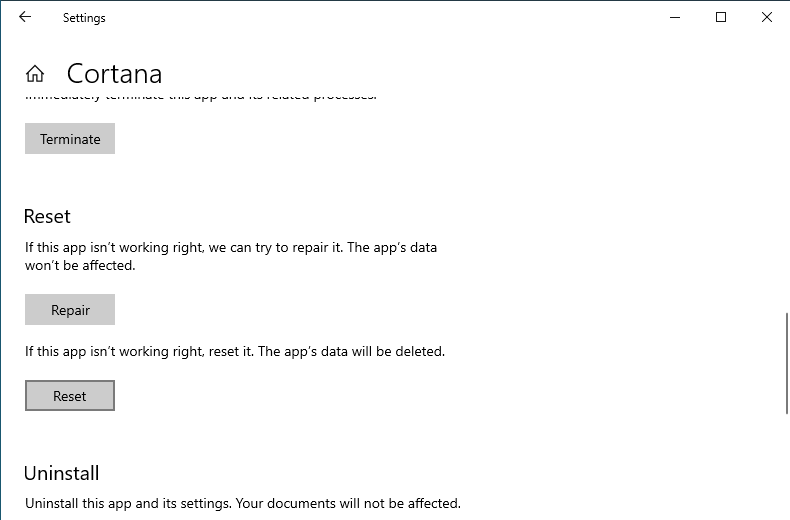
💡Tips: Resetting the search app will clear all its data (such as index cache), and settings will be restored to default values. After reset, Windows may take some time to rebuild the search index (especially if your computer has many files). During this period, search speed may temporarily slow down, which is normal.
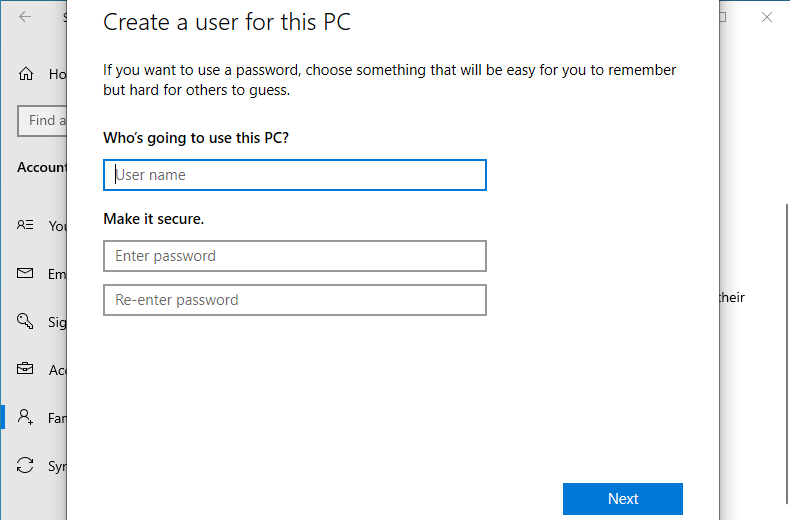
Solution 8: Create a New User Account
If your user profile is corrupted, it may cause the Start menu or search bar to not respond. Creating a new local account can effectively solve this problem.
Step 1. Press "Win+I" to open Settings, click "Accounts".
Step 2. Click "Family and other users" on the left. Click "Add another user to this PC" on the right.
Step 3. Enter the username you want (it is recommended to use an English name to avoid garbled characters in some older software), and set a password (password can be empty, just click Next to create a local account).
Step 4. After creation, it is recommended to log out of the current account or restart the computer. On the login screen, switch to the newly created account.
Step 5. After entering the new account, test if the search function is working normally.
- If it works normally, the original account profile is indeed corrupted. You need to log in to the old account as administrator, and manually copy Desktop, Documents, Downloads, Pictures and other folders from C:\Users\OldUsername\ to the corresponding C:\Users\NewUsername\ folder.
- If it still doesn't work, the problem may be related to system components or services.
What If Nothing Works? Restore from a System Backup
If you have tried all 8 fixes above and the Windows search bar still does not work, the problem likely stems from deep-seated system corruption that cannot be repaired through targeted troubleshooting alone. In this scenario, restoring from a complete system backup is the fastest and most reliable path to recovery.
If you created a system backup image using Hasleo Backup Suite before the search issue began—ideally when your system was running normally—you can restore the entire operating system, including all applications, settings, and personal files, to that working state in as little as 10-30 minutes. This approach bypasses the need to diagnose the specific cause of the search failure and guarantees a complete resolution. For detailed restore instructions, refer to our guide: How to Restore Your System From Full/Incremental/Differential Backups.
This is also why we recommend setting up automatic backup schedules today—so that when any Windows issue arises (not just search bar problems), you always have a reliable restore point to fall back on.
Frequently Asked Questions
A: Common causes include the search service stopped, corrupted search index, blocked background processes, or system file corruption.
A: Press Win+R, type services.msc, find Windows Search, right-click and select Restart. Set startup type to Automatic.
A: Depends on the number of files on your drive. It can take anywhere from 30 minutes to several hours. Keep your computer on during rebuilding.
A: No, clearing the cache only removes index cache files. Your actual files remain safe. The index will rebuild automatically.
A: Yes, some security software may block search-related processes. Try temporarily disabling your antivirus to test.
A: No, SFC only scans and repairs corrupted system files. Your personal files remain untouched.
A: These folders may not be included in the index. Go to Indexing Options > Modify to add your folders to the index.
A: If search works in a new account but not your original account, your user profile is corrupted. Create a new account and migrate your files.
Conclusion
Windows search bar problems are frustrating, but in most cases they can be resolved with the 8 troubleshooting methods above. Start with the simplest fixes—restarting the search service and running the troubleshooter—before moving on to more involved solutions like rebuilding the index or repairing system files.
However, the most important lesson any Windows issue teaches us is the value of preparation. A system backup created with Hasleo Backup Suite transforms any system problem—search bar failures, blue screens, boot errors, or worse—from a potential disaster into a 30-minute inconvenience. If you have not yet created a system backup, we strongly encourage you to do so now, before the next problem arises. Set up incremental backup schedules to keep your backup current with minimal effort, and you will never have to fear system failures again.
Related Articles
- How to Fix Windows Update Problems: A Complete Step-by-Step Guide
- How to Fix Windows Boot Problems: Step-by-Step Repair Guide
- How to Clear Windows 11 Update Cache: 3 Effective Methods
- How to Back Up and Restore Windows 11 for Free Using Hasleo Backup Suite Free?
- How to Fix Windows Blue Screen Errors (BSOD): A Complete Step-by-Step Guide


