
- Why You Should Clean the Update Cache
- Essential Preparation: Backup System Using Hasleo Backup Suite
- Method 1: Clean Update Cache Using Disk Cleanup Tool
- Method 2: Clean Update Cache Using Storage Settings
- Method 3: Clean Update Cache Using Command Prompt (Administrator)
- Precautions for Cleaning the Windows Update Cache
- Frequently Asked Questions
- Summary
Windows 11 system updates retain a large amount of cached files and old system version files locally, which can accumulate over time and occupy dozens of gigabytes of disk space. This can lead to insufficient system drive space and reduced operating efficiency. This tutorial will introduce several safe methods to clean these files, including using the Disk Cleanup tool, deleting temporary files through Storage settings, and using Command Prompt for advanced cleanup commands. Before performing any cleanup operations, it is strongly recommended to create a complete system backup using tools like Hasleo Backup Suite to ensure data security.
Why You Should Clean the Update Cache
Windows 11 system updates are an important mechanism for maintaining system security and new features, but the cache files generated during the update process gradually accumulate and may cause the following problems:
Problems Caused by Accumulated Update Cache:
- Insufficient Disk Space: Windows update cache is typically located in directories like C:\Windows\SoftwareDistribution\Download and C:\Windows\System32\DriverStore. Without regular cleanup, it can occupy several gigabytes or even dozens of gigabytes of space.
- System Running Slower: A large number of cache files occupy disk space and affect system performance, causing slower program startup and decreased file copy speeds.
- Update Issues: Corrupted update cache may cause Windows update failures, error codes, or updates getting stuck and failing to complete.
- Slow Startup Speed: Excessive temporary files and cache may extend system startup time.
👍 Benefits of Regularly Cleaning Update Cache:
- Free up valuable disk space for storing important files or installing new programs.
- Resolve Windows update issues caused by corrupted cache.
- Improve overall system performance and responsiveness.
- Reduce disk fragmentation and extend SSD lifespan.
Essential Preparation: Backup System Using Hasleo Backup Suite
Before cleanup, creating a full system backup is crucial for safety. Use Hasleo Backup Suite for a secure backup. It supports all Windows architectures (X86/X64/ARM64) and can create WinPE boot media. This lets you restore your system even if it won't boot, ensuring full protection.
📌 Steps to Backup System Using Hasleo Backup Suite:
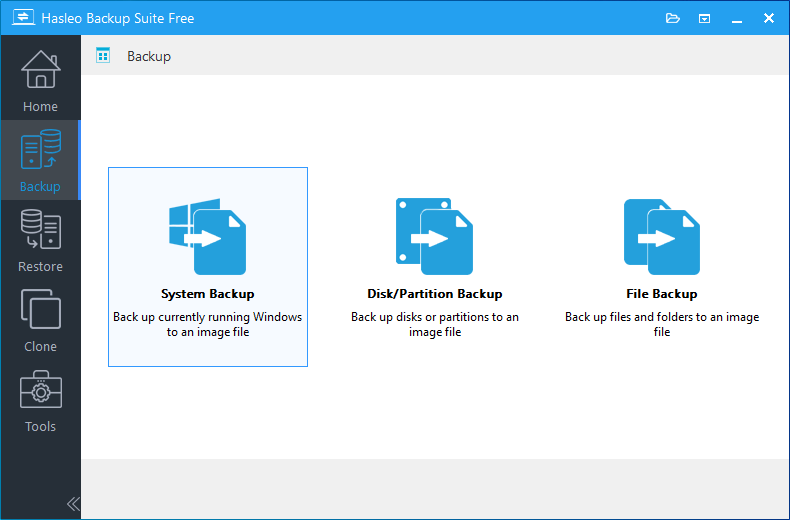
Step 1. Download, install, and run Hasleo Backup Suite. Click the "Backup" button in the navigation bar, then select "System Backup" in the operation area.
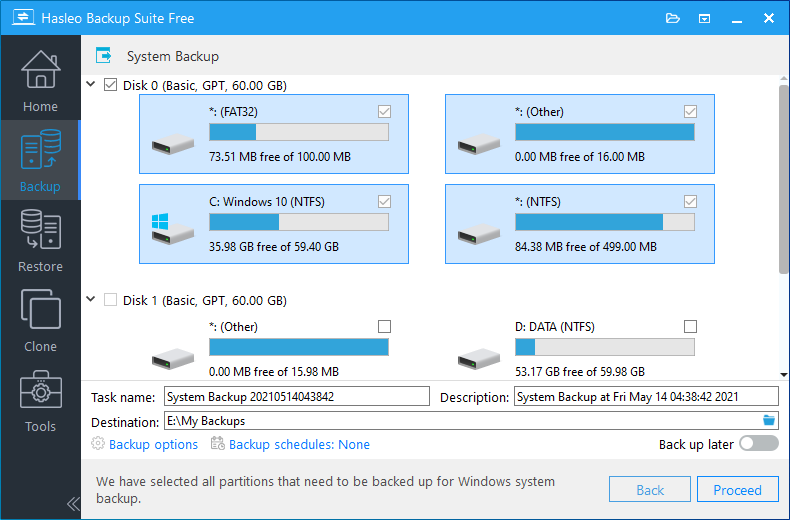
Step 2. Hasleo Backup Suite will automatically select all partitions required for Windows 11 system backup. Customize the task name, description, destination, and backup options. Then click Continue.
💡Tips:
- Task name: Specify a task name so that you can quickly find and manage your backup task later.
- Description: Briefly describe the purpose of the task and any other relevant information.
- Destination: Modify the destination path where the backup image files will be stored by clicking the folder icon.
- Backup options: Advanced backup settings. For more details, please refer to Backup options.
- Backup schedule: Set up backup schedules to automatically perform your backup tasks on a regular basis. For more details, please refer to Backup schedule.
Step 3. After clicking Continue, Hasleo Backup Suite will start backing up Windows 11 to your selected location. Note: The time required for backup depends on your data size, and the process may take some time.

💡Tips:
- It is recommended to store backup files on an external hard drive. This ensures they remain accessible for recovery if your primary system drive fails.
- For the first backup, it is recommended to use Full Backup mode. Subsequent backups can use incremental backup to save space.
- Set up backup schedules to automatically perform system backups regularly.
Method 1: Clean Update Cache Using Disk Cleanup Tool
Windows built-in Disk Cleanup tool is the simplest and safest method to clean update cache files.
📌 Operation Steps:
Step 1. Press Win + R to open the Run dialog, type "cleanmgr" and press Enter to open Disk Cleanup. Or directly search for Disk Cleanup in the taskbar search box.
Step 2. Select the drive to clean (usually C: drive), then click "OK".
Step 3. After the tool finishes scanning, click the "Clean up system files" button at the bottom of the displayed window.
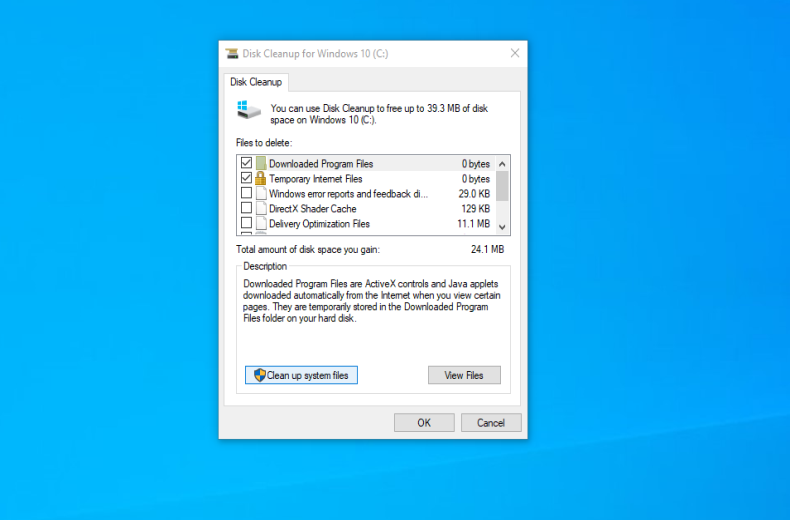
Step 4. After selecting the drive and scanning again, in the system files list, you can check the following related options:
- ✅Windows Update Cleanup (clean cached installed updates)
- ✅Windows Update Logs
- ✅Delivery Optimization Files
- ✅Temporary Windows Installation Files
- ✅Previous Windows Installation Files (Warning: After cleanup, you will not be able to roll back to the previous version)
- ✅Temporary Files
Step 5. Click "OK" and confirm the deletion according to the prompts.
Step 6. Wait for the cleanup to complete. After cleanup is finished, Disk Cleanup will display the amount of space freed.
👍Advantages:
- System built-in tool, safe and reliable
- Simple operation, no technical knowledge required
- Can precisely select file types to clean
⚠️Disadvantages:
- May not be able to clean all update cache (some deep or in-use files cannot be deleted)
- Some stubborn cache files may not be removable
Method 2: Clean Update Cache Using Storage Settings
Windows 11 Storage settings provide an intuitive graphical interface to manage and clean disk space.
📌 Operation Steps:
Step 1. Press "Win + I" to open Windows 11 Settings.
Step 2. Go to "System" > "Storage".
Step 3. Click "Temporary Files" (or first click "Cleanup Recommendations", then go to "Advanced Options").
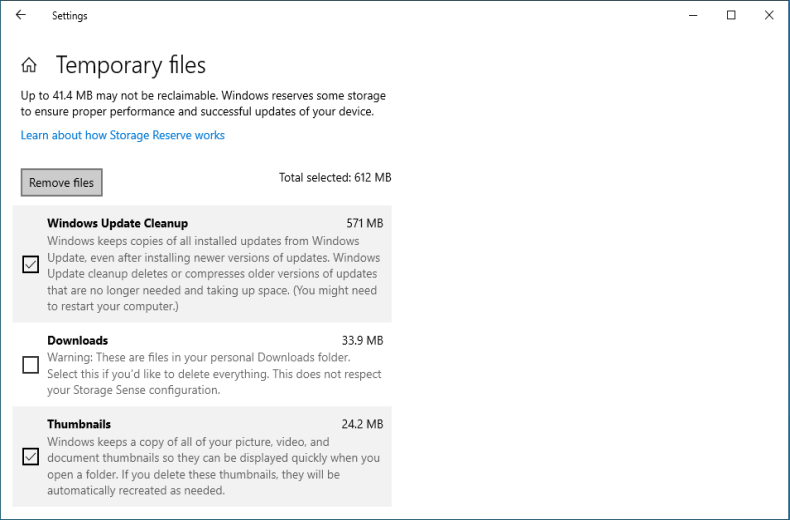
Step 4. On the Temporary Files page, you can check the following options:
- ✅ Windows Update Cleanup (if available)
- ✅ Delivery Optimization Files
- ✅ Temporary Files
- ✅ Thumbnails
- ✅ Recycle Bin (please ensure no important files inside)
Step 5. Click "Remove files" and confirm.
Step 6. (Optional) Return to the Storage main page and use "Cleanup Recommendations" to view and manage other files.
👍Advantages:
- Windows 11 native feature, intuitive interface
- Can view detailed disk space usage
- Provides cleanup recommendations and suggested items
Method 3: Clean Update Cache Using Command Prompt (Administrator)
Method A: Stop Services and Delete Cache
This method fixes update failures, stuck updates, or error codes caused by corrupted cache by resetting the core cache folders of Windows Update. It is recommended to use this method only when encountering update issues, not for routine cleanup. (Suitable for advanced users)
📌 Operation Steps:
Step 1. Run Command Prompt as Administrator: Right-click the "Start" button and select "Terminal (Administrator)" or "Command Prompt (Administrator)". Click "Yes" if prompted by User Account Control (UAC).
Step 2. Stop related services: In the Command Prompt window, type the following commands one at a time. Press Enter after each command and wait for the "Service successfully stopped" confirmation before proceeding to the next.
         net stop wuauserv
         net stop cryptsvc
         net stop bits
         net stop msiserver
Step 3. Execute the following commands to rename cache folders one by one:
         ren %windir%\SoftwareDistribution SoftwareDistribution.old
         ren %windir%\System32\catroot2 catroot2.old
💡Tips: If the system drive is not C:, please replace C: with the corresponding drive letter.
Step 4. Execute the following commands to restart the stopped services one by one:
         net start wuauserv
         net start cryptsvc
         net start bits
         net start msiserver
Step 5. Close Command Prompt, then restart the computer.
Step 6. After restarting, if Windows Update functions normally, you can manually delete the C:\Windows\SoftwareDistribution.old and C:\Windows\System32\catroot2.old folders to free up space.
💡Tips: If you get permission denied errors when deleting, try again after restarting.
Method B: Use DISM Commands to Clean Component Store
This method thoroughly cleans update cache and repairs system components through command-line tools. Suitable for advanced users or when standard troubleshooting fails.
📌 Operation Steps:
Step 1. Run Command Prompt as Administrator: Right-click the "Start" button and select "Terminal (Administrator)" or "Command Prompt (Administrator)". Click "Yes" if prompted by User Account Control (UAC).
Step 2. (Optional) Execute the following command to check component status:
DISM /Online /Cleanup-Image /CheckHealth
If corruption is detected, run /ScanHealth for detailed scanning, then use /RestoreHealth to repair.
Step 3. Execute the following command to clean update cache:
DISM /Online /Cleanup-Image /StartComponentCleanup
Step 4. (Optional but Critical Warning) The following command will permanently and irreversibly remove old component versions.
DISM /Online /Cleanup-Image /StartComponentCleanup /ResetBase
💡Tips: This operation will delete all backups of old update components, making installed updates uninstallable. Only use when you are sure you don't need to roll back updates and urgently need disk space.
👍Advantages:
- Performs a more thorough cleanup, capable of removing stubborn cache files.
- Can repair corrupted Windows Update components.
- No third-party software required.
⚠️Disadvantages:
- Requires administrator permissions, slightly complex operation.
- Commands must be executed in a strict sequence; errors may cause system issues.
- Deletes cached update files, which will need to be re-downloaded during the next update.
ℹ️Precautions for Cleaning the Windows Update Cache
To ensure safe and effective operation, please pay attention to the following points before performing cleanup:
- Create a Backup First: Always create a system restore point or a full system backup with third-party software (e.g., Hasleo Backup Suite) before any cleanup. This allows for instant recovery if an issue occurs.
- Delete Only Cache Files: Only remove files from the designated Windows Update cache folders. Do not manually delete other system files or folders.
- Expect Re-downloads: Clearing the cache forces Windows to re-download all update files during the next check, consuming time and bandwidth. Perform cleanup only when you have a stable, unrestricted internet connection.
- Ensure System Stability: If the system has serious issues, it is recommended to resolve the root problem first before performing cache cleanup.
- Clean as Needed: It is recommended to perform cleanup when encountering update failures, C: drive space warnings, or before major version upgrades.
- Monitor Disk Space: Configure Windows Storage Sense or the built-in Disk Cleanup tool to automatically delete temporary files, including update cache, for ongoing space management.
Frequently Asked Questions
A: You can safely clear Windows 11 update cache using three methods: 1) Disk Cleanup tool - select Windows Update Cleanup and related options, 2) Storage settings - go to System > Storage > Temporary Files, or 3) Command Prompt - stop services and rename cache folders, or use DISM commands.
A: The amount of space freed depends on your update history. Windows update cache can occupy several gigabytes to dozens of gigabytes. On systems with frequent updates, you may free up 10-30GB or more by cleaning the cache.
A: No, cleaning the update cache (SoftwareDistribution folder) does not affect already installed updates. However, Windows will need to re-download update files for future updates. Using DISM /ResetBase command will make updates irreversible, so use with caution.
A: No, you should not attempt to clean the update cache while Windows updates are actively downloading or installing. This can cause update failures. Always stop Windows Update service first before cleaning cache.
A: It is recommended to clean the update cache when you encounter update failures, receive low disk space warnings on C: drive, or before major version upgrades. Monthly or quarterly cleanup is sufficient for most users.
A: Before cleaning, it is strongly recommended to create a complete system backup using tools like Hasleo Backup Suite. This ensures you can restore your system if anything goes wrong during the cleanup process.
A: Disk Cleanup is simpler and safer for beginners, but may not remove all cache. Command Prompt methods (especially DISM commands) provide deeper cleanup but require more technical knowledge and carry higher risk if commands are executed incorrectly.
A: Yes, corrupted update cache is a common cause of Windows update failures. Cleaning the cache by stopping services and renaming folders often resolves update stuck, error codes, and failed download issues.
Summary
Cleaning Windows 11 system update cache is an effective method to improve system performance and free up disk space. This guide has introduced several commonly used methods for this operation. It is particularly important to note that before performing any cleanup steps, it is strongly recommended to create a complete system backup using professional tools like Hasleo Backup Suite. This tool not only enables quick system recovery but also supports various functions such as system migration and disaster recovery, making it an excellent assistant for Windows system protection. Download now and experience more useful features!
Related Articles
- How to Merge/Delete Old Backup Files Using Hasleo Backup Suite Free?
- How to Create Full/Incremental/Differential Backups Using Hasleo Backup Suite?
- How to Set Up Automatic Windows Backup with Backup Schedule?
- How to Use the Deduplication in Hasleo Backup Suite to Save Storage Space?
- How to Compress Backup Files Using Hasleo Backup Suite Free?


