
- Why Downgrade from Windows 11 to Windows 10?
- Method 1: Use Windows Built-in Rollback Feature (Within 10 Days)
- Method 2: Uninstall Updates Using Windows Recovery Environment (WinRE)
- Method 3: Perform a Clean Install via Windows 10 Installation Media
- Method 4: Restore Using Hasleo Backup Suite (Recommended)👑
- Frequently Asked Questions
- Conclusion
While Windows 11 brings a new interface design and multiple feature improvements, some users may need to downgrade to Windows 10 due to compatibility, performance, usage habits, or hardware requirements. This tutorial will introduce 4 ways to downgrade from Windows 11 to Windows 10, with special emphasis on using Hasleo Backup Suite to restore a Windows 10 backup image. This method provides complete system backup and restoration, is not limited by time constraints, maximizes the preservation of the original environment and data, is the most powerful and flexible, and is the preferred solution for the vast majority of scenarios. Whether you have exceeded the 10-day period after upgrade or have already cleaned up old system files, you can use this method to achieve downgrade.
Why Downgrade from Windows 11 to Windows 10?
Windows 11 was released on June 24, 2021, bringing a modernized interface and new features, but some users may choose to downgrade after upgrading for the following reasons:
- Compatibility and Stability Issues: Some older hardware or professional software may be incompatible with Windows 11 or exhibit abnormalities, preventing normal operation.
- Performance Experience Decline: On some lower-spec computers, Windows 11's animations and new security features may cause it to run less smoothly than Windows 10.
- Changed User Habits: Windows 11's new interface layout (such as centered taskbar and Start menu) disrupts users' familiar workflow.
- Driver and Hardware Support: Stable drivers for some hardware (such as specific printers and scanners) may be slow to update on Windows 11.
- Enterprise Deployment Strategy: Enterprise IT departments typically delay upgrades to ensure absolute stability of all business software.
Preparations Before Downgrading:
- Backup Important Data: Regardless of which method you use to downgrade, it is recommended to first back up important files from the C drive and personal folders.
- Create System Backup: It is strongly recommended to create a system backup image using Hasleo Backup Suite before downgrading, so you can quickly restore if needed.
- Prepare Windows 10 Installation Media: If you expect to exceed the 10-day rollback period or need a fresh installation, please download and create a Windows 10 installation USB drive from Microsoft's official website in advance.
- Confirm License: Devices that upgraded from genuine Windows 10 will typically activate automatically after downgrade. However, it is recommended to record or confirm that your Microsoft account is linked to the digital license.
Method 1: Use Windows Built-in Rollback Feature (Within 10 Days)
Windows 11 has a built-in feature to rollback to Windows 10, but this is only effective for a limited time after upgrade (typically about 10 days), and requires the Windows.old file to be preserved.
⚠️ Applicable Conditions:
- It has been no more than the allowed rollback period (typically about 10 days) since upgrading from Windows 10 to Windows 11.
- The Windows.old folder on the system drive (usually C: drive) must still exist completely.
- You have not performed any operations that delete this folder (such as using the Disk Cleanup tool to clean up Previous Windows Installations or system restore points).
📌 Operation Steps:
- Step 1. Press Win + I shortcut keys to open Settings.
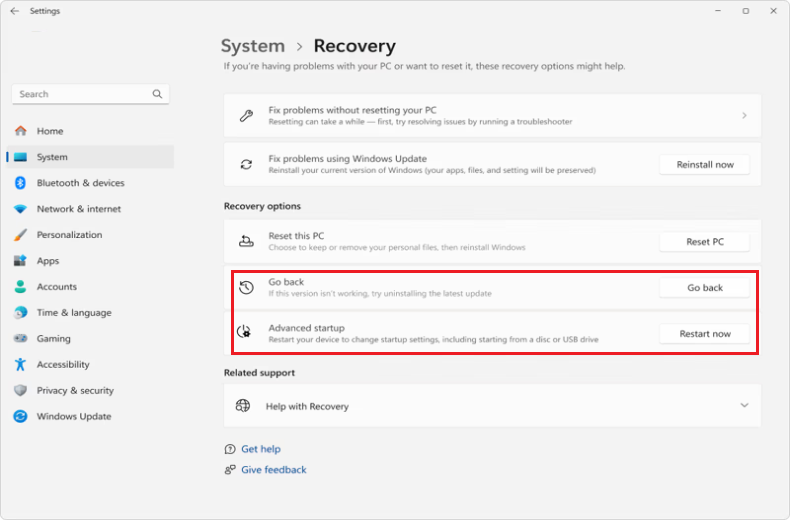
- Step 2. Go to System, find and click the Recovery option.
- Step 3. Under the Recovery option, look for the Go back button. If available, click it and follow the prompts.
- If the above button is not displayed or unavailable, you can access it through: click Restart now next to Advanced startup, then enter Windows Recovery Environment (WinRE) and select Troubleshoot > Advanced options > Go back to previous version.
- Step 4. Select the reason for going back and follow the on-screen instructions to complete the process. The system will automatically restart and execute the rollback.
💡Tips:
- The rollback process may take 30 minutes to 2 hours. Please ensure the device is connected to power and wait patiently.
- After rollback, applications you installed and system settings you made after upgrading to Windows 11 may be removed, but the Windows 10 state before the upgrade (personal files, as well as applications and settings installed at that time) will be restored.
- Please be sure to preserve the Windows.old folder. If the time limit has passed or this folder has been deleted, this method will not be available and you will need to use other methods.
Method 2: Uninstall Updates Using Windows Recovery Environment (WinRE)
If the 10-day rollback period has passed, but Windows 11 was upgraded through Windows Update (not a clean installation), you can rollback to Windows 10 through the Uninstall Updates feature in the Windows Recovery Environment (WinRE). This method only applies to Windows 11 installed via upgrade.
⚠️ Applicable Conditions:
- Windows 11 was upgraded through Windows Update, not installed fresh using installation media.
- The system still retains the original Windows 10 files (you can check via Disk Cleanup for the Windows.old folder).
- After uninstalling updates, the system will restore to the previous Windows 10 state.
📌 Operation Steps:
- Step 1. Press Win + I to open Windows 11 Settings, click System > Recovery.
- Step 2. On the Recovery page, find the Advanced startup section and click the Restart now button.
- Step 3. The computer will restart into the Windows Recovery Environment (WinRE). On the Choose an option screen, click Troubleshoot > Advanced options.
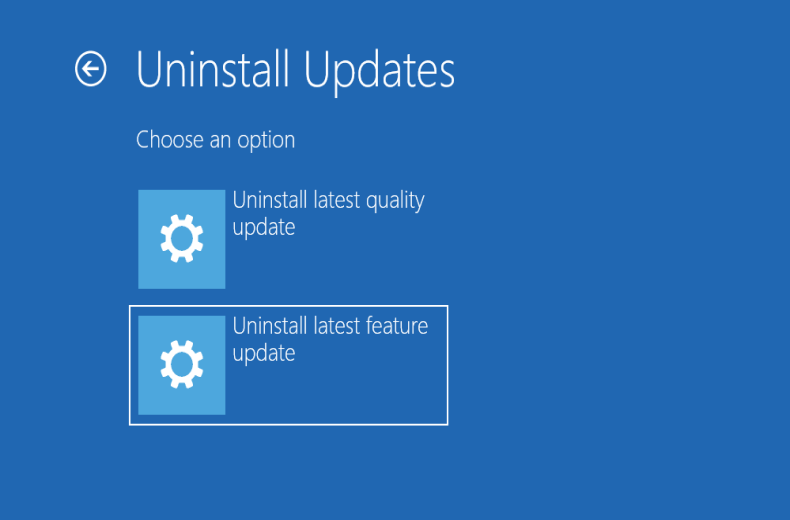
- Step 4. Click Uninstall updates > Uninstall latest feature update. If this option is greyed out or does not exist at all, it means that the system does not meet the rollback conditions.
- Step 5. Follow the on-screen prompts to confirm the operation. The system will begin uninstalling Windows 11 and restoring to Windows 10. This process may take 20 minutes to 1 hour. Please do not interrupt the power supply.
- Step 6. After rollback is complete, the computer will automatically restart and enter the original Windows 10 system.
💡Tips:
- This method only applies to Windows 11 upgraded through Windows Update. If Windows 11 was installed fresh using installation media, this method is not available.
- After uninstalling updates, Windows 10 will restore to its state before the upgrade, including all applications, settings, and personal files.
- If the Uninstall latest feature update option does not exist or is unavailable, it means the Windows.old folder is no longer valid, and this method cannot be used.
- After rollback, you may need to reactivate Windows 10. If you encounter issues, please ensure network connectivity and try troubleshooting in Settings > Update & Security > Activation, or contact Microsoft support.
Method 3: Perform a Clean Install via Windows 10 Installation Media
This is the most thorough downgrade method but will delete all data. You need to prepare a Windows 10 installation USB drive in advance.
⚠️ Preparations:
- Download the Windows 10 installation tool (Media Creation Tool) or prepare a Windows 10 ISO file.
- Prepare a USB drive with a capacity of at least 8GB and format it as FAT32.
- Back up all important data to an external storage device.
📌 Operation Steps:
- Step 1. Use another computer to run the Windows 10 Media Creation Tool and select Create installation media for another PC.
- Step 2. Select language, Windows edition, and architecture (32-bit or 64-bit), then click Next.
- Step 3. Select USB flash drive as the media, then select the prepared USB drive and click Next to start creating the installation media.
- Step 4. Insert the created Windows 10 installation USB drive into the computer that needs to be downgraded. Restart the computer and enter the BIOS/UEFI settings interface (usually accessed by pressing Del, F2, F12, etc.). Set the USB drive as the first boot item, save and exit.
- Step 5. After booting from the USB drive, enter the Windows installer. Follow the prompts to select language and keyboard layout, then click Install now.
- Step 6. Enter your Windows 10 product key (if required), or click I don't have a product key to skip (you can activate later). Select the Windows 10 edition to install (should match your original license edition, usually Home).
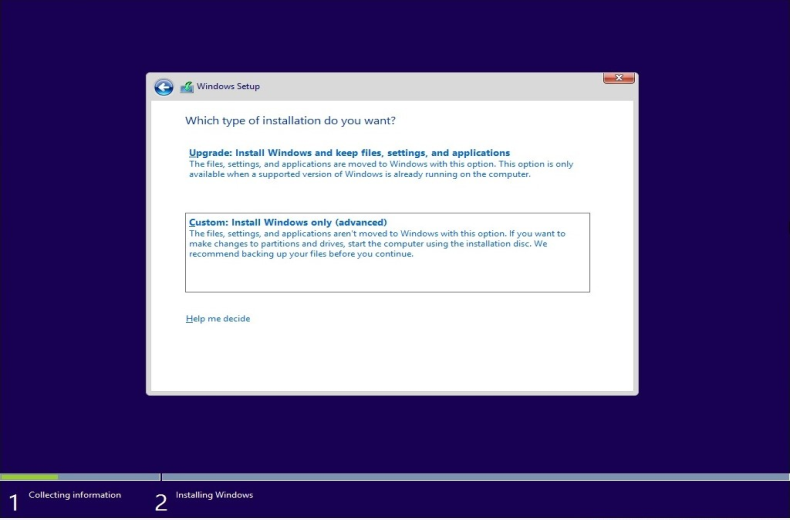
- Step 7. On the Install type screen, select Custom: Install Windows only (advanced).
- Step 8. On the partition selection screen, select the original system partition (usually Primary partition), click Delete. Repeat this operation to delete all partitions related to the original system. Finally, you will get a Drive X Unallocated space. (Warning: This operation will permanently delete all data on that partition. Please confirm again that you have backed up!)
- Step 9. Select this Unallocated space and click Next directly. The Windows installer will automatically create the required system partitions.
- Step 10. The installer will automatically copy files, install the system and updates. The computer will restart several times during this process. This may take 30 minutes to 2 hours.
- Step 11. After installation is complete, follow the wizard to complete region settings, user account creation, etc.
💡Important Reminders:
- This method will delete all data on the hard drive, including the operating system, applications, and personal files.
- After reaching the desktop, install basic drivers using the network adapter driver installation package you prepared earlier, or use Windows Update to check for updates. Then visit your computer manufacturer's official website to download and install all Windows 10-specific drivers.
- If automatic activation fails, please check in Settings > Update & Security > Activation. For pre-installed computers, activation typically occurs automatically after connecting to the internet.
- Reinstall the applications you need.
Method 4: Restore Using Hasleo Backup Suite (Recommended)👑
This is the most recommended method! If you created a Windows 10 system backup image using Hasleo Backup Suite before upgrading to Windows 11, you can use this method to quickly and completely restore your system to Windows 10.
If you have not created a system image backup using Hasleo Backup Suite, you can choose to create a system image on another Windows 10 computer and then restore it to this computer. This method requires using the Universal Restore feature. Please upgrade to Hasleo Backup Suite Home/Professional/Server/Enterprise edition.
🎯 Core Advantages
- Complete System Restore: The restored system will be exactly the same as at the time of backup, including the operating system, all installed applications, personal settings, and files.
- Efficient and Time-saving: The entire process typically takes only 10-30 minutes, which is much faster than installing the system from scratch and reinstalling all software.
- No Product Key Required: When restoring an activated system image, Windows can typically automatically reactivate based on the digital license without needing to re-enter the key.
- High Flexibility: Supports restoring the system to the original disk or a new disk.
- Data Protection: The restore process will not affect data on other partitions or non-system drives.
⚠️ Preparations:
- Ensure you have a complete Windows 10 system backup image created by Hasleo Backup Suite.
- Download and install the required version of Hasleo Backup Suite.
- The restore operation will completely overwrite the current system drive (usually C: drive). Please be sure to back up any new files from the current Windows 11 system drive that you need to keep.
📌 Steps to Restore Windows 10 Using Hasleo Backup Suite:
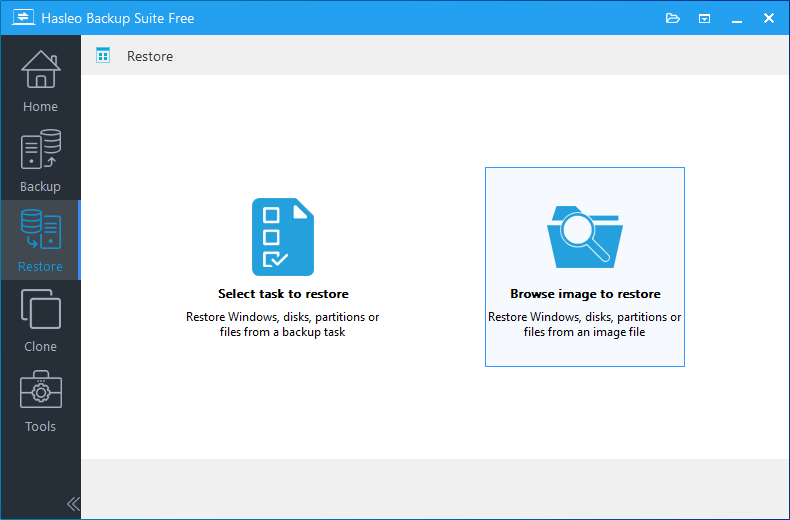
Step 1. Run Hasleo Backup Suite. Click the "Restore" button in the navigation bar, then click "Browse image to restore" in the operation area to find the Windows 10 backup image.
Step 2. Select System mode to restore the entire system, then click Next.
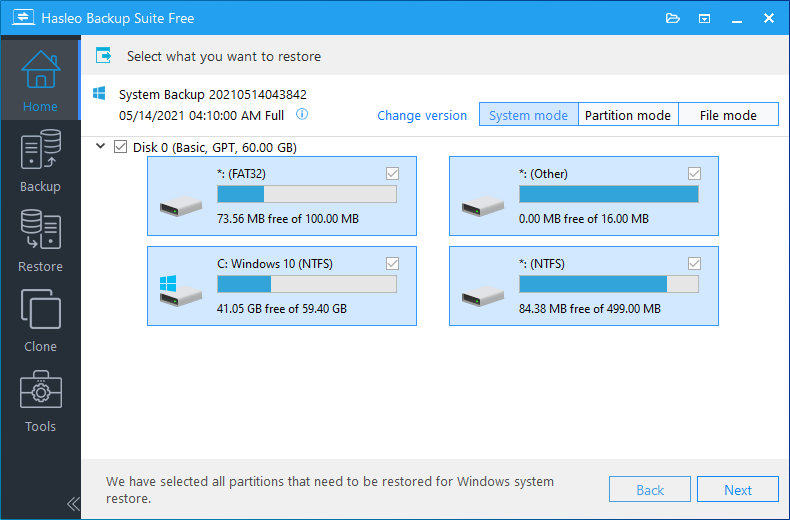
⚠️Tips:
- If you want to restore your entire operating system, please choose "System mode" in the upper-right corner. To restore a single partition, please select "Partition mode". For recovering individual files, please use "File mode".
- Important Note: Restoring only the Windows partition in "Partition Mode" may result in a system that fails to boot or function properly.
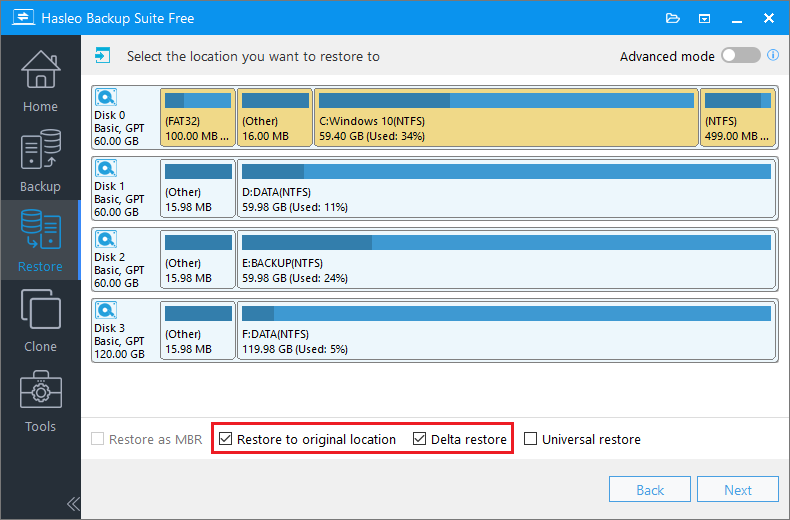
Step 3. Select the target disk for the restore. If your Windows 10 image was created before upgrading to Windows 11 and you are restoring to the original location (the same disk), check the "Restore to original location" box. This will automatically enable Delta Restore to significantly speed up the process. Click Next to continue.
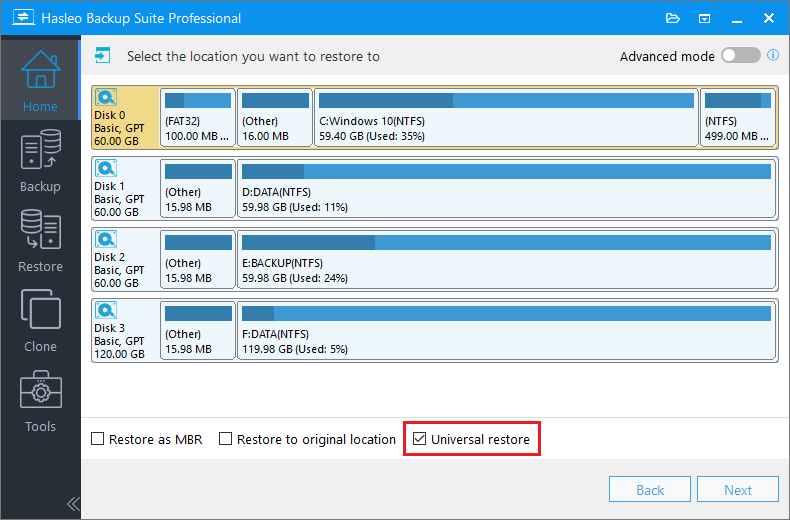
If you are restoring the Windows 10 system image created on a different computer, please check the "Universal restore" option. Then, click Next to continue.
💡Tips:
- Restore to Original Location: This option allows you to restore the Windows operating system to its original location on the original disk without damaging other partitions. Please note that this option is only available in System mode.
- Keep Partition Layout: This option ensures that the partition layout of the target disk after restoration is exactly the same as the source disk. Please note that this option is only available in System mode.
- Universal Restore: This option allows you to restore a system image to a computer with different hardware configuration.
Step 4. Hasleo Backup Suite will start restoring system from the Windows 10 backup image. This process may take several minutes. Please do not interrupt power or close the application.
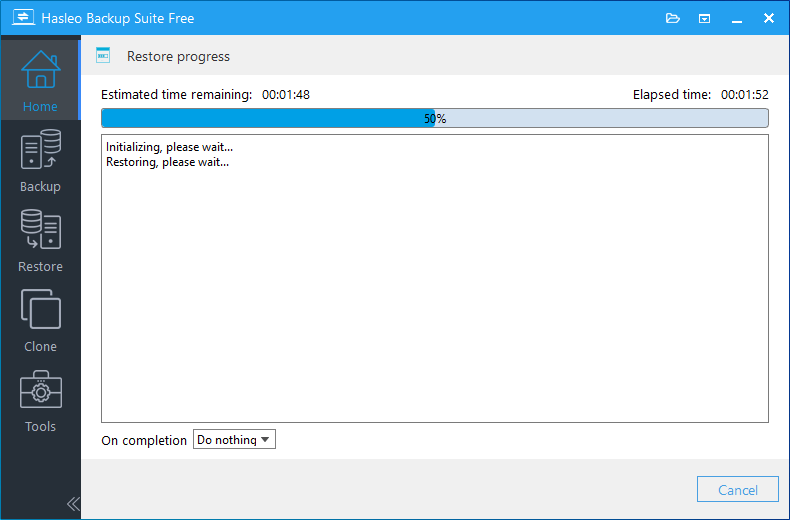
✅Congratulations! The system has been successfully restored to Windows 10! You can use Windows 10 after restarting the computer.
The following table compares the four downgrade methods in detail to help you select the most suitable one.
| Method 1: Built-in Rollback | Method 2: Uninstall Updates | Method 3: Fresh Install | Method 4: Backup Restore (Recommended) | |
| Time Requirement | Within 10 days | No limit | No limit | No limit |
| Time Required | 30 min - 2 hours | 20 min - 1 hour | 1-3 hours | 10-30 min |
| Data Retention | Keep personal files and apps | Restore to pre-upgrade state | Delete all data | Fully restore backup state |
| Product Key Required | No | Usually not required | Yes | Usually not required |
| Backup Dependent | No | No | Yes (backup data) | Yes (system image) |
| Restoration Completeness | Average | Good | Fresh system | Completely consistent |
| Complexity | Simple | Simple | Medium | Simple |
| Recommended Index | ★★★☆☆ | ★★★☆☆ | ★★☆☆☆ | ★★★★★ |
🎯 Recommendations:
- Best Choice: Method 4 (Backup Restore) is strongly recommended. Using Hasleo Backup Suite to create a Windows 10 system backup is the fastest, most complete, and safest downgrade method.
- Urgent Rollback: If you need to quickly revert to the previous state within 10 days after an upgrade, use Method 1: Built-in Rollback.
- Fresh Start: If you want a clean Windows 10 system and do not mind reinstalling all applications, you can use Method 3 (Fresh Install).
- Prevention First: It is recommended to create a system backup image using Hasleo Backup Suite before upgrading to Windows 11, so you can easily downgrade to Windows 10 at any time.
Hasleo Backup Suite delivers complete Windows system protection. Seamlessly downgrade from Windows 11 to 10, upgrade your hard drive, or recover from a crash—all from a single, reliable tool. Experience professional backup and recovery. Download now.
Frequently Asked Questions
A: You typically have about 10 days to use the built-in rollback feature. However, this requires that the Windows.old folder still exists on your system drive. If you've cleaned up old files using Disk Cleanup, this option may no longer be available.
A: It depends on the method. Using the built-in rollback (Method 1) or uninstalling updates (Method 2) will preserve your personal files. Using Hasleo Backup Suite restore (Method 4) will restore to your exact backup state. Only the clean install method (Method 3) will delete all data.
A: For Methods 1, 2, and 4 (rollback, uninstall updates, or backup restore), you typically don't need a product key as Windows will activate automatically based on your digital license. For Method 3 (clean install), you may need to enter a product key or activate later.
A: If you don't have a backup, you can use Methods 1-3. The built-in rollback works within 10 days. WinRE uninstall updates works if Windows was upgraded via Windows Update. Clean install requires Windows 10 installation media and will delete all data.
A: Method 1 (rollback) restores your system to the state before Windows 11 upgrade. Method 2 restores to pre-upgrade state. Method 4 restores exactly to your backup state. Only Method 3 (clean install) gives you a fresh Windows 10 without any apps or settings.
A: Yes, but you need to use the Universal Restore feature in Hasleo Backup Suite Home/Professional/Server/Enterprise edition. This allows you to restore a system image to a computer with different hardware.
A: Method 4 (restoring with Hasleo Backup Suite) is typically the fastest, taking only 10-30 minutes. It also provides the most complete restoration without needing to reinstall applications.
Conclusion
Choosing the right downgrade method depends on your specific situation. If you are still within the 10-day rollback window, the built-in rollback feature offers the simplest path requiring no extra tools. For those who upgraded via Windows Update and missed the deadline, the WinRE update uninstall method can still restore your system to its pre-upgrade state. A clean install via Windows 10 installation media provides the freshest system but at the cost of all data and applications.
For users who planned ahead by creating a system backup with Hasleo Backup Suite before upgrading, restoring from that backup image is far and away the fastest, most complete, and most reliable option—restoring your entire system including all applications, settings, and files in as little as 10–30 minutes. Regardless of which method you choose, always back up your important data first to avoid permanent loss.


