
- Why Upgrade Your Surface SSD to Larger Capacity?
- Why Choose Hasleo Backup Suite for SSD Cloning?
- Preparations Before SSD Upgrade
- How to Clone Surface (ARM64) SSD to a Larger SSD with Hasleo Backup Suite?
- Steps to Replace SSD in Surface ARM64 Computer
- Verification and Troubleshooting
- Frequently Asked Questions
- Conclusion
With the popularity of ARM64 computers like the Surface Pro 11 equipped with Snapdragon X Elite/Plus chips, the accumulation of Windows system updates, increasing applications, and growing personal data has made the original 256 GB or 512 GB SSD storage space increasingly insufficient. Compared to the time-consuming and complex system reinstallation solution, upgrading to a larger capacity SSD is undoubtedly a better solution that can completely preserve all software, settings, and personal data. This article will provide a detailed guide on how to use Hasleo Backup Suite to safely and efficiently clone your Surface device's SSD to a larger capacity SSD, achieving lossless capacity expansion.
Why Upgrade Your Surface SSD to Larger Capacity?
Insufficient SSD storage space on Surface devices is a common problem many users face. Here are the main reasons for upgrading to a larger capacity SSD:
- System alerts for insufficient storage: Windows frequently pops up "low disk space" warnings, affecting normal work and system updates.
- Unable to install important updates: System updates or applications cannot be installed due to insufficient space, increasing security risks.
- Applications running slowly: Insufficient SSD space causes system performance degradation, and application startup and running speeds become slower.
- Unable to save new files: Work documents, photos, videos and other new files cannot be saved, seriously affecting work efficiency.
- Cache and temporary file accumulation: Windows update cache, application temporary files and other data occupy a large amount of space, yet are difficult to clean up.
Advantages of upgrading SSD over other solutions:👍
- Preserve all data and settings: Direct cloning ensures that operating system, applications, drivers, and personal settings are completely preserved.
- No need to reinstall system: Avoid the cumbersome process of Windows reinstallation, driver installation, and application configuration.
- Minimize Downtime: Get back to work instantly after cloning—no lengthy setup or configuration needed.
- Data security guaranteed: The entire process does not affect data on the original SSD, and you can roll back at any time before cloning is complete.
Why Choose Hasleo Backup Suite for SSD Cloning?
Among many disk cloning software, Hasleo Backup Suite stands out as the ideal choice for Surface device SSD upgrades with its excellent performance and rich features. Here are the core advantages of choosing Hasleo Backup Suite:
- ✅Native ARM64 Support: Hasleo Backup Suite provides a native ARM64 version, specifically optimized for Surface Pro X, Surface Pro 11 and other ARM64 devices, fully leveraging Snapdragon chip performance advantages while reducing power consumption and extending battery life.
- ✅Professional Cloning Features: Provide disk and partition cloning functions, allowing you to migrate data without paying any fees.
- ✅High-Speed Cloning Engine: A deeply optimized engine delivers industry-leading cloning speeds, saving you significant time.
- ✅Delta Clone Technology: The function can clone only the data blocks that have changed since the last full cloning, significantly shortening the time for repeated cloning operations.
- ✅Flexible Partition Adjustment: During the cloning process, you can freely adjust the size and position of target partitions to fully utilize the entire space of the new SSD.
- ✅Multiple Disk Alignment Modes: Support 1MB alignment, 4KB alignment, cylinder alignment, and None (no alignment) to meet different application scenarios and performance.
- ✅Intuitive Operation Interface: Clean and clear user interface, combined with clear wizard-style operation process, allows even beginners to get started quickly.
📌Download Hasleo Backup Suite ARM64 version now to start SSD upgrade for your Surface device. To ensure data security, it is strongly recommended to create a complete system backup before cloning.
⚠️Preparations Before SSD Upgrade
Adequate preparation before starting SSD cloning is the key to ensuring successful cloning. First, you need to confirm whether your Surface device model supports SSD replacement:
Check Device Compatibility:
- Confirm if SSD is replaceable: Not all Surface devices support user-replaceable SSDs. Some models (such as Surface Pro 7 and earlier versions, certain versions of Surface Pro X) have SSDs soldered to the motherboard and cannot be replaced. Please consult Microsoft official documentation or professional repair guides to confirm whether your device supports SSD replacement.
- Check device model: View your Surface device model in "Settings > System > About", then check on Microsoft official website or third-party repair websites whether that model supports SSD replacement.
Select the Right New SSD:
- Confirm SSD specifications: Surface ARM64 devices typically use M.2 2230 NVMe SSDs. Please confirm the new SSD's dimensions, interface, and protocol are compatible with your device before purchasing.
- Choose capacity: It is recommended that the capacity be more than 1.5 times the currently used space on the SSD to ensure there is enough space for cloning and system operation. For optimal value, a 512GB or 1TB SSD is typically recommended.
Prepare Tools and Equipment:
- SSD enclosure: Need to connect the new SSD via USB for cloning. It is strongly recommended to use USB 3.0 or higher version enclosures for the best transfer speed.
- Disassembly tools: Prepare dedicated Surface disassembly tools (typically require SIM card ejector tool, plastic spudger, Torx screwdriver, etc.).
- ESD protection equipment: ESD wrist strap and ESD mat to prevent static electricity from damaging device components.
Data Backup:
- Create system backup: Use Hasleo Backup Suite to create a complete system backup image as the final data protection barrier.
- Backup important files: Extra backup of documents, photos, videos and other important files to external hard drive.
- Disable BitLocker: To avoid boot failure or lockout after cloning, it is recommended to temporarily disable BitLocker encryption in "Settings > Privacy and security > Device encryption" before cloning.
System Preparation:
- Clean temporary files: Use Windows disk cleanup tool to delete temporary files, cache, and unnecessary system files.
- Uninstall unnecessary applications: Uninstall long-unused software to reduce the amount of data to be cloned.
- Run disk check: Check the health status and errors of the existing SSD to ensure there are no bad sectors or potential issues.
- Ensure stable power: Connect power adapter for operation to avoid cloning interruption due to battery depletion.
How to Clone Surface (ARM64) SSD to a Larger SSD with Hasleo Backup Suite?
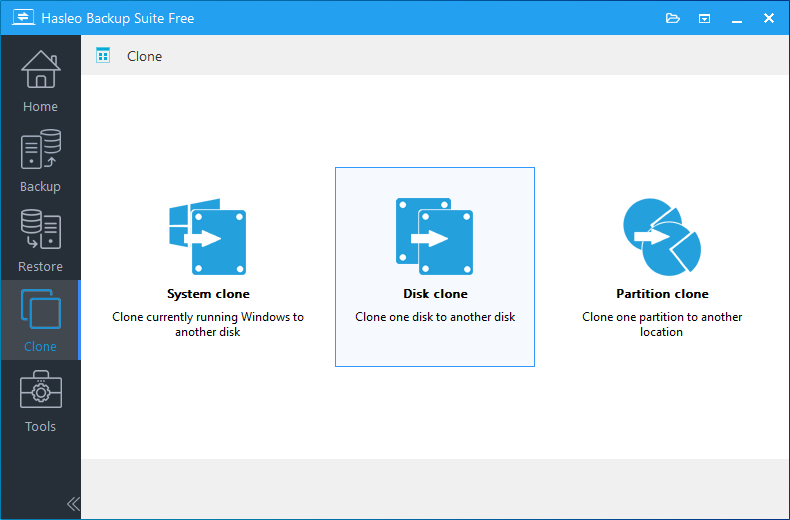
Step 1. Download, install, and run Hasleo Backup Suite. Click the "Clone" button in the navigation bar, then select "Disk Clone" in the operation area.
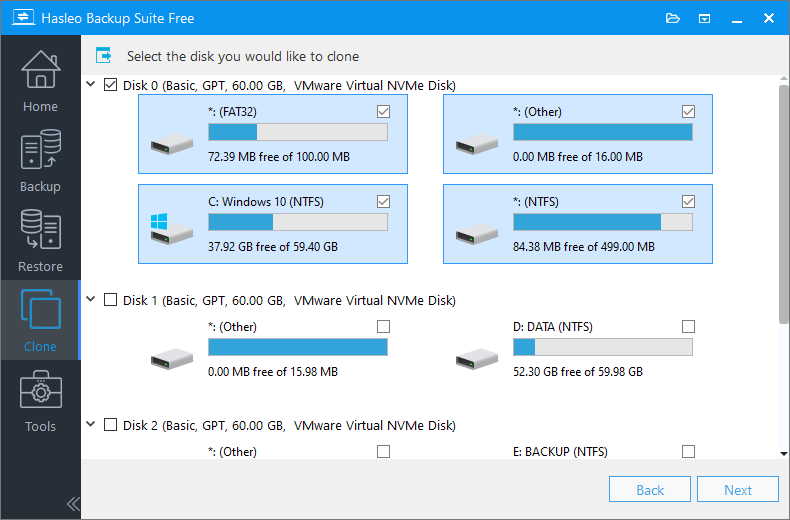
Step 2. Select the original SSD that comes with the Surface (usually Disk 0) and click "Next".
Step 3. Select the new SSD connected via USB enclosure as the target disk, then click "Next".
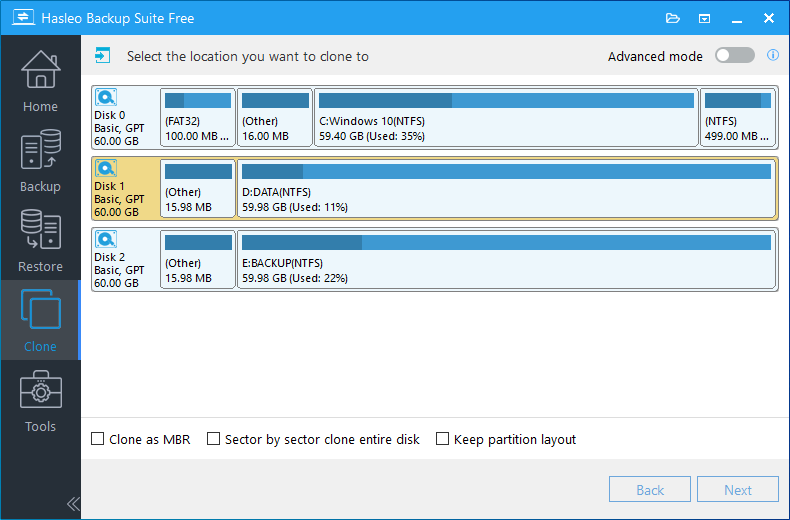
💡Tips:
- Clone as MBR/GPT: During a full disk clone (especially for the system disk), you can choose to convert the partition table of the target disk to either MBR or GPT format.
- Delta Clone: If a full clone of the source disk already exists on the target disk, only the data changed since the last full clone will be copied. To use Delta Clone, please upgrade to the Home, Professional, Server or Enterprise version.
- Sector by sector clone entire disk: Performs a bit-for-bit copy of the entire source disk to the target disk, including all sectors including used, unused, and deleted data space.
Step 4. Adjust the size and position of partitions on the target SSD as needed, then click "Proceed".
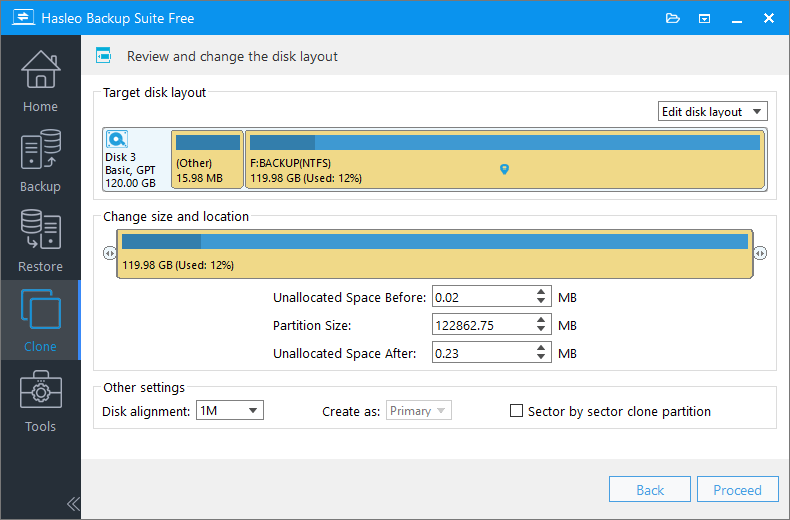
💡Disk alignment:
- 1M (Recommended): 1M alignment is a subset of 4K alignment. Partitions aligned to 1MB are always 4K-aligned, which helps you get the best SSD performance. In Windows Vista and later operating systems, partitions created using Windows Disk Management are always aligned to 1MB bytes, regardless of whether the disk is an SSD.
- 4K: This option ensures the starting sector of every partition is aligned on a 4K bytes, which is very important for the best performance of an SSD.
- Cylinder: Ensure the starting sector of each destination partition always starts at the beginning of a cylinder. Windows XP and previous OSs use this alignment mode.
- None: The start sector of each the destination partitions is not aligned.
* The Sector by sector clone partiton option copies every sector from the source partition to the destination partition, including unused sectors.
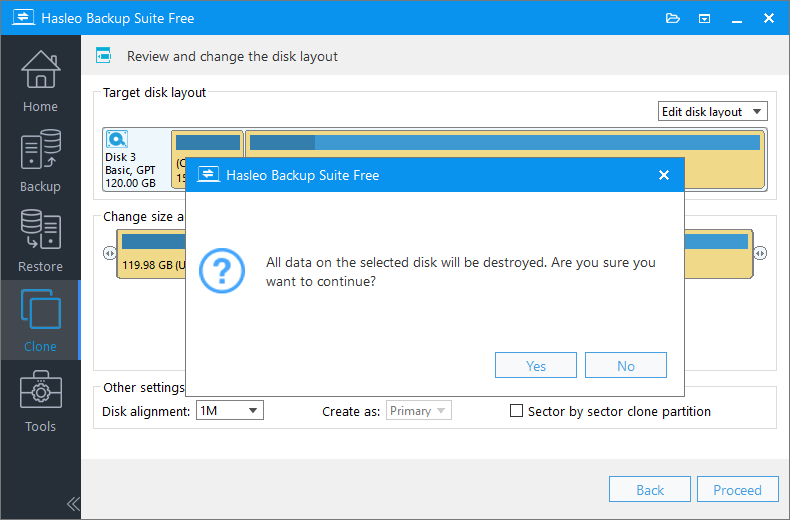
Step 5. A warning message will appear, telling that all data on the target disk will be destroyed. If the target SSD contains no important data, click "Yes" to continue.
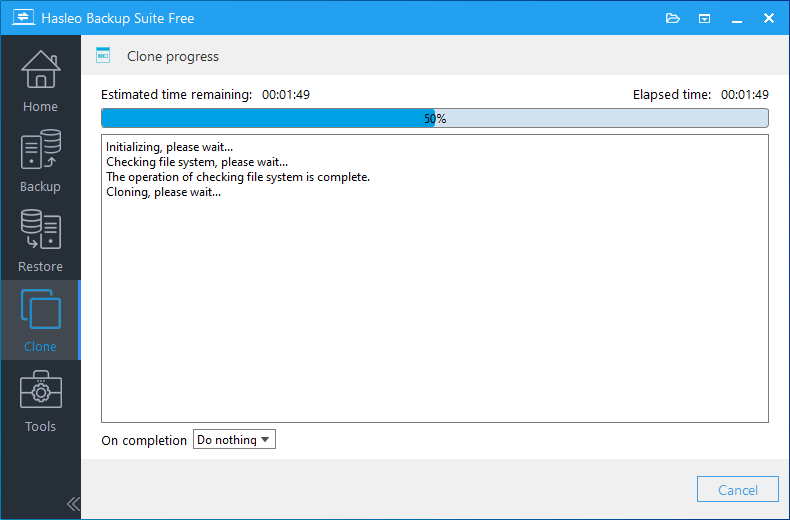
Step 6. Hasleo Backup Suite is now cloning the source SSD to the larger capacity SSD. The required time depends on the data volume of the source SSD and the connection speed of the target SSD.
Steps to Replace SSD in Surface ARM64 Computer
After cloning is complete, the new SSD needs to be physically installed in the Surface device. Please follow these steps:
Preparation:
- Power off device: Completely turn off the Surface device and disconnect the power adapter.
- Discharge static electricity: Wear ESD wrist strap or touch metal objects to discharge static electricity.
- Backup important data: Ensure cloning is complete and data integrity is verified before performing replacement.
Disassembly Steps:
- Eject SIM card tray: Use SIM card ejector tool or paperclip to press the SIM card tray ejection hole on the side of the device and remove the SIM card tray (if supported).
- Disconnect screen cable: Carefully pry open the adhesive around the screen edges and gently disconnect the screen connection cable from the motherboard using a plastic spudger. This step requires extreme caution, and it is recommended to refer to professional repair videos.
- Remove mounting screws: Use Torx screwdriver to remove all screws securing the SSD and motherboard, and keep them safe.
- Remove SSD bracket: Gently remove the metal bracket or heatsink securing the SSD (if present).
Install New SSD:
- Remove old SSD: Use plastic spudger to gently lift one end of the old SSD, then remove it from the M.2 slot.
- Install new SSD: Insert the new SSD into the M.2 slot at approximately 30 degrees, ensuring the gold fingers are fully inserted, then gently press the SSD down to lay flat on the motherboard.
- Secure SSD: Install the SSD mounting bracket or heatsink and tighten the securing screws.
- Reconnect screen: Gently press the screen connection cable to ensure it is firmly connected.
Reassemble Device:
- Check all connections: Confirm all cables are properly connected and no screws or cables are left behind.
- Close screen: Carefully place the screen back in position, ensuring edges are aligned.
- Press edges to adhere: Apply appropriate pressure along the screen edges to re-adhere the adhesive. It is recommended to use clamps to secure for 24 hours.
- Insert SIM card tray: Reinsert the SIM card tray into the device (if applicable).
- Self-disassembly risks: Disassembly will cause the Surface device to lose Microsoft official warranty. If the device is still under warranty, it is recommended to contact Microsoft official or authorized service center for upgrade.
- High technical requirements: Surface devices have precise internal structures and are difficult to disassemble. If you lack relevant experience, it is recommended to seek help from professional repair technicians.
- Data security: Disassembly may cause data loss or device damage. Please ensure complete backups have been created.
- ESD protection: Be sure to take ESD protection measures. Failure to take ESD protection may cause permanent damage to the motherboard or other components.
Verification and Troubleshooting
After cloning and replacement is complete, comprehensive verification is needed to ensure everything is normal:
Boot Verification:
- Enter BIOS settings: Restart Surface device and enter UEFI/BIOS settings (usually by pressing volume up + power button).
- Set new SSD as boot drive: Set the newly installed SSD as the first boot device.
- Verify successful boot: Confirm that Windows can normally boot to the desktop and all drivers are working properly.
Function Verification:
- Check disk capacity: Confirm that the new SSD capacity is displayed correctly and partition size meets expectations.
- Test applications: Open commonly used applications and confirm all programs are running normally.
- Verify data integrity: Check that important files are intact and documents, photos and other data can be opened normally.
- Test hardware functions: Confirm that WiFi, Bluetooth, stylus, keyboard cover and other Surface accessories function normally.
ℹ️Common Issues and Solutions:
- Unable to boot from new SSD: Check BIOS boot order settings and ensure booting from new SSD in UEFI mode. Check if SSD is properly installed.
- System prompts missing drivers: Repair in the WinPE environment, or download Surface-specific drivers from Microsoft official website.
- Device cannot recognize new SSD: Power off and reinstall the SSD, ensure gold connectors are clean and slot is free of dust.
- Screen or touch malfunction: Check if screen connection cable is properly inserted, disassemble and check connection again.
Frequently Asked Questions
A: Yes, using Hasleo Backup Suite's disk cloning feature, you can clone your Surface ARM64 SSD to a larger SSD without losing any data. The cloning process preserves all your applications, settings, and personal files.
A: It is recommended to choose an SSD with capacity at least 1.5 times the currently used space on your source SSD. For most users, a 512GB or 1TB SSD is recommended to ensure enough space for cloning and system operation.
A: Not all Surface devices support user-replaceable SSDs. Some models like Surface Pro 7 and earlier versions have SSDs soldered to the motherboard. Please check Microsoft official documentation to confirm whether your device supports SSD replacement.
A: Surface ARM64 devices typically use M.2 2230 NVMe SSDs. When purchasing a new SSD, please ensure the dimensions, interface, and protocol are compatible with your device.
A: Yes, it is recommended to temporarily disable BitLocker encryption in Settings > Privacy and security > Device encryption before cloning to avoid boot failure or lockout after the cloning is complete.
A: The cloning time depends on the data volume of the source SSD and the connection speed of the target SSD. Using a USB 3.0 or higher enclosure typically takes 15-30 minutes for a 256GB SSD, and longer for larger capacities.
A: Self-disassembly of Surface devices will cause the device to lose Microsoft official warranty. If your device is still under warranty, it is recommended to contact Microsoft official or authorized service center for upgrade options.
A: You will need an SSD enclosure (USB 3.0 or higher), dedicated Surface disassembly tools (SIM card ejector tool, plastic spudger, Torx screwdriver), and ESD protection equipment (ESD wrist strap and ESD mat).
Conclusion
Cloning your Microsoft Surface (ARM64) device's SSD to a larger capacity SSD using Hasleo Backup Suite is a wise choice to solve insufficient storage space and improve device performance. This upgrade solution not only preserves all original data and system settings but also fully utilizes the entire capacity and performance advantages of the new SSD. As professional Windows backup and cloning software, Hasleo Backup Suite has become the ideal tool for Surface device SSD upgrades with its native ARM64 support, extremely fast cloning experience, and outstanding Delta Clone technology.
⚠️Important Reminder: Please be sure to confirm that your Surface device supports user-replaceable SSDs before proceeding with any operations. For devices that do not support replacement (SSDs soldered to the motherboard), it is recommended to contact Microsoft official or authorized service center for upgrade options.


