
- What is Windows Blue Screen Error
- Common Blue Screen Error Codes Explained
- Primary Fix: Restore Using a System Backup (Recommended)
- Alternative Fix 1: Update or Roll Back Drivers
- Alternative Fix 2: Repair Corrupted System Files
- Alternative Fix 3: Diagnose Hardware Issues
- Alternative Fix 4: Use Windows Built-in Repair Tools
- How to Prevent Blue Screen Errors
- Frequently Asked Questions
- Conclusion
Windows Blue Screen Error (Blue Screen of Death, abbreviated as BSoD) is a protective crash mechanism that activates when the system encounters serious problems. When you see a blue screen, it means Windows has stopped running to prevent further damage to your computer, but this often comes with the loss of unsaved work. Blue screen errors can be caused by various reasons, including hardware driver conflicts, Windows update patch failures, memory or hard drive damage, and more.
While multiple methods exist to diagnose and repair blue screen errors, restoring a complete system backup is by far the fastest and most reliable solution. If you have a system backup image created with Hasleo Backup Suite before the blue screen appeared, you can restore your entire operating system—including all applications, settings, and files—to a working state in as little as 10–30 minutes. This approach is not limited by error code type and does not require technical diagnosis skills.
This tutorial first covers the primary recommended fix using system backup restore, then explains how to identify common blue screen error codes, and provides 4 alternative repair methods for situations where a system backup is not available.
What is Windows Blue Screen Error
Windows Blue Screen Error, full name Blue Screen of Death (BSoD), is a fault interface that Windows operating system forcibly displays when encountering severe system errors that it cannot recover from on its own, in order to protect data security and hardware integrity. The blue screen interface typically displays a Stop Code, fault information, and technical support information, which are crucial for diagnosing and resolving problems.
🎯The Role and Significance of Blue Screen
Although blue screens can be alarming, they are actually an important protective mechanism in Windows. The core functions of blue screen include:
- Prevent Damage Spread: Immediately terminate system operation, prevent errors from spreading to other hardware components or core system files, and avoid causing damage to a wider area.
- Preserve Diagnostic Evidence: At the moment of stopping, the system records key error information (memory dump files), providing first-hand information for subsequent technical troubleshooting.
- Protect Data Security: By forcibly stopping all write operations, maximize the prevention of user files from being corrupted or lost due to system confusion.
Main Components of Blue Screen
A typical Windows blue screen interface contains the following important information:
- Stop Code: This is the most critical clue. It usually displays as a concise English name (such as DRIVER_IRQL_NOT_LESS_OR_EQUAL or SYSTEM_SERVICE_EXCEPTION). Users only need to remember this text, which is the best keyword for searching solutions online.
- Error Code and Parameters: In addition to the name, it usually includes a string of hexadecimal codes starting with "0x" and parameters in parentheses. These are precise coordinates for technical personnel to analyze the specific cause of the fault (such as which memory address conflicts).
- Operation Suggestions: The interface usually provides some general suggestions (such as "Collecting error information, will restart soon") and prompts users to scan the QR code appearing on the screen to access more help from Microsoft.
- Technical Support Information: Contains error collection ID and other information to help quickly locate problems when communicating with Microsoft support personnel.
💡Important Note: When a blue screen occurs, Windows automatically creates a memory dump file. These files are located in the system directory, with filenames usually being Memory.dmp or small dump files in the Minidump folder. Professional technicians can determine the exact cause of blue screen by analyzing these dump files. For frequent blue screen cases, it is recommended to regularly check and save these DMP files, or provide them to technical support personnel, which is the most efficient way to solve problems.
Common Blue Screen Error Codes Explained
Understanding common blue screen error codes can help you quickly identify the cause of problems and take correct repair measures. Here are the most common blue screen error codes in Windows systems and their detailed explanations:
- DRIVER_IRQL_NOT_LESS_OR_EQUAL (0x000000D1): This is one of the most common blue screen errors in Windows systems, usually occurring when a driver tries to access a memory address it does not have permission to access. Common trigger scenarios include: installing incompatible or outdated hardware drivers, driver files being corrupted or lost, using defective third-party drivers. Additionally, if the driver is incompatible with the current Windows version, it may also cause this error. The best way to solve this problem is to enter safe mode and roll back or update the problematic driver.
- SYSTEM_SERVICE_EXCEPTION (0x0000003B): This error indicates that an exception occurred in a system service, usually related to third-party software conflicts. Common trigger reasons include: antivirus software conflicting with system security features, corrupted system files causing service exceptions, memory faults or hard drive bad sectors causing data read errors. If you have recently installed new security software or system optimization tools, uninstalling these software may solve the problem.
- CRITICAL_PROCESS_DIED: This error indicates that a critical system process has unexpectedly terminated, which is a relatively serious system error. Possible trigger reasons include: serious system file corruption causing critical processes to fail, poor hard drive health causing critical file read failures, virus or malware infection destroying critical system components. When seeing this error, it is recommended to immediately perform system file checks and virus scans.
- PAGE_FAULT_IN_NONPAGED_AREA (0x00000050): This error indicates that the system tried to access a non-existent memory page, usually related to memory issues. Possible causes include: memory (RAM) fault or damage causing data read errors, incompatible drivers trying to access invalid memory addresses, hardware conflicts causing abnormal memory access. Using Windows Memory Diagnostic tool or professional memory testing software can help identify problematic memory modules.
- VIDEO_TDR_FAILURE (0x000001116) This error is specifically related to graphics cards and is the most common blue screen code when graphics card drivers crash. Possible causes include: graphics card driver version being too old or having defects, graphics card overheating causing driver crashes, graphics card hardware fault or poor contact, excessive overclocking causing system instability. If this error occurs after updating the graphics card driver, try rolling back to the previous stable version.
- SYSTEM_THREAD_EXCEPTION_NOT_HANDLED (0x1000007E): This error indicates that the system thread failed to handle an exception correctly, usually occurring when a driver or system component cannot properly handle a specific operation. Common trigger reasons include: graphics card driver issues causing graphics rendering abnormalities, sound card or network adapter driver conflicts, system service configuration errors or incompatibilities. The specific module name is usually displayed in parentheses after this error code, which helps locate the source of the problem.
- INACCESSIBLE_BOOT_DEVICE (0x0000007B): This error indicates that the system cannot access the boot device during startup, usually occurring when Windows cannot recognize the system drive. Possible causes include: hard drive connection problems or SATA/NVMe interface failures, storage controller drivers being corrupted or lost, hard drive partition table corruption or MBR boot record errors, hardware identification changes after replacing the system drive to a different computer. This error usually requires repair using WinPE bootable media.
- MEMORY_MANAGEMENT (0x0000001A): This error is usually related to memory management and can be caused by various reasons. Common causes include: memory module fault or poor contact causing data transmission errors, memory compatibility issues with the motherboard, incorrect memory timing or voltage parameters in BIOS settings, memory capacity exceeding motherboard support limits or recognition issues. This error usually appears together with other memory-related errors.
- KERNEL_MODE_EXCEPTION_NOT_HANDLED: This error indicates that a kernel mode exception was not handled, usually occurring at the operating system kernel level. Possible causes include: CPU instruction set compatibility issues with the system, severe defects in kernel-level drivers, corrupted system files affecting core component operation, hardware virtualization function conflicting with system settings. This is a relatively serious error and may require complete system recovery or reinstallation.
- IRQL_NOT_LESS_OR_EQUAL: This error is similar to the first one but is usually more serious. It indicates that the system attempted an operation not allowed at a higher Interrupt Request Level (IRQL). Possible causes include: kernel-level drivers trying to access protected memory areas, driver stack corruption, Hardware Abstraction Layer (HAL) file corruption. This error usually requires entering WinRE environment for system repair.
💡Tips: The same blue screen code can be caused by many different reasons, and the operation record before the blue screen occurs is crucial for diagnosis. It is recommended to record the error code after a blue screen occurs and recall whether new software was installed, drivers were updated, or hardware was changed before the blue screen.
Primary Fix: Restore Using a System Backup (Recommended)👑
When Windows encounters blue screen problems, restoring to a previously stable system state is often the most direct and effective solution. If you have a system backup created with software like Hasleo Backup Suite, you can revert to a working state and quickly resolve the issue.
Scenario A: System can still start
If Windows can still reach the desktop (even with frequent blue screens), follow these steps:
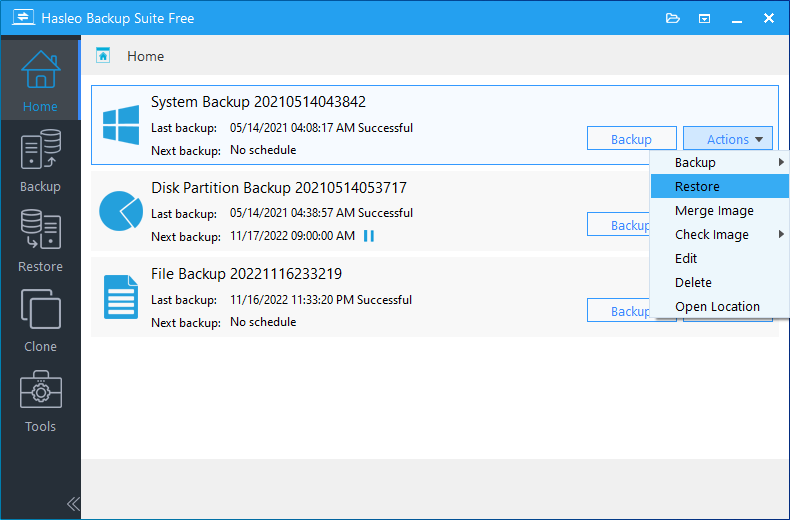
Step 1. Start Windows and run Hasleo Backup Suite. Click the "Home" button in the navigation bar and find the system backup task you created before. Click the "Actions" button next to it, and select "Restore" from the dropdown menu.
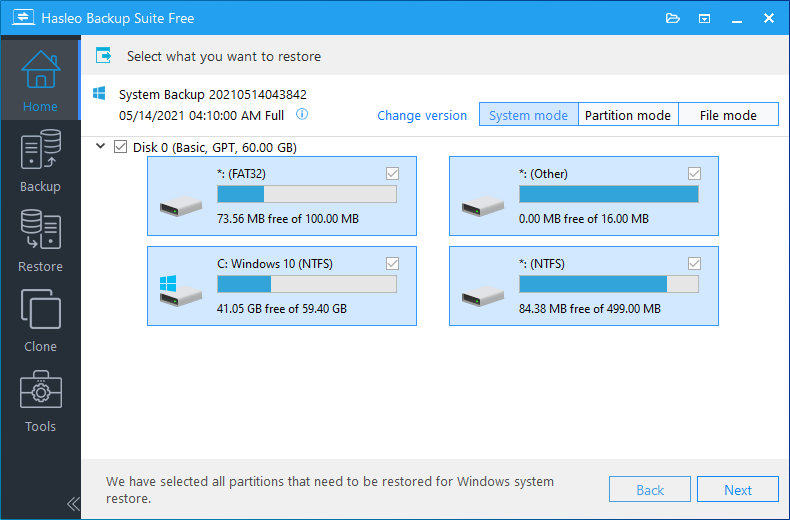
Step 2. Click "Change Version" and choose a backup version created before the blue screen issues began. Select a date when the system was stable—ideally at least one week before the problem first appeared—then click "Next".
💡Tips:
- If you need to restore the entire operating system, please select "System Mode" in the upper right corner, which ensures all system components and boot files are correctly restored.
- Warning: Restoring only the Windows partition in "Partition Mode" may cause the system to fail to start or work normally. Please be sure to use "System Mode".
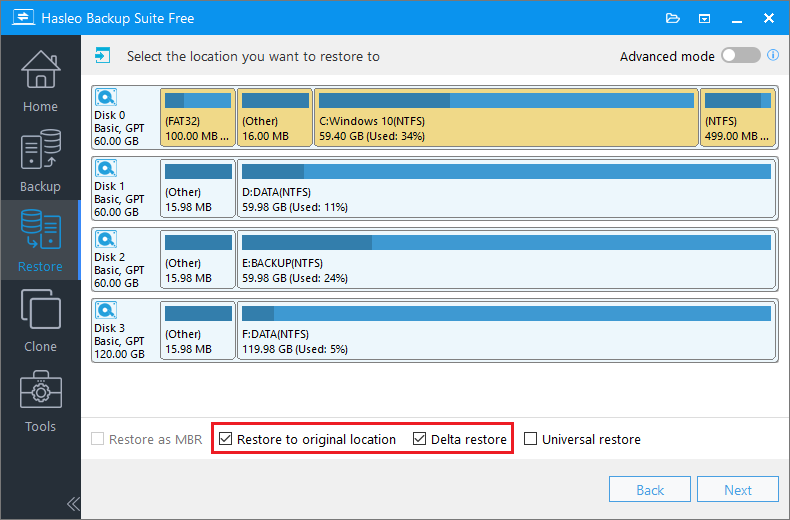
Step 3. Select the destination disk for restoration (usually Disk 0). It is recommended to check "Restore to original location". This restores the system to its original position without affecting other partitions. Click "Next".
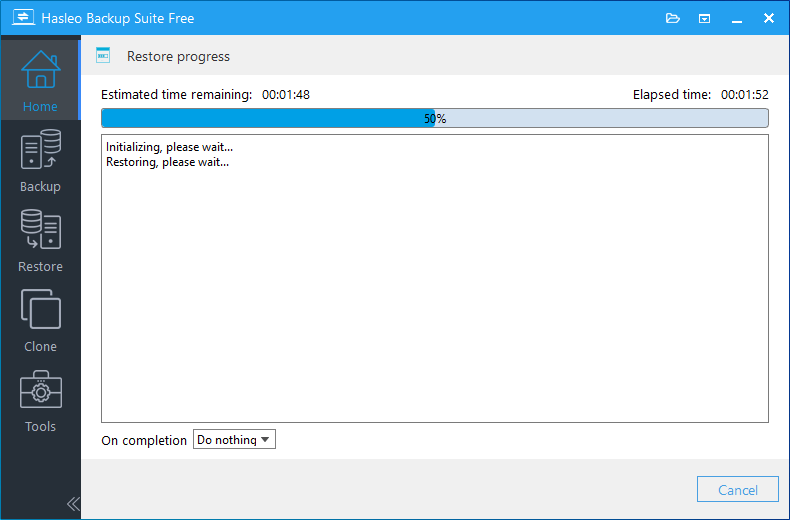
Step 4. Hasleo Backup Suite starts restoring the system to the target disk. The time required for restoration depends on the amount of data to restore. Please wait patiently for the entire process to complete. Do not turn off the computer or interrupt the operation during this time.
Step 5. When prompted that the operation is successful, click "Finish" or "Close".Restart your computer. The blue screen issue should be resolved, and all applications should run normally.
💡Tips: If the blue screen problem still appears after restoration, it indicates the problem is likely not caused by software or system files, but by hardware failure (such as memory or hard drive issues). In this case, it is recommended to use hardware diagnostic tools for testing.
Scenario B: System cannot start (Blue Screen Loop)
If Windows fails to boot and enters a continuous blue screen loop, you will need WinPE bootable media to perform the system restore. For detailed instructions, refer to our guide: How to Restore Windows from a System Backup Image When It Fails to Boot.
Alternative Fix 1: Update or Roll Back Drivers
If you do not have a system backup available, driver issues are among the most common and fixable causes of blue screens. If you can enter the system normally, updating, rolling back, or reinstalling problematic drivers can usually resolve the problem quickly.
Update Drivers
Outdated or incompatible drivers are a common cause of blue screens. Updating drivers to the latest version may solve the problem.
- Press "Win + X" and select "Device Manager" from the shortcut menu. In some Windows 10 versions, this menu may display as "Computer Management". Click to enter and then select Device Manager from the left list.
- In Device Manager, find the device that may have problems. Usually, the blue screen error message will point to the relevant driver module name (such as nvlddmkm.sys pointing to graphics card driver). If not sure, you can focus on checking "Display adapters", "Network adapters", and "Storage controllers".
- Right-click the problematic device and select "Update driver".
- Select "Search automatically for drivers". Windows will try to find and install matching drivers online.
- If Windows does not find a new driver, you can visit the hardware manufacturer's official website and manually download and install the latest driver based on your hardware model and system version. After installation, restart the computer.
Roll Back Drivers
If the blue screen problem only appeared after recently updating the driver, rolling back to the previous version is usually the most effective.
- Open Device Manager and find the problematic device.
- Right-click the device and select "Properties".
- Switch to the "Driver" tab and click the "Roll Back Driver" button.
- Select the rollback reason in the popup window (optional), then click "Yes" to confirm.
- After rollback is complete, restart the computer and check if the blue screen problem is resolved.
💡Tips: If this button is grayed out and unavailable, it means the system does not have a previous driver backup (for example, you just finished installing the system and have never updated drivers, or the old backup has been overwritten). In this case, this feature cannot be used.
Uninstall and Reinstall Drivers
If both updating and rolling back cannot solve the problem, you can try completely uninstalling and reinstalling.
- Open Device Manager.
- Right-click the problematic device and select "Uninstall device".
- In the confirmation dialog, check "Attempt to remove this device's driver" (or "Delete the driver software for this device"), then click "Uninstall".
- After uninstallation is complete, restart the computer. Windows will automatically install a basic version of the driver to ensure the device is basically usable.
- Then, download and install the latest stable driver for your device model from the hardware manufacturer's official website.
💡Tips: If uninstalling network adapters or hard drive controllers, Windows will automatically install generic drivers after restart. During this period, the computer may temporarily be unable to connect to the internet or recognize external hard drives, which is normal.
Use DDU to Completely Uninstall Graphics Card Drivers (For Stubborn Problems)
Graphics card driver issues often cause blue screens, especially when encountering "VIDEO_TDR_FAILURE" errors. Using Display Driver Uninstaller (DDU) can completely clear all residual files of graphics card drivers and avoid conflicts between old and new drivers.
- Download Display Driver Uninstaller (DDU) from a trusted source (such as Guru3D.com) and extract it to the computer desktop or a non-system drive.
- Restart the computer and press F4 to enter safe mode when Windows starts (or enter advanced startup options from settings).
- In safe mode, run the extracted DDU tool.
- In the DDU main interface, accurately select your graphics card type (NVIDIA, AMD, or Intel) in the upper right corner.
- Click the "Clean and Restart" button. DDU will begin completely removing the graphics card driver and related registry entries and file residuals.
- After the computer automatically restarts, enter normal mode. Download the latest graphics card driver from the graphics card official website (NVIDIA, AMD, or Intel ARC) and perform a fresh installation.
⚠️Tips:
- After using DDU to restart, some dual-graphics laptops (such as Intel integrated graphics + NVIDIA discrete graphics) may experience display abnormalities or brief black screens due to the integrated graphics driver temporarily not matching. It is recommended to prepare the integrated graphics driver installation package in advance. If display problems occur, you can install the integrated graphics driver in safe mode first, then install the discrete graphics driver.
- Before installing new drivers, it is highly recommended to use professional tools like DDU to completely clean old drivers. Regular uninstall programs often cannot clear all residual files, which may cause conflicts and instability after new driver installation.
Alternative Fix 2: Repair Corrupted System Files
System file corruption is one of the common causes of blue screens. Windows built-in System File Checker (SFC) and Deployment Image Service and Management (DISM) tools can scan and repair most system file problems.
Use SFC to Scan and Repair System Files (Applicable when can normally enter system)
The SFC (System File Checker) tool can scan and repair corrupted system files.
- Press "Win + X" and select "Windows PowerShell (Admin)" or "Command Prompt (Admin)".
- In the opened administrator window, enter the following command and press Enter:
- SFC will scan all protected system files and automatically repair any problems found. This process may take some time (usually 15-30 minutes). Please wait patiently until the progress bar reaches 100%.
- After the scan is complete, the system will display the results:
- "Windows Resource Protection did not find any integrity violations": System files are intact.
- "Windows Resource Protection found corrupted files and successfully repaired them": Problem solved.
- "Windows Resource Protection found corrupted files but was unable to repair some of them": Please use DISM to repair component store.
sfc /scannow
Use DISM to Repair Component Store (When SFC cannot repair)
If SFC cannot repair certain files, it means the system component store itself may be corrupted and needs to be repaired using the DISM tool.
- Open Command Prompt or PowerShell as administrator.
- Enter the following command and press Enter:
- DISM will connect to Windows Update servers to download and repair the corrupted component store. This process may take longer. Please ensure normal network connection.
- After DISM is complete, run SFC scan again:
DISM /Online /Cleanup-Image /RestoreHealth
sfc /scannow
Repair in Windows Recovery Environment (WinRE) (Applicable when cannot start system)
If the system has frequent blue screens and cannot normally enter the desktop, repairs can be performed in Windows Recovery Environment (WinRE).
- Force shutdown three times to enter WinRE environment (when the Windows logo appears during startup, immediately force shutdown, repeat three times).
- In WinRE environment, select in order: Troubleshoot > Advanced options > Command Prompt.
- In WinRE, the original system drive (usually C: drive) letter may change (may become D: or E: drive). You must confirm before executing repairs, otherwise you may accidentally repair other partitions.
- In Command Prompt, enter "diskpart" and press Enter.
- Enter "list volume" and press Enter.
- Observe the list: Find the partition with "Type" as "Primary" and "Info" as "System", or judge by "Size" (the partition that is usually several tens of GB and contains the Windows folder is the system partition). Note the drive letter for that partition (e.g., D: or E:).
- Enter "exit" to exit diskpart.
- Assuming the system partition drive letter is confirmed as D:, enter the following command and press Enter:
- After repair is complete, enter "exit" to close Command Prompt, then click "Shut down computer" or restart, normally enter the system to check if the problem is resolved.
sfc /scannow /offbootdir=D:\ /offwindir=D:\Windows
💡Tips: If your system partition drive letter is other letters (such as E:), please replace "D" in the above command with the corresponding letter.
Alternative Fix 3: Diagnose Hardware Issues
If both a system backup and software-level fixes cannot solve the blue screen problem, the issue may be with hardware. Here are methods to check and resolve hardware problems.
Run Windows Memory Diagnostic
Memory issues may cause random blue screens. Using Windows built-in Memory Diagnostic tool can detect memory problems.
- Press "Win + R" to open the Run dialog, enter "mdsched.exe" and press Enter.
- The Memory Diagnostic tool will pop up a dialog. Select "Restart now and check for problems (recommended)".
- The computer will automatically run memory diagnostic after restarting. Results will be displayed after checking is complete.
- If problems are found, it is recommended to replace the problematic memory module. If the problematic memory module is identifiable (usually slot information will be displayed), you can reinstall the memory module or move it to another slot for testing.
Check Hard Drive Errors
Hard drive problems can also cause blue screens. Using the CHKDSK tool can check and repair hard drive errors.
- Open Command Prompt as administrator.
- Enter the following command:
- The system will prompt to check on the next restart. Press "Y" to confirm.
- Restart the computer and let CHKDSK complete the check and repair.
chkdsk C: /f /r
Tips: The /f parameter fixes file system errors, the /r parameter scans for bad sectors and recovers readable information. This process may take several hours.
Check Hardware Temperature
Overheating can cause system instability and blue screens. You can use hardware monitoring software or enter BIOS to check temperature information.
Common normal operating temperature ranges:
- CPU: Idle 30-50°C, Full load 60-80°C, above 90°C may be at risk
- GPU: Idle 30-50°C, Full load 60-85°C, above 95°C may be at risk
- Hard Drive/SSD: 30-50°C, above 60°C may affect lifespan
If temperature is found to be too high, it is recommended to: clean dust inside the case, replace aged thermal paste, check if fans are running normally, improve case airflow, reduce ambient temperature.
Minimal Hardware Configuration Test
If you suspect a certain hardware is causing blue screens, you can try minimal configuration testing.
- Turn off the computer and open the case.
- Disconnect all non-essential peripherals and internal devices (such as additional hard drives, optical drives, USB expansion cards, etc.), only keep motherboard, CPU, single memory stick, graphics card, and system drive.
- Start the computer and observe if blue screens still occur.
- If blue screens disappear, gradually add other devices back until you find the hardware causing the problem.
Check Power Supply
Unstable power can cause various system problems. You can try replacing the power supply for testing.
Methods to check power supply include: observe if the power supply fan is running normally, check if power cable connections are secure, use a multimeter to test if voltage outputs on each line are stable, check if capacitors have bulging or leakage.
Alternative Fix 4: Use Windows Built-in Repair Tools
Windows system provides various built-in repair tools that can help solve blue screen and related system problems when a system backup is not available.
Enter Safe Mode
Safe mode only loads the most basic drivers and services. If you can enter safe mode, the problem is likely caused by third-party driver or software conflicts.
- During Windows startup (when the Windows logo appears), long-press the power button to force shutdown. Repeat this operation 3 times. When starting again, the system will automatically enter the "Automatic Repair" interface. Click "Advanced options" to enter the WinRE environment (Windows Recovery Environment).
- In WinRE environment, select in order: Troubleshoot > Advanced options > Startup Settings > Restart.
- After the computer restarts, a list of options will appear. Press number key "4" or "F4" to select "Enable Safe Mode".
- If there is no blue screen in safe mode, the problem is caused by regular drivers/software. You can:
- Uninstall software: Uninstall software or drivers just installed before the blue screen.
- Roll back drivers: In Device Manager, right-click the problematic device (such as graphics card), select "Properties" > "Driver" > "Roll Back Driver".
- Use System Restore: Restore to a previous state.
Use System Restore
System Restore can restore system files, settings, and programs to a previous point in time (restore point), and will not delete your personal files.
- Enter WinRE environment (same method as above).
- Select in order: Troubleshoot > Advanced options > System Restore.
- When the System Restore wizard starts, click "Next", select a restore point before the blue screen problem appeared, then click "Next" again.
- After confirming the restore information is correct, click "Finish". The system will begin the restore process and automatically restart after completion.
💡Tips: After restore, programs and drivers installed after the selected restore point may be removed, but your documents, photos, and other personal files will be preserved.
Startup Repair
This tool can automatically detect and repair common startup problems, such as missing or corrupted boot files.
- Enter WinRE environment.
- Select in order: Troubleshoot > Advanced options > Startup Repair.
- Select your administrator account and enter the password (if set).
- The system will begin automatic diagnosis and attempt repair.
- If repair is successful, the computer will automatically restart. If repair fails, a diagnostic report will be displayed containing information about problems that could not be repaired.
Use Command Prompt to Repair Startup Problems
If the above automatic repairs are ineffective, you can use Command Prompt to manually repair system boot configuration (BCD) and Master Boot Record (MBR).
- Enter WinRE environment and open Command Prompt.
- In Command Prompt, enter the following commands in sequence to repair BCD (Boot Configuration Data), pressing Enter after each line:
- If reconstruction fails (prompt indicating BCD store is corrupted), you can try renaming the original file first and then reconstructing:
- If the above commands are ineffective, try entering the following commands to repair the boot record:
- After repair is complete, restart the computer and check if the problem is resolved.
bootrec /scanos
bootrec /rebuildbcd
ren C:\boot\bcd bcd.old
bootrec /rebuildbcd
bootrec /fixmbr
bootrec /fixboot
How to Prevent Blue Screen Errors
Preventing blue screen errors is more important than fixing them after they occur. The single most important preventive measure is maintaining an up-to-date system backup so that any blue screen incident becomes a minor inconvenience rather than a major disaster. By combining regular backups with the following additional measures, you can greatly reduce the occurrence of blue screen errors and protect stable system operation.
⭐Create Regular System Backups
This is one of the most effective methods to prevent blue screen problems. It is recommended to use professional system backup software to regularly back up the entire system, including operating system, applications, settings, and personal files.
- Initial complete backup: Immediately after the system is installed and all software is configured, create a complete system backup as a gold image.
- Regular incremental backups: Set up automatic backup schedules, recommend performing incremental backups weekly, only saving changed files.
- Backup before important changes: Before making major system changes (such as installing new software, updating drivers, or modifying registry), manually create system restore points or complete backups.
- Backup storage location: Follow the "3-2-1" backup principle, store backups on different physical drives, external hard drives, or cloud storage from the system drive.
Update Drivers Cautiously
Driver errors are one of the main causes of blue screens. Special attention is needed when updating.
- Only download from official sources: Always download drivers from hardware manufacturers (such as NVIDIA, Intel, AMD) or motherboard manufacturers' official websites. Avoid using third-party driver update tools or installation packages from unknown sources.
- Create restore point before updating: Before updating any driver, manually create a system restore point to roll back if problems occur.
- Update in batches and observe: Avoid updating multiple drivers at the same time. Only update one key hardware's driver at a time, observe for a few days after updating to ensure system stability before making other changes.
- Observe stability after updating: After updating drivers, observe for a few days to ensure system stability before making other changes.
- Use safe mode wisely: If blue screen immediately appears after updating drivers, try entering "Safe Mode" and roll back the driver to the previous version in Device Manager.
Treat System Updates Rationally
Windows updates are important, but sometimes they may introduce compatibility issues.
- Reserve sufficient disk space: Before performing major updates (such as annual feature updates), ensure the system drive has at least 20-30GB of available space.
- Observe update feedback: For major updates, you don't have to upgrade immediately first. First pay attention to other users' feedback in online forums or communities, confirm there are no obvious problems before updating.
- Distinguish driver updates: It is recommended to uncheck "Receive updates for other Microsoft products when updating Windows" in Windows Update advanced settings (or through Group Policy settings) to prevent the system from automatically pushing unstable optional drivers.
- Hide problematic updates: If you confirm a certain update caused blue screen, you can uninstall and hide that update in the update history to prevent it from automatically installing again.
Monitor Hardware Health
Regularly monitoring hardware status can help detect problems in time and avoid blue screens caused by hardware failures.
- Memory diagnostic: Run memory diagnostic tool monthly to check memory stability.
- Hard drive health check: Use tools like CrystalDiskInfo to regularly check the hard drive's SMART status. Pay attention to "Health Status" warnings and promptly detect bad sectors or drives about to fail.
- Temperature monitoring: Use tools like HWMonitor, AIDA64 to monitor CPU, graphics card, and hard drive temperatures. If temperature abnormally increases (especially during gaming or rendering), check the cooler or fan.
- Regular physical dust cleaning: Clean dust inside the case every 3-6 months to ensure smooth airflow and stable power supply.
Avoid Software Conflicts
Certain software may conflict with the system or other software and needs careful handling.
- Single security software: Only install one antivirus software. Note that Windows Defender is also a security software. After installing third-party antivirus software, it will automatically close. Make sure to thoroughly clean up old antivirus software when uninstalling to avoid two security software processes running simultaneously.
- Use optimization tools cautiously: Use so-called system optimization tools or registry cleaning tools carefully. These tools may delete critical system configurations causing instability if misused.
- Test new software: For non-well-known or highly professional software, it is recommended to first test its stability on a virtual machine or non-critical machine.
Maintain Sufficient Disk Space
Insufficient system drive space can cause virtual memory swap failures, leading to blue screens.
- Maintain free space: It is recommended to keep at least 15%-20% free space on the system drive (usually C: drive).
- Regular cleanup: Use the system's built-in "Disk Cleanup" tool to delete temporary files, Windows update cache, etc.
- Transfer personal data: Transfer default paths of folders like "Documents, Pictures, Videos, Desktop" to other non-system drives, or manually transfer large games and installation packages to other partitions.
Avoid Improper Operations
Improper operations may cause system file corruption or data write interruptions.
- Avoid forced shutdown: Unless the system is completely unresponsive, do not long-press the power button to force shutdown. Close all running programs before shutting down.
- Safely eject hardware: After using USB mobile devices, first click "Safely Remove Hardware" in the taskbar before unplugging to avoid data transfer interruptions causing file system errors.
- Stable power supply: Equip desktops with voltage regulators or Uninterruptible Power Supplies (UPS) to avoid voltage fluctuations or sudden power outages damaging hard drives or system files.
Record Key System Configurations
Recording important system configuration information helps with problem diagnosis and recovery.
- Record driver and software lists: Keep a list of key hardware driver versions and installed core software.
- Record BIOS settings: If you have modified BIOS/UEFI settings (such as boot order, voltage, XMP), it is recommended to take photos or screenshots to record them.
Frequently Asked Questions
A: First, note the error code displayed on the blue screen—take a photo if possible. Then, restart your computer. If blue screens repeat, try entering Safe Mode to troubleshoot. Most importantly, ensure you have a system backup ready for restore.
A: Yes. Use WinPE bootable media created by Hasleo Backup Suite to boot and access your files. You can browse and copy important data to an external drive before performing any repairs.
A: Recurring blue screens often indicate unresolved hardware issues—like failing memory, bad sectors on the hard drive, or overheating. Software fixes only address symptoms. Run hardware diagnostics to identify the root cause.
A: CRITICAL_PROCESS_DIED and KERNEL_MODE_EXCEPTION_NOT_HANDLED are serious—they indicate core system component failures. These often require complete system reinstallation or hardware replacement.
A: Key preventions include: creating regular system backups, updating drivers cautiously (one at a time), monitoring hardware health monthly, maintaining 20% free disk space, and avoiding forced shutdowns.
A: Not immediately. Wait 1-2 weeks to observe feedback from other users. Uncheck "Receive updates for other Microsoft products" in Windows Update settings to prevent unstable optional drivers from installing.
A: Not necessarily—driver conflicts and software issues are common causes. However, if blue screens persist after driver updates and system repairs, hardware diagnostics are needed to check memory, hard drive, and power supply.
A: The error code is your best search keyword. Include it when searching online for solutions. For persistent issues, provide the memory dump file (Memory.dmp) to professional technicians for analysis.
Conclusion
Although Windows blue screen errors are troublesome, as long as you master the correct diagnostic thinking and repair methods, the vast majority of problems can be effectively resolved. This tutorial has systematically sorted out the common causes of blue screens, interpretation of key error codes, and various practical repair strategies. Here, we want to emphasize the most important advice: Prevention is better than cure. It is strongly recommended to develop the habit of regular backups. You can use professional backup software (such as Hasleo Backup Suite) to create complete system backups. At the same time, cautiously update drivers and systems, and always pay attention to hardware health. This way, even if you encounter blue screens, you can quickly restore to normal state, minimizing data loss and downtime.
If you have tried various methods and the blue screen problem still persists, this usually points to deeper hardware failures or serious system file corruption. In this case, reinstalling the Windows system or contacting professional technical support for hardware testing will be a more stable choice.
Related Articles
- How to Merge/Delete Old Backup Files using Hasleo Backup Suite Free?
- How to Back Up and Restore Windows 11 for Free Using Hasleo Backup Suite Free?
- How to Compress Backup Files using Hasleo Backup Suite Free?
- How to Back Up Windows Server Automatically on a Regular Basis?
- How to Restore Your System From Full/Incremental/Differential Backups?


