
- Overview of Windows recovery drive
- Best Windows backup and recovery tool—Hasleo Backup Suite
- How to Create a Compatible Windows Recovery Drive Using Hasleo Backup Suite?
- Frequently Asked Questions
- Conclusion
Creating a Windows recovery drive can repair or restore your computer system when needed. However, a Recovery Drive made using Windows' built-in tools usually only works for the current device. So, how can you create a Windows recovery drive with broad compatibility? This guide will provide detailed instructions on how to create a Windows recovery drive suitable for multiple devices, along with relevant knowledge and precautions.
Overview of Windows recovery drive
A Windows recovery drive, also known as a system repair drive or recovery drive, is a bootable USB/CD/DVD created by the user, primarily used for system repair, restoration or reinstallation when the Windows system fails to start or encounters severe issues. A recovery drive generated using the Windows built-in "Recovery Drive" tool is essentially an emergency boot disk tightly bound to the current device's hardware. Its core principle is to back up a specific recovery partition in the current system, which usually contains manufacturer-preinstalled drivers, system images and corresponding firmware support. Therefore, a recovery drive created on an A-brand computer is unlikely to be used on a B-brand computer, and even different models of the same brand may not boot or complete the recovery process successfully.
A compatible Windows recovery drive is essentially a Windows PE boot disk integrated with universal drivers, system images and maintenance tools. It can not only start the computer when the system crashes but also perform operations such as system backup and cloning. Its core feature is that it does not rely on the recovery partition of a specific computer, but is an independent, portable system environment built on the original Windows system kernel.
While compatible Windows recovery media are generally suitable for a variety of computer devices, issues may still occur in certain special circumstances. To ensure a successful recovery, observe the following precautions:
- If the target computer uses a newer or special hard disk/SSD controller (e.g., RAID, specific NVMe drives), you may need to integrate the corresponding storage driver into the recovery disk in advance, or manually load the driver after booting from the recovery disk.
- Ensure the computer's firmware boot mode (UEFI or Legacy BIOS) matches the mode used to create the recovery disk. Booting a UEFI system requires a UEFI-based recovery disk.
- For UEFI boot, the USB drive needs a FAT32-formatted partition to store boot files, which cannot hold single files larger than 4GB. If your system image or integrated tool is large, special handling may be required (e.g., using a high-end hidden partition).
- Pay attention to system architecture compatibility. A recovery disk created with an X64 (64-bit) system cannot boot on a computer that only supports X86 (32-bit) (as a 32-bit CPU cannot run a 64-bit system).
- You may need to enter the UEFI/BIOS settings and temporarily disable Secure Boot.
Best Windows backup and recovery tool—Hasleo Backup Suite
To meet the need for creating a Windows recovery drive that can be used across multiple computers, we recommend using Hasleo Backup Suite. This is professional backup and recovery software that helps you restore your computer system easily and efficiently. It supports UEFI and Legacy BIOS boot modes, is compatible with all major Windows PCs and servers, and can create bootable USB, CD/DVD, or ISO image files, enabling rapid startup on any compatible device. In addition, it provides comprehensive data protection solutions, supports full system backups, and allows for quick restoration when needed, all without requiring other software. Hasleo Backup Suite also has the following notable advantages:
- Comprehensive and powerful free edition: Its backup and restore features let you create system images effortlessly and recover from crashes instantly, while the cloning function promotes seamless data migration.
- Advanced technology and excellent performance: Compatible with all Windows PCs and servers, it supports Windows x86/x64 and ARM64 architectures. It boots in both UEFI and Legacy BIOS modes, ensures safe and stable program running, and operates with high efficiency and low power consumption.
- Multiple backup modes: It supports full, incremental and differential backups. Following an initial full backup, both incremental and differential backups save time and storage space by only copying the data that has changed.
- Features compression and encryption: It allows you to compress backup images to save disk space and encrypt them to protect your important data.
- Practical Toolbox: Here you can access advanced features like creating a WinPE emergency disk, merging backup images, and securely wiping disks.
- Intuitive and user-friendly interface: The interface design is clear, with the main functions immediately obvious, and guided prompts allow even beginners to get started quickly.
How to Create a Compatible Windows Recovery Drive Using Hasleo Backup Suite?
Before creating a compatible Windows recovery drive, you need to prepare a USB drive with a capacity of 16GB or more (USB 3.0 recommended), a working Windows computer, your system image file, and the utility files for integration.
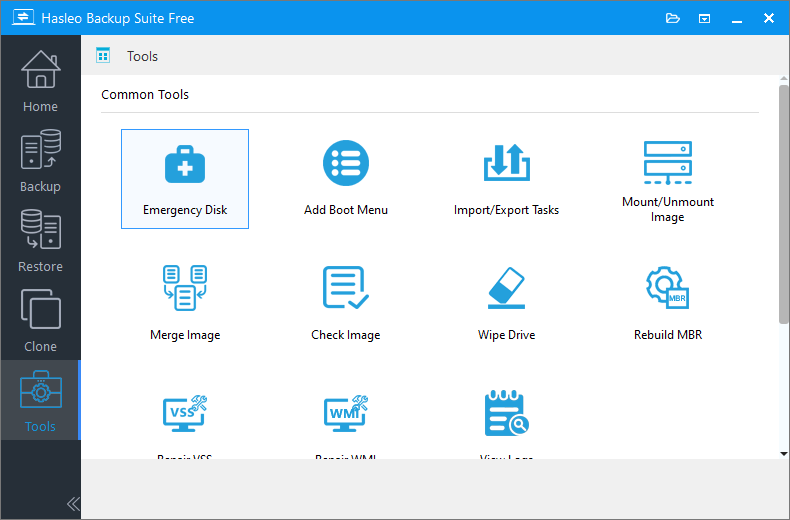
Step 1. Insert the USB into a working computer. Then, download, install, and run Hasleo Backup Suite. Click the "Tools" button in the navigation bar, and select "Emergency Disk" in the operation area.
Step 2. Check the "Automatic driver injection" or "Download WinPE components" option to have the required drivers added to WinPE, then click "Next". To add any additional drivers, click "Add driver" and make your selection.
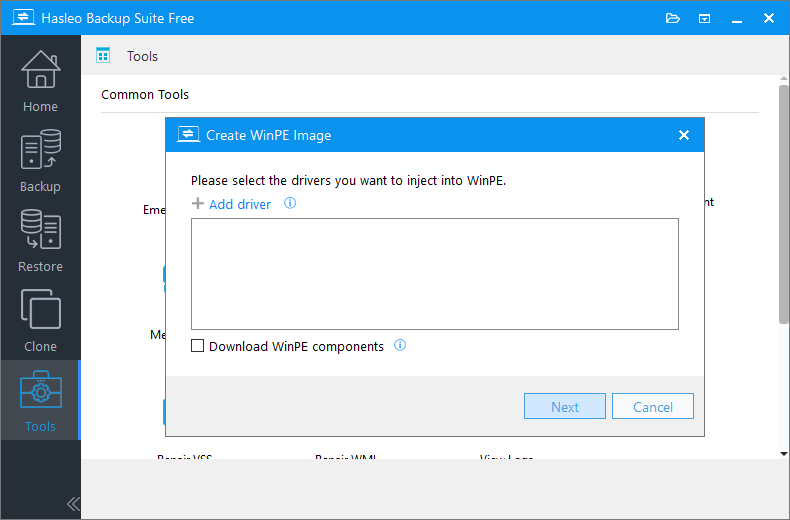
* Tips:
- Only drivers that are based on an .inf file can be injected into WinPE.
- The "Download WinPE components" option allows you to obtain them from Microsoft.
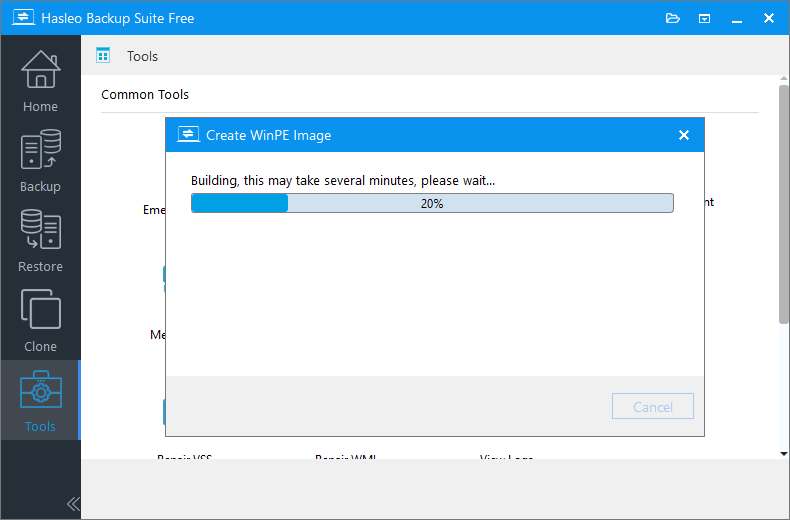
Step 3. Hasleo Backup Suite begins creating a WinPE bootable image.
Step 4. After the WinPE image is created successfully, select "USB" and click "Proceed" to create the bootable USB drive.
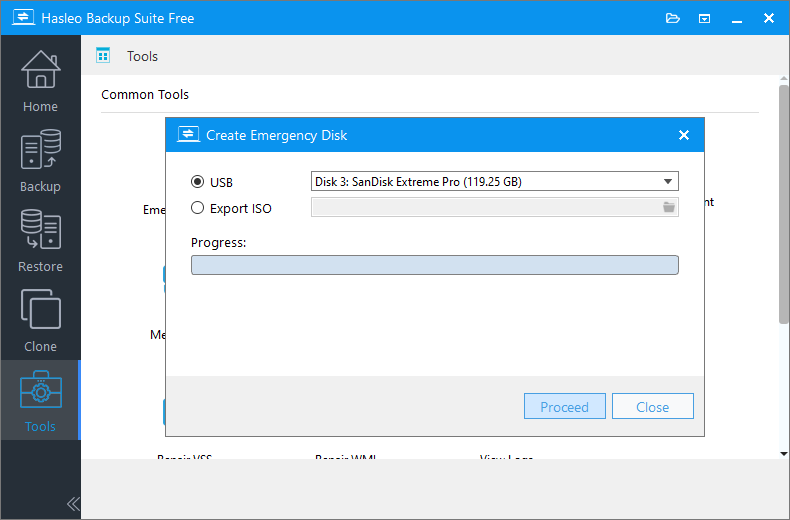
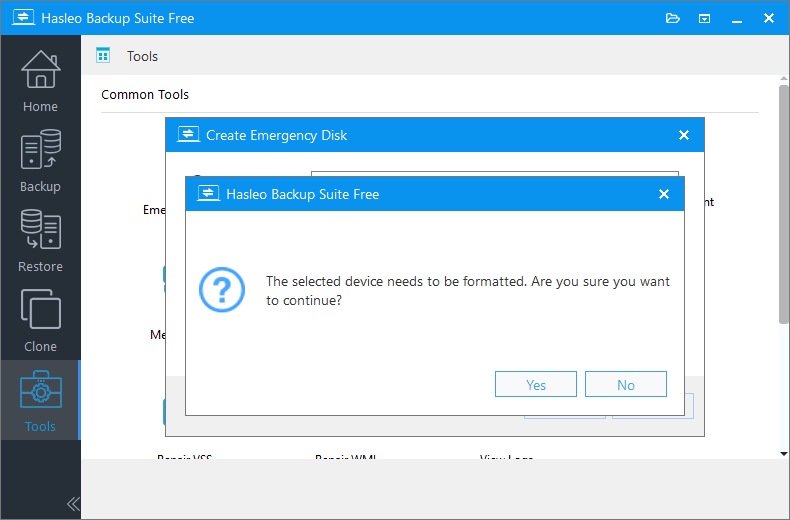
Step 5. The program will prompt you that the selected USB drive will be formatted. Please ensure any important files are backed up beforehand. To confirm and proceed with creating the bootable drive, click "Yes".
Step 6. Hasleo Backup Suite has started creating a USB recovery drive.
After creating a bootable USB recovery drive, you only need to open File Explorer, go to the USB drive, create the appropriate folders (such as Backup, Tools, Documents, etc.), and then copy the pre-prepared system image, tools and other files into the corresponding folders. Your comprehensive recovery drive is now ready. To use it, boot the target computer from this USB drive. For detailed guidance on how to boot from USB and restore the system, see our guide: How to Restore Windows from a System Backup Image When It Fails to Boot.
Frequently Asked Questions
A: A USB drive with at least 16GB capacity is recommended, with USB 3.0 preferred for faster read/write speeds during boot and recovery operations.
A: Yes, unlike Windows built-in recovery drives that are tied to specific hardware, a recovery drive created with Hasleo Backup Suite is a portable WinPE environment that works across multiple computers from different brands.
A: In some cases, yes. If the target computer has UEFI Secure Boot enabled, you may need to enter UEFI/BIOS settings and temporarily disable Secure Boot to boot from the external recovery drive.
A: Yes, you can click "Add driver" to inject additional drivers into WinPE. This is useful for computers with newer or special hard disk controllers like RAID or specific NVMe drives.
A: UEFI boot mode requires a FAT32-formatted boot partition on the USB drive and cannot hold single files larger than 4GB. Legacy BIOS boot mode uses NTFS and doesn't have this limitation. The boot mode must match the target computer's firmware settings.
A: Yes, the recovery drive can be used to restore system images on any compatible computer, as long as the image was created from a similar system configuration. For cross-computer restores, you may need to use Universal Restore feature.
A: It is recommended to recreate the recovery drive after major Windows system updates, driver changes, or hardware modifications to ensure it contains the latest drivers and components for optimal compatibility.
Conclusion
A Windows recovery disk created with Hasleo Backup Suite is portable across multiple computers, perfect for long-term use in various computer maintenance scenarios at home or in the office. Additionally, the suite provides comprehensive data protection through integrated features for system backup, disk cloning, and system restore, positioning it as a versatile, all-in-one utility.
Related Articles
- How to Create Full/Incremental/Differential Backups in Windows Using Hasleo Backup Suite Free?
- How to backup and restore Windows 11 for free?
- How to Encrypt Backup Tasks Using Hasleo Backup Suite Free?
- Best Windows Server Backup and Restore Software in 2026
- How to set up backup schedules to automatically backup Windows?


