
- Common Causes of External Hard Drive Not Showing
- Solution 1: Try a Different USB Port
- Solution 2: Check and Initialize in Disk Management
- Solution 3: Update or Reinstall USB Drivers
- Solution 4: Assign or Change the Drive Letter
- Solution 5: Repair File System Errors
- Data Recovery Suggestions
- Frequently Asked Questions
- Conclusion
In daily life and work, external hard drives (portable hard drives, USB hard drives) are the preferred devices for many people to backup and store important data. However, when you excitedly connect an external hard drive to your computer, you find that the hard drive simply cannot be recognized and doesn't appear in "This PC" - this is undoubtedly a frustrating issue. The problem of external hard drive not showing can be caused by various reasons, including USB port issues, driver abnormalities, unallocated disks, file system corruption, and more. This tutorial will provide you with a systematic solution set, from simple to complex, to help you troubleshoot and resolve the issue of external hard drive not showing. Whether you are a computer novice or a user with some experience, you will find a solution that suits you.
Common Causes of External Hard Drive Not Showing
Before seeking solutions, understanding the root causes of external hard drive not showing can help us locate the problem more quickly. Here are the most common reasons:
- Insufficient USB port power supply: Some USB ports (especially front USB ports or USB 2.0 ports) may not provide enough power for large-capacity portable hard drives, causing the hard drive to not work properly.
- Disk not allocated or uninitialized: New hard drives or hard drives after repartitioning need to be initialized and allocated in Disk Management before they can be used normally.
- Driver issues: Damaged or outdated USB drivers may cause the system to fail to recognize connected storage devices.
- Drive letter conflict or not assigned: The hard drive's drive letter may be occupied by other devices, or no drive letter may be assigned at all.
- File system corruption: The hard drive's file system may be corrupted due to abnormal power outages, forced removal, etc., preventing normal access.
- Hardware failure: The hard drive itself has physical faults, such as circuit board damage, head failure, etc.
⚠️Tips: If your hard drive contains important data, it is recommended to back up the data using professional data recovery software before attempting any repair operations to prevent data loss.
Basic Troubleshooting: Check Hardware Connections
Before entering complex system settings, let's do some simple basic troubleshooting first, which can solve most connection issues:
- Check hard drive indicator light: Most external hard drives have indicator lights. After connecting to the computer, observe whether the indicator light on the hard drive lights up or flashes. If the indicator light does not light up at all, first confirm whether the power (if using a separate power adapter) is turned on. For USB-powered hard drives, it may indicate no power supply or insufficient power.
- Listen to hard drive sounds: A normally working hard drive will emit slight operational sounds or clicking sounds. If you hear abnormal noises (such as continuous clicking), the hard drive may have physical problems. It is recommended to stop powering it immediately to avoid further damage to data.
- Check USB cable and port: Try using another USB cable to connect the hard drive to rule out cable damage. Some hard drives use Y-shaped cables (requiring two USB ports for power). Make sure both ports are connected. Avoid using the front USB ports on the computer (may have unstable power). Try connecting to the USB ports on the back of the computer case (directly integrated on the motherboard, more stable power supply).
- Test on another computer: Connect the hard drive to another computer to check if it can be recognized normally. This can help determine whether the problem is with the hard drive itself or the computer system.
Solution 1: Try a Different USB Port
Insufficient USB port power supply is one of the common causes of external hard drive not showing. Please try the following methods:
Step 1. If you are using a desktop computer, please connect the hard drive to the USB port on the back of the case. The rear ports are directly powered by the motherboard, providing more stable and sufficient power compared to front ports connected via cables.
Step 2. Please prioritize connecting to the blue USB 3.0 port, which has higher power supply capability than USB 2.0. If your hard drive came with a dual-USB connector data cable (one end has two plugs), please insert both plugs into computer USB ports to obtain double power supply.
Step 3. If your hard drive is large (usually 3.5-inch backup hard drives for desktops), it typically requires a separate 220V power adapter to work. Please check if the power adapter is firmly plugged in and if the indicator light is on. Such hard drives cannot be powered by USB cable alone.
Solution 2: Check and Initialize in Disk Management
Windows' built-in Disk Management tool can solve most hard drive not showing problems.
Step 1. Right-click the "Start" menu and select "Disk Management". Or press Win+R, type "diskmgmt.msc" and press Enter to open Disk Management.
Step 2. Find the corresponding disk at the bottom of the window. Choose operations based on the status:
- If it shows "Unallocated", the partition is lost or not partitioned yet. Please see Step 4 directly.
- If it shows "Offline", right-click the disk label on the left (e.g., "Disk 0") and select "Online".
- If it shows "Not Initialized", please continue to Step 3.
Step 3. If the disk shows "Not Initialized" or "Unallocated", right-click the disk label on the left (e.g., "Disk 0") and select "Initialize Disk" (for new hard drives or hard drives that need to be cleared). In the pop-up dialog, select the partition style:
- GPT (GUID Partition Table): Suitable for hard drives over 2TB capacity and computers with UEFI boot
- MBR (Master Boot Record): Suitable for hard drives under 2TB capacity or older computers
⚠️Tips: This operation will erase all data on the disk! If it's an old hard drive with data, please back up first or seek data recovery help. Do not initialize randomly.
Step 4. Create new partition or format
- Create partition: After initialization, if the disk area is still "Unallocated", right-click it and select "New Simple Volume". Follow the wizard prompts (usually just keep clicking "Next" with default settings) to complete partition creation.
- Format: If the hard drive already has partitions but cannot be accessed, you can right-click the partition and select "Format" to fix file system issues (will also clear data on that partition).
Solution 3: Update or Reinstall USB Drivers
Outdated, damaged, or incompatible USB drivers are common causes of hard drive not being recognized. Please follow these steps:
Step 1. Right-click the "Start" menu (or press "Win + X") and select "Device Manager".
Step 2. In the Device Manager window, focus on these two areas (may need to check separately):
- Universal Serial Bus controllers: Click to expand. This is the core location for handling USB ports.
- Disk drives: Click to expand. If the hard drive itself is detected by the system but the driver is abnormal, it usually displays here (the name may have a yellow exclamation mark).
Step 3. In Device Manager, expand the "Universal Serial Bus controllers" option.
- Prioritize handling abnormal devices: If there are devices with yellow exclamation marks in the above list, prioritize right-clicking that device and selecting "Update driver".
- General operation: If there are no abnormal signs, you can right-click "USB Root Hub" or "USB Composite Device", select "Update driver" > "Automatically search for drivers".
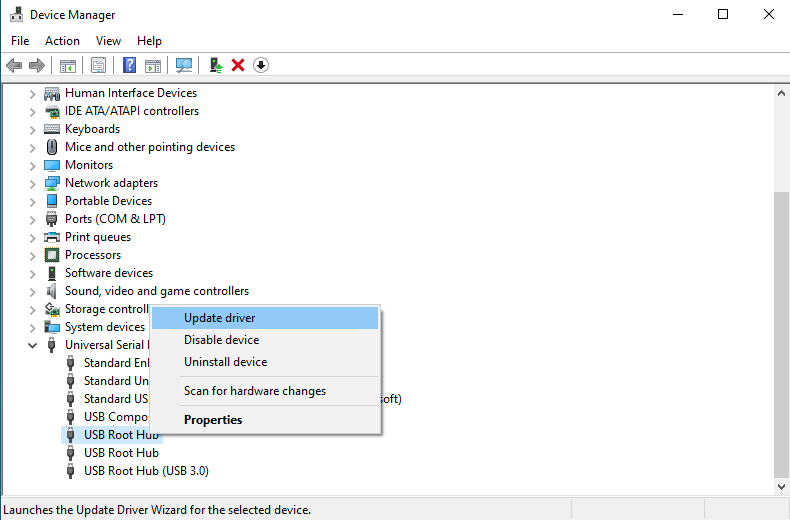
Step 4. If updating the driver doesn't work, it is recommended to perform a thorough reset:
- Uninstall device: Right-click the problematic device (such as the device with exclamation mark, USB Root Hub, or external hard drive name) and select "Uninstall device". If prompted with "Delete the driver software for this device", check it to clear possibly corrupted old drivers.
- Physically disconnect: After uninstallation is complete, unplug the external hard drive.
- Restart computer: Click Start menu to restart. This step allows the system to completely reset the USB controller state.
- Reconnect: After the computer restarts, reconnect the hard drive. The system will automatically try to install the correct driver.
Solution 4: Assign or Change the Drive Letter
Sometimes the hard drive can be recognized by the system but doesn't have a drive letter assigned, causing it to not appear in "This PC". Here is the solution:
Step 1. Press "Win + R" combination, type diskmgmt.msc to open Disk Management.
Step 2. Find your external hard drive in the disk list. Make sure the disk is correctly recognized (usually judged by capacity). Right-click the partition you need to operate and select "Change drive letter and paths".
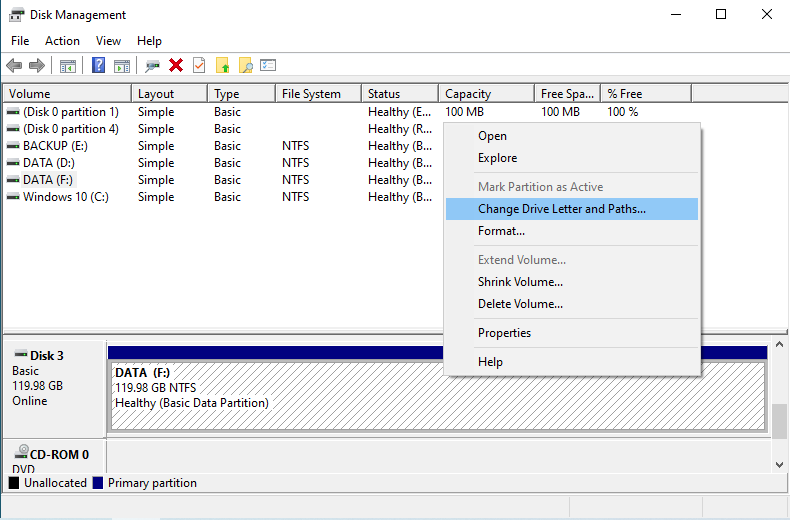
Step 3. If the partition has no drive letter: Click "Add" button, select an unused drive letter (such as E:, F:, G:, etc.) from the dropdown list, then click "OK".
Step 4. If the partition already has a drive letter but conflicts with other devices (or you want to customize): Click "Change" button and select a new drive letter.
⚠️Tips:
- Do not change the system drive (usually C:) drive letter, otherwise it may cause the system to fail to start. This operation is only for external data drives or USB drives.
- It is recommended to set the external hard drive drive letter to later letters (such as X:, Y:, Z:) to avoid conflicts with system drive (C:) or devices like virtual optical drives and phone storage that may be inserted later.
Solution 5: Repair File System Errors
If the hard drive can be recognized but cannot be accessed, it may be caused by file system corruption. Here are the repair methods:
Use chkdsk command to repair
Step 1. Press "Win + X" and select "Terminal (Admin)" or "Command Prompt (Admin)"
Step 2. If the hard drive doesn't show a drive letter in "This PC":
- Right-click "This PC" > "Manage" > "Disk Management"
- Find the target hard drive, right-click partition > "Change drive letter and paths" > "Add" to assign a drive letter (such as E:)
Step 3. Enter the following command and press Enter:
chkdsk E: /f /r
💡Tips: Please replace E: with your hard drive's actual drive letter.
Step 4. Wait for the scan to complete. After completion, open "This PC" again to check if the hard drive has recovered.
Format the hard drive
If chkdsk cannot repair it and the hard drive has important data, it is recommended to try data recovery first. If the data on the hard drive has been backed up or is no longer needed, consider formatting the hard drive:
Step 1. Right-click "This PC" > "Manage" > "Disk Management"
Step 2: Right-click the target hard drive partition and select "Format".
- File system: NTFS (for Windows system)
- Allocation unit size: Keep default
- Perform quick format: It is recommended to uncheck (performing full format can check for bad sectors, but takes longer)
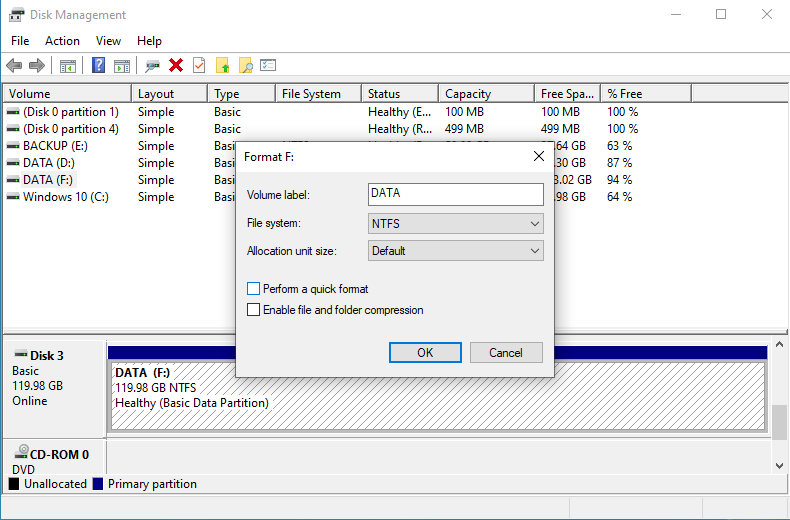
Step 3: Click "OK" to start formatting. After formatting is complete, the hard drive should be normally recognizable and usable.
⚠️Tips: Formatting will clear all data on the hard drive. Please ensure important data has been backed up before operation.
⭐Data Recovery Suggestions
If none of the above methods solve your external hard drive not showing problem, and the hard drive contains important data, it is recommended to choose the following measures based on the hard drive status:
Seek professional data recovery services (for physical failures)
If the hard drive makes abnormal sounds (such as continuous clicking, screeching), has a burnt smell, or has been bumped/dropped in water, this is usually a sign of physical hardware damage. Please stop powering it immediately to avoid secondary damage to the platters and heads. Contact a professional data recovery agency as soon as possible.
Use data recovery software (for logical failures)
If the hard drive can be recognized by Disk Management but cannot be accessed normally, you can try using data recovery software like Hasleo Data Recovery to attempt data recovery.
Frequently Asked Questions
A: This can be caused by several reasons: insufficient USB power, unallocated disk, driver issues, missing drive letter, or file system corruption. Try the solutions in this tutorial starting from basic checks.
A: Yes, new hard drives or hard drives after repartitioning need to be initialized in Disk Management before use. Right-click the disk and select "Initialize Disk".
A: GPT supports hard drives over 2TB and is required for UEFI boot. MBR is for hard drives under 2TB or older computers. For most modern systems, GPT is recommended.
A: You can assign any unused letter, but avoid changing the system drive (C:). It is recommended to use later letters (like X:, Y:, Z:) to avoid conflicts.
A: Clicking sounds indicate physical hardware failure. Stop using the drive immediately to prevent further damage and contact professional data recovery services.
A: Yes, formatting will delete all data on the hard drive. If the drive contains important data, try data recovery software first or seek professional help before formatting.
A: Use USB 3.0 ports on the back of your computer (directly on the motherboard) for more stable power. Avoid front ports connected via cables.
A: Signs of physical damage include abnormal clicking sounds, burning smell, no indicator light, and failure to spin up. Stop powering it immediately and seek professional recovery.
Conclusion
External hard drive not showing is a relatively common problem, but it can usually be solved through the above methods. This may indicate that the hard drive has physical bad sectors or hardware failures. At this point, repeated attempts may cause secondary damage to the data. It is recommended to stop operations immediately and seek professional data recovery services, or use professional tools to attempt backing up important data. To avoid data loss due to sudden hard drive failures, it is strongly recommended to develop a regular backup habit. You can use Windows' built-in backup features or choose trusted backup software like Hasleo Backup Suite to back up important data to other hard drives or cloud storage.
We hope this tutorial can help you solve the external hard drive not showing problem. If your problem persists, it is recommended to consult professional technical support personnel or contact the hard drive manufacturer for further assistance.
Related Articles
- How to Backup Windows 11 to an External Hard Drive?
- How to Prevent Hard Disk Failure and Respond to Emergencies?
- 3 Ways to Back Up VMware Workstation Pro Virtual Machines
- How to Fix Windows Boot Problems: Step-by-Step Repair Guide
- How to Securely Erase a Hard Drive: Completely Wipe Data and Prevent Privacy Leaks


